A lot of people are interested in how I take my images and the gear that I use. I don’t mind talking about ether one –if I can save you some time or some money then I’m more than happy to do it! But don’t get too caught up in the “how” –the final image that you print or display on the web is infinitely more important than how you took it…
I run into people on a regular basis that are so sure their way of getting from point A to point B is the best path –everyone else is either wrong or just getting lucky. I don’t get worked up over them though, because in time their gallery will be the real test of their technique. In photography, where technique is concerned, there is no black and white. There are only different shades of gray. Just about the time that you think you’re “there” and there’s nothing left to learn someone will come along and show you just how far you really have to go ;)
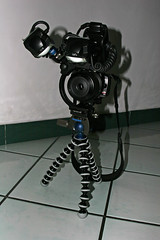
As for my gear, and the way that I use it: Don’t get comfortable with it cause it’s going to change. As I learn more about photography and develop my own style of images the process, and the tools, are going to evolve. I let my style dictate the process, so the path I take to get from an idea to a final image is going to change as I get better. I might save you some money on hardware by posting what’s worked and what hasn’t –but that evaluation is based on my style and how I use the equipment. Something that works for me might not work for you, and if you follow too closely behind me you might end up wasting money with me. The photo included with this post is a prime example: I hate the ballhead and I’ve already changed the diffusers on my MT-24EX (I went back to using a set from Sto-Fen). The only reason why I posted that shot was someone wanted to see the Really Right Stuff bracket that I use.
I look at a lot of images taken by other photographers and I also learn from their techniques. But I “cherry pick” the best of what they do, and I apply what I see only if it fits into my style of shooting. That’s the best advice I can offer anyone who is reading this blog –pick the best parts out of it, apply what works for you, and ignore the rest. Don’t take anything you read here as gospel –no one is the last word on any photographic discipline, including me…

Friday, November 30, 2007
Saturday, November 24, 2007
Soap Bubbles
This type of abstract macro has been floating around in my head for a while but I just now got around to getting it out from between my ears and into the camera. The setup: Take a small glass bowl and fill it with water. Add dishwashing soap and food coloring (I used a neon blue). Place a flash configured for slave mode on the table next to the bowl with the flash head pointed at a 45 to 90 degree angle with respect to where you’ll be photographing (you don’t want the flash pointing toward you or directly away from you due to some possibly bad reflections from the flash). Then use a drinking straw to blow air into the water to make the bubbles.
I used an MR-14EX set as a master (the 430EX on the table ended up being a “C” channel flash) and an MPE-65mm macro lens set to around 3x to emphasize the gaps between the bubbles. Then I went looking for interesting compositions and lines in the mass of soap bubbles, often shooting well into the pile. Using the 430EX to pump light into the bowl really brought out the surface of the bubbles and where they intersected with each other.

I used an MR-14EX set as a master (the 430EX on the table ended up being a “C” channel flash) and an MPE-65mm macro lens set to around 3x to emphasize the gaps between the bubbles. Then I went looking for interesting compositions and lines in the mass of soap bubbles, often shooting well into the pile. Using the 430EX to pump light into the bowl really brought out the surface of the bubbles and where they intersected with each other.
Friday, November 23, 2007
You Say Diffraction, I Say Motion Blur
I’ve seen a lot of incredible photos taken with the MPE-65mm macro lens at apertures that should have made the image soft due to diffraction, and yet there is a lot of detail in them anyway. After looking at my own work and a lot of trial and error I’m beginning to think that a lot of what people call diffraction is simply motion blur.
Don’t get me wrong; diffraction is a problem and it does exist. The laws of physics can’t be changed –if you send light through a small opening it will have e tendency to bend. Wikipedia has an excellent article on diffraction if you want to dig deeper into the effect.
Unfortunately I think that a lot of photographers are too quick to blame diffraction for soft images, so they open up the aperture on their lens, get a sharper image, and then think that they’ve defeated diffraction by using a smaller Fstop. But by dropping down to a smaller Fstop (moving to a larger aperture) the exposure is also changing, so that the flash has to turn on for a shorter amount of time. Maybe the problem isn’t diffraction; maybe the real issue is motion blur due to a flash duration that’s just too long…
Take a close look at the image that I’ve included with this post. I shot it at F14 and 4x with an MPE-65mm macro lens and an MR-14EX set to a 2:1 ratio (too keep the light from looking flat) and with the flash assembly turned 45 degrees off axis. That shot, even though it’s at F14, has a lot of detail and all I had to do was brace the camera so that there was no movement.
Flash macro really is nothing more than a form of stop motion photography, and keeping the flash duration to a minimum can really make a difference in the quality of your images. To learn more about high speed photography and how flashes work see the HiViz web site.
Saturday, November 17, 2007
The Ansel Adams Excuse
This rant has been coming for a while; in fact it’s been on my mind since the very first post in this blog. I wasn’t sure how to explain it until recently but it finally dawned on me during a discussion of what makes a photo a photo. Buckle your seatbelt –the ride might get a little bumpy for some of you…
Ansel Adams is known for his mastery of the darkroom, and a lot of people use him as an excuse for why they use a certain tool in post processing. People will resort to an incredible degree of photo manipulation in Photoshop and when questioned about it will claim that they are only doing what Ansel did. Or if Mr. Adams had a copy of Photoshop then he would have used it too.
On the surface they are right…
But Ansel wasn’t just a master of the darkroom; he was also a master of light and composition. He lived in Yellowstone and he became so familiar with the weather patterns that he could tell if a sunset was going to be spectacular or if it was going to fizzle long before the sun got close to the horizon. Ansel knew when to press the shutter release, and when to pack up his gear and go home. Ansel Adams NEVER took snap shots and then tried to recover the images later in the darkroom. Granted he pushed the exposure limits of the film he was using, but he did it knowing what his post processing would do to the negative and the final print.
Mr. Adams used post processing as a tool to bring his creative vision to a print –he did not use it as a crutch to compensate for poor technique…
If you are justifying your post processing by claiming that Ansel Adams did it, or would have done it, then you are taking the man completely out of context! A big part of being a photographer is learning about all of the things that influence an image before you press the shutter release.
Note: Although it might look computer generated the image I’ve included with this post is a photograph and, like most of my images, I spent less than two minutes post processing it. As a photographer I don’t want the computer to become my primary photographic tool –that’s what the camera is for…
Friday, November 9, 2007
Abstract Macro
The bugs are almost gone, except for the jumping spider that has greeted me for the last few mornings on my living room floor, so I’m back to shooting abstract macro. There are two aspects that make shooting abstracts difficult for me. The first is all of the images that I’ve seen from other photographers -I can’t use them. I just don’t want to do what’s already been done because if I’m walking in someone else’s shadow my work isn’t going to stand out. So I have to put all of the images that I’ve seen out of my head and try to come up with a new idea that isn’t influenced by anyone else.
Then there is that little problem of taking that idea, once I have it, out of my head and into the camera ;)
A few weeks ago I was experimenting with a 3 watt LED and a DVD and I liked the results. So I decided to try shooting a small water drop while pumping the light form the LED into the DVD. The setup is pretty simple: I placed the camera on a Joby Gorillapod SLR-Zoom (highly recommended!) that I set on my living room table and then I stacked some books up so I could have a working surface even with the camera. Then I took a DVD and coated part of it with canola oil. Any light oil will work, but I used canola since it is almost completely clear. The oil serves two purposes; it keeps the surface of the DVD from looking completely smooth (so the final image has some “defects” in it and won’t look like it was computer generated) and it makes the surface tension between the DVD and the water drop higher so the drop doesn’t flatten out. Then I just placed a drop of water on the DVD and focused the lens by moving the books and adjusting the magnification of my MPE-65 to shift the point of sharp focus –kinda like a poor mans focusing rail.
The tricky part is getting the light and the color that I want. Moving the LED closer to the DVD effects how sharp and defined the light will look after it bounces off of the DVD and splits into the different colors. So I have to “focus” the light by changing the distance from the LED to the DVD. But the angle of the light also effects how the colors will split, so it can take a while to get the right combination of distance and angle –minor changes in either one can have a big impact on how the final image looks. Also what I see in the view finder isn’t always what the sensor captures. Fast shutter speeds seem to give me better results than slower ones, even though the image might look better in the view finder when the light levels are low.
A little imagination, and some trial and error, led to the image included with this post :)
Tuesday, November 6, 2007
Additional Musings on Flash Photography
I really struggled with flash photography when I first started shooting macro –and if the truth were told I’d have to say that I still struggle with it from time to time even today. Macro, defined as life size and higher magnification, is really a form of stop motion photography. No matter what you use to steady the camera there is still going to be movement. Vibration from the mirror, the wind blowing the subject or your tripod, etc. is all going to create minor displacement that wouldn’t normally be a problem for any other type of shooting. But when the image frame, at life size, is only 22.5 millimeters wide on a 1.6x crop factor camera it doesn’t take much movement to make an image look soft…
The key to getting good at flash photography is to understand how the flash works. I’m sure I’ve said this before but I’ll say it again: The intensity of the light that your flash produces does not change –ever. No matter what the exposure is the intensity of the light that the flash produces from frame to frame is always a constant. The only thing that does change is the duration of the light –darker scenes require the flash to turn on longer than lighter ones.
You’d think that getting more distance between the flash and the subject would be a good thing, but the duration of the flash has to increase to give you a correct exposure. Reflections become more of a problem because the light has more time to bounce off of shiny surfaces. Plus it gets more difficult to freeze motion since the light is on longer –there is more time for you, or the subject, to move.
I can’t tell you how much time I spent trying to get the flash away from the subject thinking that it would make the light less harsh and improve the quality of my images… *sigh*
So how do you get a short flash duration and at the same time reduce reflections? Get the flash heads close to the subject, and then experiment with the angle of the flash heads. The flash duration will be low, so freezing motion and getting sharp images won’t be an issue. As for reflections; sometimes all it takes is a minor change in the angle of a flash head to cut most, if not all, of the reflections out of a scene. The image above is an example of getting the flash heads of the MT-24EX close to the subject and using one flash head as a fill light (positioned over the top of the dragonfly).
I tried experimenting with using the flash head that’s over the subject for the main light source and the other as a fill flash for the shadows by setting the ratio control on the MT-24EX to make the overhead flash twice as bright as the fill light. Here’s the result:

If you look at both of the images with this post you’ll see that the bottom photo doesn’t have as much detail in the eyes because the shadows are too strong. Also since the camera is metering for the entire scene the flash head that’s over the subject has to be on a lot longer to get the scene properly exposed (due to the distance and the angle of the overhead light source). I knew the flash duration was high because it was taking too long for the flash to recycle after each frame. So I went back to using the flash heads at equal power and the struggle continues… :)

The key to getting good at flash photography is to understand how the flash works. I’m sure I’ve said this before but I’ll say it again: The intensity of the light that your flash produces does not change –ever. No matter what the exposure is the intensity of the light that the flash produces from frame to frame is always a constant. The only thing that does change is the duration of the light –darker scenes require the flash to turn on longer than lighter ones.
You’d think that getting more distance between the flash and the subject would be a good thing, but the duration of the flash has to increase to give you a correct exposure. Reflections become more of a problem because the light has more time to bounce off of shiny surfaces. Plus it gets more difficult to freeze motion since the light is on longer –there is more time for you, or the subject, to move.
I can’t tell you how much time I spent trying to get the flash away from the subject thinking that it would make the light less harsh and improve the quality of my images… *sigh*
So how do you get a short flash duration and at the same time reduce reflections? Get the flash heads close to the subject, and then experiment with the angle of the flash heads. The flash duration will be low, so freezing motion and getting sharp images won’t be an issue. As for reflections; sometimes all it takes is a minor change in the angle of a flash head to cut most, if not all, of the reflections out of a scene. The image above is an example of getting the flash heads of the MT-24EX close to the subject and using one flash head as a fill light (positioned over the top of the dragonfly).
I tried experimenting with using the flash head that’s over the subject for the main light source and the other as a fill flash for the shadows by setting the ratio control on the MT-24EX to make the overhead flash twice as bright as the fill light. Here’s the result:
If you look at both of the images with this post you’ll see that the bottom photo doesn’t have as much detail in the eyes because the shadows are too strong. Also since the camera is metering for the entire scene the flash head that’s over the subject has to be on a lot longer to get the scene properly exposed (due to the distance and the angle of the overhead light source). I knew the flash duration was high because it was taking too long for the flash to recycle after each frame. So I went back to using the flash heads at equal power and the struggle continues… :)
Subscribe to:
Posts (Atom)