Don’t wait for perfect conditions to go shooting macro; in fact some of the best days to go looking for critters are when the weather isn’t ideal. Low temperatures and partly cloudy skies can create a “stop and go” environment for some insects (that’s how I’ve been shooting Miner Bees above life size lately). As long as the sun is out they have the energy to move, but as soon as it goes behind the clouds or they land in the shade their metabolisms take a nose dive and you can get really close.
Wind can be a blessing and a curse. I had to delete a lot of frames after shooting a pair of mating Hoverflies due to the wind. But the breeze also kept them pinned down to the leaf they were on –all I had to do is wait for the brief pauses in the wind to take my shots.
So get out into the big blue room with the big yellow ball on days when the weather is poor. You might be surprised at what you find…

Saturday, March 22, 2008

Monday, March 17, 2008
Earth Calling Gary Fong
You really should consider making a set of diffusers for the MT-24EX macro twin light from the same plastic that you use in the Puffer diffuser -I hot glued a couple of them to my flash heads and that's the lighting that I used for the image attached to this post. A three times life size shot with an MPE-65mm macro lens and a diffused MT-24EX that looks like I shot it using natural light...

Thursday, March 13, 2008
Statistics
I often get asked “What’s your keeper rate?” so I thought I’d share the statistics for a single shoot –the miner bee included with this post. There was a little wind, and I’m really picky about the composition of my images (that includes the area of sharp focus). So keep in mind as you read the numbers that I’ll delete images that are close to being the same, or if a photo is even slightly off I’ll can it. Someone once said that the difference between a professional photographer and an amateur is that a pro throws away more photos…
I posted a six image set of that miner bee on Flickr. I have another 31 images and some of those are duplicate compositions so I’ll end up deleting a few more. But I shot a total of 117 frames of that bee, recomposing for every image, before it got tired of me and flew off. I’ll probably end up with a 10% keeper ratio once I finish editing and or deleting the remaining images. But for an image like the one I’m including with this post I’ll gladly take a 1 in 20 keeper rate…

I posted a six image set of that miner bee on Flickr. I have another 31 images and some of those are duplicate compositions so I’ll end up deleting a few more. But I shot a total of 117 frames of that bee, recomposing for every image, before it got tired of me and flew off. I’ll probably end up with a 10% keeper ratio once I finish editing and or deleting the remaining images. But for an image like the one I’m including with this post I’ll gladly take a 1 in 20 keeper rate…
Thursday, March 6, 2008
Getting use to the 40D
Like most of the gear I write about on this blog this is not a review –I’m not qualified to give you an in-depth review of any camera body or lens because I haven’t used them all. Instead I’m going to tell you about the problem that I had in switching from the Xti (400D) to the 40D.
The Xti’s light meter consistently under-exposed everything and I was use to it. No problems with raising the exposure in post by about -1/3 (if necessary) because colors naturally saturate when you under expose with a digital camera, and since I cut my teeth on Fujichrome Velvia back in the film days I liked the effect that under-exposing has.
Unfortunately, at least for me, the 40D’s light meter is very accurate –sometimes a little too accurate. Images are either dead on, or a little over-exposed and the level of over-exposure depends on how much natural is available. The end results are what seem to be inconsistent exposures when shooting flash macro at 0 FEC –sometime it works, and when it doesn’t the area in the scene that’s blown out varies.
Like an idiot I switched cameras and immediately changed my style by shooting at ISO 200 instead of staying at ISO 100 and it made the problem worse…
I didn’t think that going from ISO 100 to 200 would make much of a difference –it’s just one stop and when shooting flash macro I’m usually 3 or 4 stops below ambient anyway. But for every one stop change in exposure the amount of light coming through the lens either gets cut in half or it doubles (depends on the direction of the change). In going from ISO 100 to 200 the amount of light coming through the lens from the flash stayed the same –the flash duration simply dropped in half (which was my motivation for going to ISO 200 in the first place since it would be easier to freeze motion with a faster flash). But the amount of ambient light coming through the lens DID double, and that’s what was causing my inconsistent problems with blown highlights in my images.
Sure, I could set the FEC to -2/3 and continue to shoot at ISO 200 with no blown highlights. But the subject would be too dark and I’d loose too much detail. So at ISO 200 I can set my FEC to -1/3 and deal with some minor over-exposure in the highlights or drop down to ISO 100 to eliminate it. I still have to set the FEC to -1/3 at ISO 100, but I don’t think it’s a metering issue with the camera: I’m using the MT-24EX and when you shoot with two light sources one of them is bound to cause problems depending on the scene. If I were using a single flash head I could probably set the FEC to 0…
The photo I’ve attached to this post was taken at ISO 100 with the FEC set to 0 and there is some minor blown highlights in the background –you can’t see it because I adjusted the exposure in post to pull it out. As long as the blown highlights are minor, and not on the subject, it’s an easy fix. This next shot was taken at ISO 100 and -1/3 FEC and the exposure was dead on:

Moral of the story: If you run into a problem then blame yourself first, and not the gear…

The Xti’s light meter consistently under-exposed everything and I was use to it. No problems with raising the exposure in post by about -1/3 (if necessary) because colors naturally saturate when you under expose with a digital camera, and since I cut my teeth on Fujichrome Velvia back in the film days I liked the effect that under-exposing has.
Unfortunately, at least for me, the 40D’s light meter is very accurate –sometimes a little too accurate. Images are either dead on, or a little over-exposed and the level of over-exposure depends on how much natural is available. The end results are what seem to be inconsistent exposures when shooting flash macro at 0 FEC –sometime it works, and when it doesn’t the area in the scene that’s blown out varies.
Like an idiot I switched cameras and immediately changed my style by shooting at ISO 200 instead of staying at ISO 100 and it made the problem worse…
I didn’t think that going from ISO 100 to 200 would make much of a difference –it’s just one stop and when shooting flash macro I’m usually 3 or 4 stops below ambient anyway. But for every one stop change in exposure the amount of light coming through the lens either gets cut in half or it doubles (depends on the direction of the change). In going from ISO 100 to 200 the amount of light coming through the lens from the flash stayed the same –the flash duration simply dropped in half (which was my motivation for going to ISO 200 in the first place since it would be easier to freeze motion with a faster flash). But the amount of ambient light coming through the lens DID double, and that’s what was causing my inconsistent problems with blown highlights in my images.
Sure, I could set the FEC to -2/3 and continue to shoot at ISO 200 with no blown highlights. But the subject would be too dark and I’d loose too much detail. So at ISO 200 I can set my FEC to -1/3 and deal with some minor over-exposure in the highlights or drop down to ISO 100 to eliminate it. I still have to set the FEC to -1/3 at ISO 100, but I don’t think it’s a metering issue with the camera: I’m using the MT-24EX and when you shoot with two light sources one of them is bound to cause problems depending on the scene. If I were using a single flash head I could probably set the FEC to 0…
The photo I’ve attached to this post was taken at ISO 100 with the FEC set to 0 and there is some minor blown highlights in the background –you can’t see it because I adjusted the exposure in post to pull it out. As long as the blown highlights are minor, and not on the subject, it’s an easy fix. This next shot was taken at ISO 100 and -1/3 FEC and the exposure was dead on:
Moral of the story: If you run into a problem then blame yourself first, and not the gear…
Saturday, March 1, 2008
The Sunny 16 Rule for Macro
When I wrote about exposing for two light sources I explained how I had exposed the image for the sky and for the flash, but I didn’t fully explain how I was using the ambient light or how easy it is to do. So I’m going to give you my Sunny 16 Rule for Macro, but first an explanation of what the Sunny 16 Rule is…
If you are shooting on a bright sunny day then you can set your Fstop to 16, and your shutter speed to the reciprocal of the ISO that you are using. So if you want to shoot at ISO 100 then your shutter speed is 1/100 of a second. Need to shoot at 1/200? Then set you ISO to 200. With those settings you’ll get pretty close to the ambient exposure on a bright sunny day –when shooting toward infinity…
You can easily shift the exposure around, you just have to make sure that you keep the ratio between Fstop, shutter speed, and ISO the same. Want to shoot at F11 instead of F16 and stay at ISO 200? No problem –you can increase your shutter speed by a stop to 1/400 of a second (it would have been 1/200 at F16) to eliminated the stop you gained by moving from F16 to F11. Or if you wanted to set your Fstop to 11 and your ISO to 100 then you could increase the shutter speed to 1/200 of a second. Piece of cake…
But what about shooting at life size –does the Sunny 16 Rule still work? It does, but you have to take into account the effective aperture you’re shooting at when the lens is focused at life size, which is two Fstops higher than what you have the camera set to. If you have your camera set to F16 then the effective aperture at life size is actually F32. You’ll have to make up that two stop loss and if you wanted to keep your shutter speed at 1/200 of a second you’ll have to set the ISO to 800…
But lately when shooting at life size I’ve been using F11 which is effectively F22. That’s only one Fstop higher than 16, and if I want to keep the shutter at 1/200 of a second then all I have to do is set the ISO to 400 and on the 40D that’s not a problem –and with good noise removal ISO 400 isn’t an issue on most cameras (I use Noiseware Professional). So with the camera set to F11, 1/200 of a second, and ISO 400 I am pretty close to the ambient exposure for the background –but not the subject! Since the sun is the light source, and it’s so far away, the number of photons per square centimeter that are bouncing off of things in the scene and back into the camera is the same, no matter what the distance between them and the camera is. But distant objects will reflect more light into the camera than objects that are close simply because the surface area of distance objects is larger. Larger objects reflect more sunlight –a no brainer. So the farther away an object is the better the exposure for that object will be with the Sunny 16 Rule.
This is where the flash comes in. Since the ambient light is exposing the background it’s a simple matter of putting the flash into E-TTL mode and letting the camera determine the exposure for the foreground. The end result is a nice balance between the ambient sunlight and the flash. You have to diffuse the flash, and the better the diffusion is the smoother the transition between the flash light and the sunlight will be. It’s also best to under expose a little with the flash.
The image I’ve included with this post is an example of using the Sunny 16 Rule for Macro, and it’s the third time I’ve used it in a blog post. As soon as I have another example of this technique I’ll change the image ;)
A final note: At life size I could set the Fstop to 11 (effectively F22), the ISO to 200, and the shutter speed to 1/100 of a second to expose for the background. But when using the Sunny 16 Rule for Macro I’m shooting close the ambient exposure for the subject, how close depends on the angle of the sun –if it’s over my shoulder then there is a lot of sunlight hitting the subject and coming right back into the camera and I might not be able to freeze all motion with the flash. I still need to experiment with shifting the shutter speed instead of the ISO to see how much I can lower the shutter speed and still get a sharp subject. If you want to experiment on your own one way to do it, and to see the effectiveness of the ambient light, is to set up your camera and take a few shots without the flash turned on. If the subject is completely black in the frame then the flash will freeze the motion for you even if you’re using F11, ISO 100, and 1/50 of a second.
Sunday, February 24, 2008
40D First Impressions

This won’t be a review –there are at least half a dozen web sites out there written by people more qualified than me. This is just my initial few days with the 40D –an excellent camera for macro if I can just iron out a few bugs…
I'm having problems with flash exposure that I haven't been able to wrap my head around yet. I've solved a couple of problems already: With the 20D I had a bad habit of hitting the AE / FE Lock button with my thumb. On the 20D I could disable the button but all I can do on the 40D is switch its function with the AF ON button -and that just places it closer to my wandering digit. So I've started to get very conscious of that button and not hit it.
I have also taken a few shots where the flash fired at full power –ruined what would have been a real “wall hanger”. That kind of blow out is usually caused by the camera not communicating flash duration information with the flash, or the data is scrambled in transmission. Normally the fix is to make sure that the flash is seated properly on the camera’s hot shoe and tightened down. Unfortunately it’s not happening from the beginning of a shooting session –the camera and flash will be operating just fine and all of a sudden the flash will pump out enough light to genetically alter the critter I’m shooting. If you see a bee with six wings it’s my fault…
The 40D’s flash shoe is different, in that it was designed to mate up with the new weather resistant 580EX II. Maybe the MT-24EX just isn’t seating properly, the contacts on the flash need cleaning (a red eraser works very well for scrubbing corrosion), or I’m just not tightening the flash down enough. I’ll get back to you when I know something definite…
The last part of my recent adventure with the 40D is related to shooting at ISO 200. I’m use to shooting more at ISO 100 with the Xti (due to noise issues) but with the 40D I want to wean myself off of it and shoot at higher ISOs. It seems to me that, when shooting at ISO 200 and at life size in bright sunlight, there is so much natural light getting into the camera that it’s difficult for the flash to fire without blowing something out. The flash heads of the MT-24EX are just too close to the subject when I have them on the Canon mount. Setting the FEC to -1/3 to -2/3 has eliminated most of the “hot spots”. There does seem to be a difference in the way that the metering system in the Xti and the 40D. I think the Xti under exposed a lot, even the flash. The 40D is giving me more accurate exposures and I’m going to need some time to get use to it.
Can I recommend the 40D for macro? Sure –easy to do with the large bright view finder. But I think I should go back to ISO 100 for a while, iron out issues while I’m in my comfort zone, and then experiment with new techniques…
Footnote: I think my exposure problems are due to the light meter in the 40D -it's VERY accurate! The Xti would always under expose a little...
Friday, February 22, 2008
How I use the MT-24EX
Due to the number of questions I’ve received lately I feel the need to do a step by step guide on how I set up and use the MT-24EX. But before I dive in there are a few things that you need to understand…
I’ve spent the last six months or so experimenting with the MT-24EX and looking for a way to get the light I want from a flash that, out of the box, is really harsh. I started by learning how a flash works by reading the HiViz web site and reading the tutorials at Strobist. There is a huge difference between getting good results with a flash and understanding how you’re getting the light that you’re seeing in your images. If you’re not willing to invest a little time to read those two sites then, IMHO, you should stop reading this post now. Odds are I’m going to confuse you in the long run because you’re not going to understand what you’re doing –and you’re not going to understand why the things that I do work…
The last disclaimer before we get into the nuts and blots of things: I am not now, now will I ever be, the last word on any photographic discipline. There are a lot of ways to get from point A to point B and I’m only giving you one of them –my way. Take what you read here and elsewhere and experiment. Make your photography look like it’s coming from you and not me –otherwise you will always be walking in my shadow…
Let’s get started by going over what I’ve learned about ratio control on the MT-24EX.
The light that the MT-24EX produces is harsh. Enabling ratio control just makes one flash head a lot harsher that the other –but the light is still harsh.
You do not need ratio control to get good shadows, so turn it off. The only time you should have ratio control enabled is if the flash heads are 180 degrees apart on the flash mount and even then if you have the heads angled differently you still don’t need ratio control. If you do feel the need to use ratio control then don’t set it higher than two to one –and keep in mind that I do not use it…
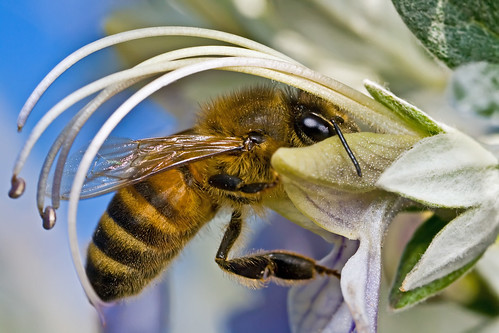
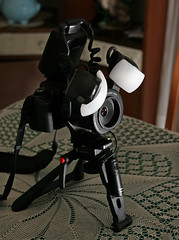
You can get really good shadows and images that look three dimensional just by placing the flash heads as close together as possible at the top of the flash mount. The image included with this post is how I have my flash heads positioned on the ring for 90% of the images that I take. The other 10% varies with the scene that I’m shooting, like if I’m trying to keep the flash heads from being blocked by leaves or other obstacles. It helps if you can visualize in your head how the light is going to hit the subject and then adjust the position of the flash heads on the ring. This next image is a prime example –there were flower petals close to the bee’s face and I had to play with the positioning of the heads to get the light from both of them into the scene. If you look at the reflection in the eye you can see where the flash heads were pointing.

I usually have one flash head at the very top center of the lens and the other flash head is off to the side. Which flash head is at the top or on the side depends on the subject. If the critter is facing to my left I turn the flash mount so that one flash head is to my left and the other is on top, and if facing to the right I turn the mount so that one flash head is on my right and the other is on top. It doesn’t always work though. This shot of a bee is good example since the bee has its face buried in a flower. Placing one of the flash heads to the right would cause the bee’s face to fall into a shadow from the flower. Again look at the eyes to see where I have the flash heads positioned –they are both toward the top of the lens.
The angle of the individual flash heads can also make a big difference. I usually keep them both pointed directly at the subject and at the same angle. If I’m getting some glare that I don’t like and I have time to correct it then I’ll angle the flash head that’s causing problems either toward the lens or toward the subject –it depends on the scene. Also the magnification that I have the MPE-65 set to determines how I have the flash heads angled, and it’s kinda tough to show it in a photo so I’m going to do my best to explain it.
If you own the MT-24EX then you know that the flash heads make a clicking sound when you move them up and down. So as a starting point push the flash heads all the way down so that they are pointing toward the lens. For life size bring both flash heads up two clicks. For twice life size and higher magnification bring both flash heads up one click. My method of angling the flash heads at the various magnifications keeps them pointed directly at the subject, and it keeps the flash duration short. In some situations you might what to change the angle to eliminate bad reflections, but the angle that I set the flash heads to works most of the time.
You can also turn the flash heads from side to side, and you might want to depending on the subject and if you’re getting a bad reflection. But I rarely turn the flash heads.
Because the light from the MT-24EX is so harsh the key to getting the quality of light that I want from it has been to get the flash heads pointed right at the subject, get them as close to the subject as possible, and to diffuse them. The end result is that people are starting to think that my images are taken in natural light and that tells me that I’m on the right track. My goal when I started experimenting six months ago was to get flash photos that didn’t look like flash photos. But keep in mind that I’m still learning, still experimenting, and that you should do the same…
I’ll end this post with a shot that I took toward the end of last summer when I was working on reducing reflections –something that got me to think more about how the light was hitting the subject.

I’ve spent the last six months or so experimenting with the MT-24EX and looking for a way to get the light I want from a flash that, out of the box, is really harsh. I started by learning how a flash works by reading the HiViz web site and reading the tutorials at Strobist. There is a huge difference between getting good results with a flash and understanding how you’re getting the light that you’re seeing in your images. If you’re not willing to invest a little time to read those two sites then, IMHO, you should stop reading this post now. Odds are I’m going to confuse you in the long run because you’re not going to understand what you’re doing –and you’re not going to understand why the things that I do work…
The last disclaimer before we get into the nuts and blots of things: I am not now, now will I ever be, the last word on any photographic discipline. There are a lot of ways to get from point A to point B and I’m only giving you one of them –my way. Take what you read here and elsewhere and experiment. Make your photography look like it’s coming from you and not me –otherwise you will always be walking in my shadow…
Let’s get started by going over what I’ve learned about ratio control on the MT-24EX.
The light that the MT-24EX produces is harsh. Enabling ratio control just makes one flash head a lot harsher that the other –but the light is still harsh.
You do not need ratio control to get good shadows, so turn it off. The only time you should have ratio control enabled is if the flash heads are 180 degrees apart on the flash mount and even then if you have the heads angled differently you still don’t need ratio control. If you do feel the need to use ratio control then don’t set it higher than two to one –and keep in mind that I do not use it…
You can get really good shadows and images that look three dimensional just by placing the flash heads as close together as possible at the top of the flash mount. The image included with this post is how I have my flash heads positioned on the ring for 90% of the images that I take. The other 10% varies with the scene that I’m shooting, like if I’m trying to keep the flash heads from being blocked by leaves or other obstacles. It helps if you can visualize in your head how the light is going to hit the subject and then adjust the position of the flash heads on the ring. This next image is a prime example –there were flower petals close to the bee’s face and I had to play with the positioning of the heads to get the light from both of them into the scene. If you look at the reflection in the eye you can see where the flash heads were pointing.
I usually have one flash head at the very top center of the lens and the other flash head is off to the side. Which flash head is at the top or on the side depends on the subject. If the critter is facing to my left I turn the flash mount so that one flash head is to my left and the other is on top, and if facing to the right I turn the mount so that one flash head is on my right and the other is on top. It doesn’t always work though. This shot of a bee is good example since the bee has its face buried in a flower. Placing one of the flash heads to the right would cause the bee’s face to fall into a shadow from the flower. Again look at the eyes to see where I have the flash heads positioned –they are both toward the top of the lens.
The angle of the individual flash heads can also make a big difference. I usually keep them both pointed directly at the subject and at the same angle. If I’m getting some glare that I don’t like and I have time to correct it then I’ll angle the flash head that’s causing problems either toward the lens or toward the subject –it depends on the scene. Also the magnification that I have the MPE-65 set to determines how I have the flash heads angled, and it’s kinda tough to show it in a photo so I’m going to do my best to explain it.
If you own the MT-24EX then you know that the flash heads make a clicking sound when you move them up and down. So as a starting point push the flash heads all the way down so that they are pointing toward the lens. For life size bring both flash heads up two clicks. For twice life size and higher magnification bring both flash heads up one click. My method of angling the flash heads at the various magnifications keeps them pointed directly at the subject, and it keeps the flash duration short. In some situations you might what to change the angle to eliminate bad reflections, but the angle that I set the flash heads to works most of the time.
You can also turn the flash heads from side to side, and you might want to depending on the subject and if you’re getting a bad reflection. But I rarely turn the flash heads.
Because the light from the MT-24EX is so harsh the key to getting the quality of light that I want from it has been to get the flash heads pointed right at the subject, get them as close to the subject as possible, and to diffuse them. The end result is that people are starting to think that my images are taken in natural light and that tells me that I’m on the right track. My goal when I started experimenting six months ago was to get flash photos that didn’t look like flash photos. But keep in mind that I’m still learning, still experimenting, and that you should do the same…
I’ll end this post with a shot that I took toward the end of last summer when I was working on reducing reflections –something that got me to think more about how the light was hitting the subject.
Subscribe to:
Posts (Atom)