Before you get excited: There is no MPE-91mm F22 lens, but you can make one: Just add a 1.4x teleconverter to the MPE-65 and you have it. There are some pros and cons to shooting with a teleconverter though…
If you have the camera set to F16 then you’ll actually be at F22 (but the correct aperture won’t show up on the LCD) and you will get a little more depth of field. But diffraction will also be a problem since the lens is stopped all the way down.
You’ll lose a stop of light with the 1.4xTC, so your flash duration will double. Not a big issue at lower magnifications, but freezing motion is more of a problem at 3x and higher. The flash will also take a little longer to recycle as well.
When shooting in bright sunlight exposure can be a problem, especially when shooting against a light colored background (like a daisy). One way to eliminate the ambient light in the scene is to stop down, and the teleconverter helps. I’m also considering a one stop neutral density filter for my MPE-65mm for those times when the ambient light is bright and I want to cut it out completely and just rely on the flash.
I’m not shooting with a 1.4x teleconverter full time, but it is one more trick to use for those situations where there is too much ambient light or I need a little extra depth of field. Unfortunately the teleconverter really doesn’t increase working distance that much –probably due to the MPE-65mm’s unique construction (it’s basically a reversed lens with a variable length extension tube).
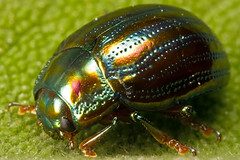
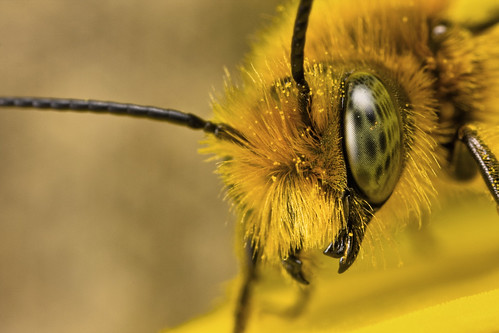
The image included with this post was taken at about twice life size with the MPE-65 + 1.4xTC at F22 (F16 on the camera). It’s not as sharp as most of my images, but there was enough depth of field to get the entire shell and the eye in focus…
On my next outing I’m going to set the camera to F14 or F16 between 1x and 2x and see if I can cut out enough ambient light to get good exposures, and get the depth that I want without the 1.4x teleconverter.
Special thanks to Robert Seber who put up with all my stupid questions about shooting with the MPE-65 + teleconverter.

Monday, May 12, 2008
Thursday, May 8, 2008
Wednesday, May 7, 2008
Still here!
Sorry I haven't posted much lately. You may have noticed the "Recent Deviations" side bar on the left hand side of the page. I've been putting together a gallery on Deviant Art and it's taken up most of my free time lately -deciding what I want to put on DA, editing those images because I needed to take a second pass at most of them, and also copy some of the tutorials that I've written here.
The hard part is deciding which way to go: Right now I've got three galleries. One of them, Deviant Art, also has blog functionality built in. I'm pretty sure that I'm going to collapse at least one of the galleries (either Flickr or SmugMug) but I'm not sure what to do with this blog. Either I'm going to do all of my blogging here and just post links to the new posts on DA, or I'm going close this blog completely and change the DNS redirect for nocroppingzone.com to point to my DA journal...
The hard part is deciding which way to go: Right now I've got three galleries. One of them, Deviant Art, also has blog functionality built in. I'm pretty sure that I'm going to collapse at least one of the galleries (either Flickr or SmugMug) but I'm not sure what to do with this blog. Either I'm going to do all of my blogging here and just post links to the new posts on DA, or I'm going close this blog completely and change the DNS redirect for nocroppingzone.com to point to my DA journal...
Thursday, May 1, 2008
Cheap Trick #1
Sometimes I get lucky and find a critter that’s so caught up in what it’s doing that it doesn’t care about me and the camera. That’s the situation that I found myself in when I started shooting this Hoverfly. The only problem was the wind –it was blowing constantly and gusting from time to time. Way too much movement to shoot above life size, and I really wanted to push myself to shoot at high magnification. So I used my left hand, palm up, to hold onto the stem of the flower while I rested a Canon MPE-65mm extended to 4x on the same hand while I held a Canon 40D in my right.
Since the lens and the subject were resting on the same surface I could move and still get a razor sharp image. I just moved the lens very slowly back and forth on my hand until the area of focus was where I wanted it. It’s a cheap trick that only works with cooperative subjects –one that comes in handy on windy days…

Since the lens and the subject were resting on the same surface I could move and still get a razor sharp image. I just moved the lens very slowly back and forth on my hand until the area of focus was where I wanted it. It’s a cheap trick that only works with cooperative subjects –one that comes in handy on windy days…
Tuesday, April 22, 2008
I got a present
This image was selected as the Juza Nature Photo of the Week -thanks Juza! :)
Juza is one of the top nature photographers on the web and his work is widely respected. Bookmark his site, Juza Nature Photography -lots of valuable information there! Although our shooing styles are radically different (Juza uses a tripod and teleconverters and I shoot hand held) there's no doubt that he knows what he's doing when you see his images...
Juza is one of the top nature photographers on the web and his work is widely respected. Bookmark his site, Juza Nature Photography -lots of valuable information there! Although our shooing styles are radically different (Juza uses a tripod and teleconverters and I shoot hand held) there's no doubt that he knows what he's doing when you see his images...
Tuesday, April 15, 2008
Post Processing
I’ve been putting this blog entry off for quite a while because the way that I post process images might not work for some of you. I spend a lot of time trying to get everything right before I press the shutter release, so the amount of time I spend on any single image once I get it on the computer is low. I also hate post processing –I’m a network engineer who spends all day with computers. So I want to limit the amount of work I have to do on one when I get home…
But how I post process is a frequent question, and it’s too long of a post to include with a simple FAQ (another post that I need to do ;) so I’m going to explain how I post process and hopefully you can walk away with something that you can use.
I started off in the Elements 6 RAW editor with the following defaults (click on the image to get to larger versions):
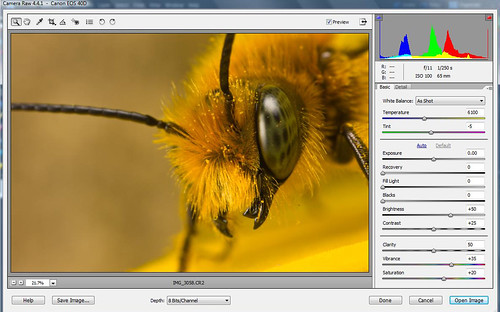
Then I opened the image making no changes in RAW. Instead I want to process the photo using an HDR plug-in so I’ll do most of my editing there (plus I like the way this shot looks right out of the camera). The first thing I did in the Elements 6 main editor is run NoiseWare Professional to strip out the sensor noise. The I ran DCE Tools ReDynaMix with the following settings:
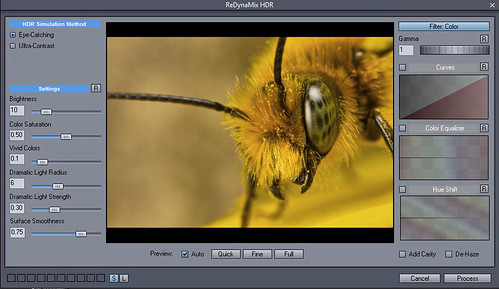
When you first open an image in ReDynaMix it’s going to look “over processed” and the first thing I do is decrease the dynamic light strength. Also for this image I dropped the color saturation down a little as well. Don’t forget to adjust the Image Smoothing –it will take out a lot of noise induced by the HDR processing. I don't aways use ReDynaMix but I like the effect it had on this shot. If I didn't use it I'd do more editing in RAW and adjust midtone contrast in the main Elements editor window (Enhance/ Adjust Lighting / Shadows/Highlights).
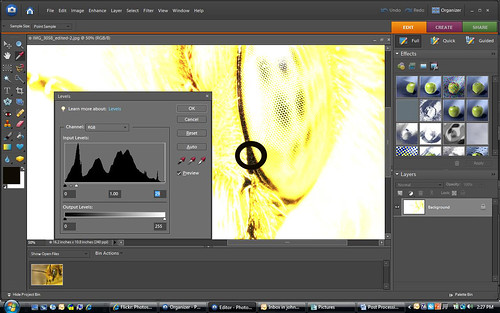
Next I adjust levels (Enhance / Adjust Lighting / Levels), and one of the first things in the levels editor that I do is set a black point. Follow the link and take a good look at that tutorial. Sometimes all you have to do in levels to make an image really look good is just set a black point. In Elements it's really simple. Click on the highlights slider (the triangle at the far right of the histogram display) and slide it to the left until you are left with just the darkest pixels. Make a mental note of where they are (it helps to magnify the image so you can see the dark pixels better). Then click on the reset button to get the histogram back to where it was before you moved the slider. Now click on the left most eye dropper (it's for setting the black pixels) and click on the darkest pixels in the image. I've circled the area that I chose for this shot:
Before you close out the levels editor adjust the middle point of the histogram above and below 1.0 and watch how your image changes. Sliding the midpoint to the left will make the image lighter and sliding it to the right will make it darker. I changed the mid point to 1.05 just to lighten it up a little.
I then went to Enhance/ Adjust Lighting / Shadows/Highlights and lightened shadows by 3%. You want to be careful here, since small changes will have a big effect and if you push the settings here you can add a lot of noise and banding to an image. Also under the Enhance menu I selected Auto Sharpen. I never use Unsharp Mask because although everyone says you need to sharpen digital images no one can agree on how much. The auto sharpen option will sharpen an image without over sharpening –and it’s fast.
The last thing I do is rub out dust spots with the Spot Healing brush, add my copy right to the Meta data that’s saved with the image file (use the File / File Info option) and then save the image as a high quality JPG. Less than two minutes per image and I get results like this:
I'm sure there is a better way to do it, but post processing this way works for someone like me who is "Photoshop challenged" ;)
But how I post process is a frequent question, and it’s too long of a post to include with a simple FAQ (another post that I need to do ;) so I’m going to explain how I post process and hopefully you can walk away with something that you can use.
I started off in the Elements 6 RAW editor with the following defaults (click on the image to get to larger versions):
Then I opened the image making no changes in RAW. Instead I want to process the photo using an HDR plug-in so I’ll do most of my editing there (plus I like the way this shot looks right out of the camera). The first thing I did in the Elements 6 main editor is run NoiseWare Professional to strip out the sensor noise. The I ran DCE Tools ReDynaMix with the following settings:
When you first open an image in ReDynaMix it’s going to look “over processed” and the first thing I do is decrease the dynamic light strength. Also for this image I dropped the color saturation down a little as well. Don’t forget to adjust the Image Smoothing –it will take out a lot of noise induced by the HDR processing. I don't aways use ReDynaMix but I like the effect it had on this shot. If I didn't use it I'd do more editing in RAW and adjust midtone contrast in the main Elements editor window (Enhance/ Adjust Lighting / Shadows/Highlights).
Next I adjust levels (Enhance / Adjust Lighting / Levels), and one of the first things in the levels editor that I do is set a black point. Follow the link and take a good look at that tutorial. Sometimes all you have to do in levels to make an image really look good is just set a black point. In Elements it's really simple. Click on the highlights slider (the triangle at the far right of the histogram display) and slide it to the left until you are left with just the darkest pixels. Make a mental note of where they are (it helps to magnify the image so you can see the dark pixels better). Then click on the reset button to get the histogram back to where it was before you moved the slider. Now click on the left most eye dropper (it's for setting the black pixels) and click on the darkest pixels in the image. I've circled the area that I chose for this shot:
Before you close out the levels editor adjust the middle point of the histogram above and below 1.0 and watch how your image changes. Sliding the midpoint to the left will make the image lighter and sliding it to the right will make it darker. I changed the mid point to 1.05 just to lighten it up a little.
I then went to Enhance/ Adjust Lighting / Shadows/Highlights and lightened shadows by 3%. You want to be careful here, since small changes will have a big effect and if you push the settings here you can add a lot of noise and banding to an image. Also under the Enhance menu I selected Auto Sharpen. I never use Unsharp Mask because although everyone says you need to sharpen digital images no one can agree on how much. The auto sharpen option will sharpen an image without over sharpening –and it’s fast.
The last thing I do is rub out dust spots with the Spot Healing brush, add my copy right to the Meta data that’s saved with the image file (use the File / File Info option) and then save the image as a high quality JPG. Less than two minutes per image and I get results like this:
I'm sure there is a better way to do it, but post processing this way works for someone like me who is "Photoshop challenged" ;)
Saturday, April 12, 2008
HDR Macro
I’ve been looking at High Dynamic Range (HDR) images for quite a while and I really like the effect –quite a few of my contacts on Flickr use HDR in their post processing. I’ve played with a few HDR programs but couldn’t find one that I liked until recently. Either they were too much of a pain to use, too expensive, or too time consuming for someone like me who hates to spend a lot of time in post processing. But I finally found a plug-in that works with Photoshop Elements that I like thanks to Haeretik made by DCE Tools called ReDynaMix HDR. It’s easy to use, compatible with Elements version 6, and the registered version is only $16 USD (you can try it before you buy it). Before I get into the nuts and bolts about how I’ve been using it I want to give you a disclaimer…
HDR processing will not make a crappy photo look good –it will just make a crappy HDR image. You still need to nail the composition, focus, and lighting. As with any other post processing technique you should never use HDR as a crutch to compensate for your mistakes. Get it right before you press the shutter release and everything that you do in post processing will be easier.
It’s very easy to go overboard with HDR processing and end up with a shot that looks like it was computer generated instead of taken with a camera. Some of the best HDR images that I’ve seen don’t look like HDR images.
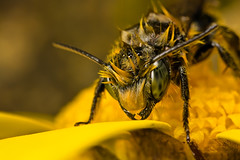
Now for the nuts and bolts. Here is an image that I processed without using ReDynaMix HDR:

Not bad, but it just doesn’t “pop”. If I had any real skill at post processing it would probably be a lot better, but I’m a network engineer and after a long day at work the last thing I want to do is spend hours in post. Another issue with this shot is all that yellow -the petals act like a colored reflector and change the quality of the light that I'm getting with the flash. The only way to avoid it is to stop shooting bees, and that's not gonna happen ;)
For the HDR version I opened the image in Elements 6 and in the RAW editor I made no changes since HDR processing is where I want to do the serious editing –another reason why it’s best to get it right with the shutter release. In the main editor I ran NoiseWare to pull out sensor noise since sending a “clean” image to ReDynaMix will reduce the amount of “surface smoothing” that I have to do (more on that later).
Now open the ReDynaMix plug-in. You’ll see a lot of options and an image that, chances are, looks “over processed”. There are two things that I do at this point to bring the shot to a level that I want. The first is to reduce the Dynamic Light Strength –by default it’s going to be set to 0.6 and, IMHO, it’s too high. Drop it down slowly and notice how the preview changes (you’ll have to release the slider to see the preview update). For this example I set it to .25 but the level that you use will depend on the image and the effect that you are looking for.
The next thing that I do is adjust the Surface Smoothness. The HDR process adds a lot of noise to an image (that’s why I ran NoiseWare before ReDynaMix) and Surface Smoothing is a way to clean up the grain –but be careful here. You don’t want to go overboard with the setting since you could end up over sharpening the image so the higher you set it the less you’ll want to sharpen your photo later. I never use anything more than the Auto Sharpen option in Elements so over sharpening isn’t a problem. Those of you who use Unsharp Mask may want to experiment with a balance between Surface Smoothing and USM. Also allowing for some “grain” can be a good thing depending on how you want the final image to look.
There are a lot of other options in ReDynaMix, and I encourage you to experiment with them. But for my images Dynamic Light Strength and Surface Smoothing have the most effect. Once I changed those two settings (and reduced the Color Saturation) I clicked on Process. Then I adjusted the levels (just set a black point) and used the Auto Sharpen option under the Enhance menu. Rub out dust spots with the Spot Healing Tool and save the image as a high quality JPG and here is the result:

Much better color and contrast and as an added bonus the time I spent in post processing was still less than two minutes :)
Footnote: The last image in this post was chosen as the Juza Nature Photo of the Week -thanks Juza!
HDR processing will not make a crappy photo look good –it will just make a crappy HDR image. You still need to nail the composition, focus, and lighting. As with any other post processing technique you should never use HDR as a crutch to compensate for your mistakes. Get it right before you press the shutter release and everything that you do in post processing will be easier.
It’s very easy to go overboard with HDR processing and end up with a shot that looks like it was computer generated instead of taken with a camera. Some of the best HDR images that I’ve seen don’t look like HDR images.
Now for the nuts and bolts. Here is an image that I processed without using ReDynaMix HDR:
Not bad, but it just doesn’t “pop”. If I had any real skill at post processing it would probably be a lot better, but I’m a network engineer and after a long day at work the last thing I want to do is spend hours in post. Another issue with this shot is all that yellow -the petals act like a colored reflector and change the quality of the light that I'm getting with the flash. The only way to avoid it is to stop shooting bees, and that's not gonna happen ;)
For the HDR version I opened the image in Elements 6 and in the RAW editor I made no changes since HDR processing is where I want to do the serious editing –another reason why it’s best to get it right with the shutter release. In the main editor I ran NoiseWare to pull out sensor noise since sending a “clean” image to ReDynaMix will reduce the amount of “surface smoothing” that I have to do (more on that later).
Now open the ReDynaMix plug-in. You’ll see a lot of options and an image that, chances are, looks “over processed”. There are two things that I do at this point to bring the shot to a level that I want. The first is to reduce the Dynamic Light Strength –by default it’s going to be set to 0.6 and, IMHO, it’s too high. Drop it down slowly and notice how the preview changes (you’ll have to release the slider to see the preview update). For this example I set it to .25 but the level that you use will depend on the image and the effect that you are looking for.
The next thing that I do is adjust the Surface Smoothness. The HDR process adds a lot of noise to an image (that’s why I ran NoiseWare before ReDynaMix) and Surface Smoothing is a way to clean up the grain –but be careful here. You don’t want to go overboard with the setting since you could end up over sharpening the image so the higher you set it the less you’ll want to sharpen your photo later. I never use anything more than the Auto Sharpen option in Elements so over sharpening isn’t a problem. Those of you who use Unsharp Mask may want to experiment with a balance between Surface Smoothing and USM. Also allowing for some “grain” can be a good thing depending on how you want the final image to look.
There are a lot of other options in ReDynaMix, and I encourage you to experiment with them. But for my images Dynamic Light Strength and Surface Smoothing have the most effect. Once I changed those two settings (and reduced the Color Saturation) I clicked on Process. Then I adjusted the levels (just set a black point) and used the Auto Sharpen option under the Enhance menu. Rub out dust spots with the Spot Healing Tool and save the image as a high quality JPG and here is the result:
Much better color and contrast and as an added bonus the time I spent in post processing was still less than two minutes :)
Footnote: The last image in this post was chosen as the Juza Nature Photo of the Week -thanks Juza!
Subscribe to:
Posts (Atom)