I’ve put off writing this tutorial for a while because the technique I’m going to describe falls into a category that I call a “cheap trick” but it’s so useful and results in such razor sharp images that I felt it was time to commit it to words.
Since I do all of my macro hand held (the critters I go after are normally too active for a tripod to be practical) I’m always looking for a way to brace the camera. First because I don’t crop and composition is important and keeping the camera steady helps me to place the critter where I want it in the frame, but also because the flash can’t freeze all the motion in the scene. No matter how short the flash duration is it will never be short enough to give you sharp details if there is a lot of movement. I’m convinced that a lot of the image softness that people blame on diffraction is really nothing more than a form of “macro motion blur”.
One trick that I’ve been using to keep everything steady I’m going to call the “Left Hand Brace” method, and here’s how it works: I’ll slowly take hold of the flower that the subject is on by pinching the stem between my left index finger and thumb. I’ll then brace the lens on that same hand and focus the scene by sliding the lens. Since the flower and the lens are all on the same support (my left hand) when one of them moves they both move so it’s easy to keep everything perfectly “still” and I have a lot of control ever where I put the area of sharp focus. Another benefit of holding onto the flower’s stem is that I can slowly rotate the flower and change the angle to get different compositions.
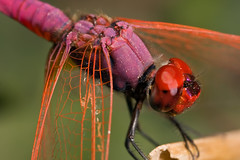
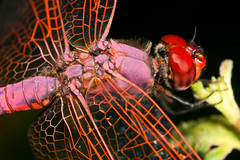
It doesn’t always work, and it helps if the critter is hungrier than it is scared of me, but when I am successful at holding onto the flower I can get some very unique images that are razor sharp even when shooting at high magnification and Fstops. The image included with this tutorial is a recent example of what I can do with the Left Hand Brace method.
Tuesday, July 29, 2008
Friday, July 25, 2008
Tutorial Updates
Almost the end of July and only two posts *sigh* Where does the time go?! Sorry folks -it's "macro season" so I've been doing more shooting than writing. You can expect a few more image deconstructions next week as soon as I get back from a short trip to Rome and the farm in Gaeta.
I did manage to update two tutorials: Shooting Dragonflies with an old technique that I use to use for getting close to dragons that I forgot to add to the original and the MT-24EX Users Guide with a helpful tip if you've been having problems getting good exposures on subjects when the background is dark.
I like the format at Deviant Art so much that I set up a Turorial Section where I'll be posting all of my tutorials, and it's the only site that will have the latest updates.
At some point, probably after this macro season, I'm going to put together a book on macro photography organized by the different types of critters that I shoot with tips on how to get close to them as well as exposure information (flash settings, angles, etc.). I'm not sure if I want to do an actual physical book or an e-book. If you'd like to cast your vote for one or the other then leave me a comment.
Take care, and happy shooting! :)
Thursday, July 3, 2008
Sleeping Solitary Deconstruction
This shot at five times life size of a solitary bee is deceptively simple once you know how I took it. First off I have the MT-24EX set to -2/3 FEC and I have the flash heads on the flash mount that Canon supplies with the flash. If you own the MT-24EX then you know that the flash heads make a clicking sound when you move them -there are graduated stops built into the base of the flash heads. I started off by moving both heads all the way down toward the lens and then I brought them back up "one click". I have the heads at that angle for 2x to 5x shooting (two clicks up for life size). Then I turned the flash heads toward each other one click (they were both facing straight out initially). I turned them toward each other because I wanted both heads to pump as much light into the scene as possible and to deepen the shadows. There really isn't anything in that shadowed area in the lower right hand corner of the image, and by letting it fall out I'm making it easier for you to focus on the eyes of the bee. I positioned one flash head at the top of the lens and the other to my left -you can see where they are by the reflections in the bee's eyes.
Since the bee was on rather long plant stem, and was pretty much fully asleep, I could move it around quite a bit. So I positioned it close to the ground with my left had so I could get some of the light from the flash to bounce off of the background and back into the camera to keep the area behind the bee from being completely black. At five times life size the flash is going to fall off quickly so I had to get within a few inches of some grass to get anything to show up in that upper left hand corner.
Now that I'm holding onto the plant stem that the bee is roosting on with my left hand it's a simple matter of resting the lens against that same hand and then slide it to get the focus point where i wanted it. Because of the way the MT-24EX's flash heads were positioned the focusing lamps were useless, but I had enough natural light anyway. See those hairs at the leading edge of the critters eye? That's what I concentrated on when I was focusing the scene. The lenses in the eye aren't easy to see sometimes, but it's easy to tell when those hairs are in focus. Also notice that I'm shooting from an angle that almost puts the eye perpendicular to the lens. Since the plane of sharp focus is also perpendicular to the lens most of the eye is razor sharp. I took four frames at 5x and I refocused for each shot. Of all of them I liked the sharpness and the composition of the image in this post.
I had the camera set to F11, 1/250 (max sync speed for the Canon 40D) and ISO 100. I'm also shooting with a Hoya 81A warming filter. In post all I had to do was run NoiseWare Professional, adjust levels (set a black spot), auto sharpen, and then rub out dust spots with the healing brush before saving the image as a JPG. Not much to post processing because most of it is done before I press the shutter release ;)
Happy shooting!
Monday, June 23, 2008
My Current Settings
I was recently asked by someone who had just bought Canon's 100mm macro about the settings that I use. Here's my response:
Hey Chris,
Some of the setting info you asked for does come with experience -and it really depends on your shooting style. But here's what I use, and keep in mind that I don't use a tripod or a monopod.
For closeup photography (1/4 to 3/4 life size):
Shutter priority 1/400 with the ISO set to 200 - 800 depending on what aperture I'm getting with that shutter speed. I try to shoot no lower than F5.6. Normally I'm in shutter priority if I'm trying to freeze a little subject motion.
Aperture priority F5.6 to F8 with the ISO set to 200 - 800 depending on the shutter speed I get with the aperture setting. I try to keep the shutter speed at twice the 1/focal length rule. So if I was shooting with the 100mm I'd want my shutter to be no lower than 1/200. Great for when I'm trying to control the depth and there is little to no movement in the scene.
A flash can be used for both of those settings for fill light to bring out more detail in the subject, but set the flash to -1 1/3 to -2 FEC and diffuse it. You want just enough light to fill in the shadows a little, but not so much that the resulting image looks like it was taken with a flash...
For macro:
With few exceptions (like low depth of field flower shots) I shoot in manual mode F11, 1/250 (the max sync speed of the Canon 40D) and ISO 100. At those settings when shooting at life size or higher magnification that flash will be the only significant source of light in the scene so the shutter speed is irrelevant -the duration of the flash is your shutter. the key to getting sharp images when shooting macro is to diffuse the flash and get it as close to the subject as possible. The closer the flash is to what you are shooting the shorter the flash duration will be -your "virtual shutter" speed will be extremely fast and you can freeze a lot of motion.
Any flash will do -just get it off of the camera and out toward the end of the lens. If you get a macro flash then I'd recommend the MT-24EX over the MR-14EX simply because the MR-14EX's flash heads are too close to the plane of the lens -getting good shadows, even with ratio control, is difficult. Using the flash mount that Canon supplies with the MT-24EX you can get the flash heads far enough from the lens plane to get good shadows and once you find a way to diffuse it (plastic from a milk jug works wonders) you'll get some really good light. I've never tried it, but you could also cut up a Lumiquest Soft Screen and use it as a diffuser.
Monday, June 16, 2008
Changes in my Gear
Just a quick note to let everyone know that I'm still here (been busy!) and that I've made some changes to the gear that I use. First up is the MT-24EX -I'm no longer using Gary Fong's Puffer diffuser. I contacted a company that makes diffusion plastics and they sent me a sales brochure with a sample of every plastic that they make. I took small strips of one of them and hot glued it directly to my MT-24EX's flash heads. Life size to twice life size is the toughest magnification range for me to shoot in and get good diffusion -past 2x the flash heads are so close to he subject that the apparent size of the flash relative to the subject makes getting good diffusion easy. So I'm including a life size shot with this post as an example of what I've been able to do with the new material. Here's a 3x shot so you can see how good the detail is -and how little glare I'm getting.

Also notice that the shadows are much more pronounced. One of the problems with using the Puffer is it's shape -that curve throws light everywhere. I've been able to get shadows with it simply because of the way I would place the flash heads on the mount, but the shadows were always "thin". With a flat diffuser the light from each flash head is a lot more directional so shadows look better, and are easier to control. As an added bonus the new material only causes me to lose about 2/3 of a stop so the flash duration is extremely low.
Several people have asked me if I use a tripod. The only time I use any kind of camera support is when I'm shooting water drops or abstracts in the house -out in the field I take every shot hand held. I'm not using any kind of brace other than an elbow on a knee. For both of the images in this post (and a lot of my recent shots) I'm holding on to whatever the critter is perching on with my left hand and I'm bracing the lens on that same hand to keep everything steady.
Now that it's "macro season" here I'll try to do more image deconstructions as a way to show you how I'm taking photos and hopefully you can pick up something from it that you can apply to your own style.
Happy shooting!
Thursday, June 5, 2008
How Working Distance Works Against You
I’ve been putting a little money aside for a while so I could pick up some new gear. Photography isn’t what I do for a living and with a wife and three kids I just can’t spend money on stuff that doesn’t help pay for the important things like electricity and food. But I managed to get in range of the Canon 180mm L macro and thought about finally getting it…
Over the course of this past weekend I talked myself out of spending the money –the 180L just won’t allow me to do anything that I’m not currently doing with the glass that I have and I don’t need the extra reach. In fact putting more distance between me and the subject could actually be detrimental. Take the shot I’ve included with this post, shot at three times life size with a Canon MPE-65mm lens. The only way I could get a sharp image of that honeybee was to hold on to the flower that it was feeding on. So with the flower’s stem pinched between my left index finger and thumb I rested the lens on my left hand and adjusted the focus by sliding the lens back and forth. Since the lens and the subject were on the same platform, my hand, I could keep the scene rock solid and take full control over where I placed the depth of field. Now imagine that same shot with a 180mm lens and two teleconverters (a 1.4x and a 2x) for 2.8x at a nine inch working distance.
I’d have to rest that bazooka of a lens on my forearm and try to shoot over the ridge of my thumb…
It’s not possible to take a shot of an insect on a flower without holding on to the stem –the slightest breeze is enough to throw the critter out of the plane of sharp focus. The best way to get a sharp, well composed image is to take full control of the scene and I just can’t do that by standing back with a long focal length lens. The 180L will have to wait for another day…
Wednesday, May 28, 2008
It's Not the Lens
It’s pretty common for someone to look at my work and then compliment me on the gear that I have. It use to bother me because it’s like going to someone’s house, enjoying a really good meal, and then complimenting the cook on their pots and pans. But I don’t let it get to me anymore because every time someone tells me that I have a great lens I know that their work will never compete with mine…
To be really good as a photographer you have to understand light, that it has different qualities, and how to take advantage of the light when it’s good or modify it when it’s bad. The light, more than any other aspect, will make or break an image. Given the choice between great light and an average lens or terrible light and a great lens I’ll choose the former every time –the resulting images will be infinitely better.
Granted I’d rather have great light and gear because I’ll have to do less post processing, and I think that’s what motivates some people to compliment others on their equipment.
Another important aspect of photography is knowing how to use the gear that you have, so you don’t have to rely heavily on post processing. The computer with never be able to replace data that you do not capture with the camera –it will never be that smart. So there’s a lot to be said for getting it right with the view finder and doing the majority of your post processing before you press the shutter release Take the image included with this post: I used a warming polarizing filter to get the detail you see in that dragonfly –something that isn’t possible with the filters in Photoshop…
In other news: If you've asked me for my help and I haven't gotten to you yet please be patient -I wasn't expecting the huge response that I got to my mentoring offer! I will get to you though, promise :)
Subscribe to:
Posts (Atom)