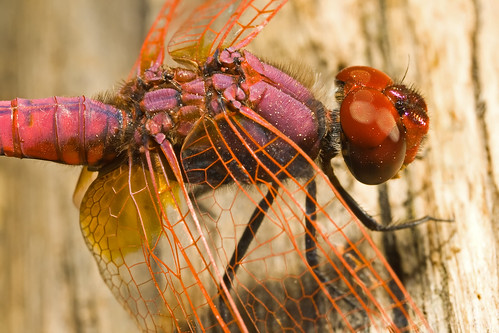
Flash macro is an exercise in Catch 22s -it really is a no win situation sometimes. The best light for both portrait and macro work is light that’s soft and very diffused. A portrait shooter has all kinds of studio sized toys to play with to get the light just right. Most portrait photographers also use the edge of their lights on the subject, rarely resorting to pointing the flash directly at the person they are shooting.
A macro photographer, for the most part, can’t carry all those goodies out in the field. If you want to be flexible enough to shoot a wide variety of creatures then your lighting gear has to be small and easy to manage. There’s also one other little problem;
The best light for macro is direct, in the critter’s face, lighting…
Flash macro is really nothing more than a form of high speed stop motion photography. The flash duration has to be low so you can freeze the motion of the subject and, if you hand hold the camera like I do, you also have to freeze your own motion. Short duration bursts of light from the flash mean sharper images (even if you have your rig on a tripod). So getting the flash close to the subject, and pointed directly at it, is almost a must. But then you have to worry about glare and about the quality of the light being too harsh.
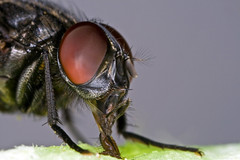
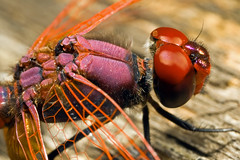
So last night, armed with a pair of heavy duty scissors, I cut up a Lightsphere II Cloud diffuser and hot glued a strip to each of my MT-24EX’s flash heads. I had been using the L2C for some other lighting projects around the house and was amazed at how good it was at giving me the quality of light that I like, even when I was shooting directly through the diffuser while hand holding one of the MT-24EX’s flash heads. As luck would have it I no sooner finished with the hot glue gun when one of my yungins spotted a huge fly in the house. The image with this post is the result of my first session with the new diffuser. It’s the quality of light that I’ve been looking for –warm, diffused, great color (even in a critter that doesn’t have much color to begin with). Plus I had the flash heads on Canon’s flash mount pointed directly at the fly and my flash duration, as judged by the recycle time of the flash, was short. Once I slipped at 4x and took two shots back to back and both times the flash fired. It wasn’t even a fresh set of NiMH batteries…
Sorry Mr. Fong for butchering one of your diffusers -but maybe you should be making them for macro too…

Sunday, December 30, 2007

Saturday, December 29, 2007
Saturday, December 22, 2007
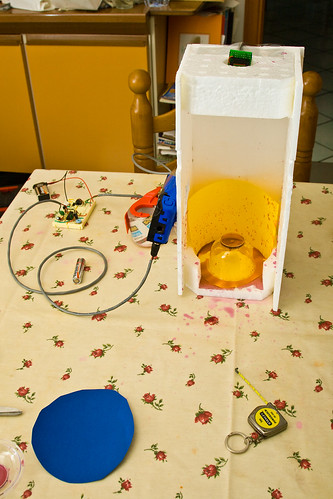
Water Drop Studio
Setting up some sort of delay timer for water drop photography has been something that I’ve wanted to do for a quite a while. There are a lot of pre-built controllers out there, but I wanted to roll my own after seeing the kits at the HiViz web site. So I ordered the last kit on this page and received it a few days ago for $25 USD counting first class priority shipping.
I have a remote cable on order for my Xti and I was going to use the controller to trigger the camera so I can use multiple flashes. But I couldn’t wait to try out the new “toy” so I picked up a couple of used disposable cameras from a local shop and rigged the trigger circuit to the switch in the camera that controls the flash. I also soldered over the switch that you would have to hold down to get the flash to charge. One word of caution: There is a large capacitor inside the camera that could still have a charge even after the battery has been removed. If you follow me on this project then be careful when you open the camera, and use an insulated screw driver to discharge the capacitor (just place the screw driver across the capacitors leads). You can get instructions on how to take apart a disposable camera from Make. They also have a kit in the Make store for 120 USD that looks pretty good, and if you what a controller with an LCD display there is the Mumford Time Machine.
I took the Styrofoam ends from the box that my 70-200 F4 L IS came in and hot glued some foam panels that I had from some other box. I made the tower small thinking that I’d need as much light as possible from the disposable camera’s flash. It turned out that I could shoot at ISO 100 and F22 and get images that were a little over exposed. The next “studio” will be bigger so I don’t get water on the material that I’m using for a background…
The next studio will also have an easy way to set up flowers and photos so that I can shoot water drops falling in front of them (the image gets refracted in the falling drop). For now here is a shot of “Beta Studio 1”:
Sunday, December 16, 2007
Really Right Stuff Hacking
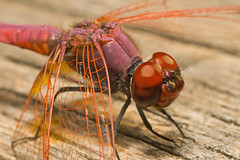
This past summer I did a lot of experimenting with the MT-24EX flash heads and placing them in different positions to see what effect it would have on the lighting. I finally settled on one flash head centered above the lens and pointed directly at the subject to bring out the details in it (it works really well especially in the shadows) and the other flash head next to it, but up above the subject to illuminated the area around it. I can also point the second flash head toward the background if I want to light that area.
It worked out really well, but I was using a small Novoflex ball head to get the second flash head where I wanted it, and it was a pain having to adjust it every time I put the rig together. I also didn’t need the kind of fine control that the ball head offered, so I went looking for a better way to position that second flash head.
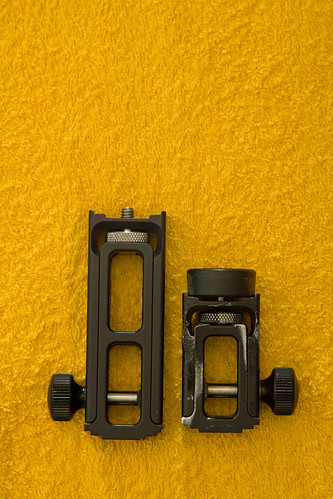
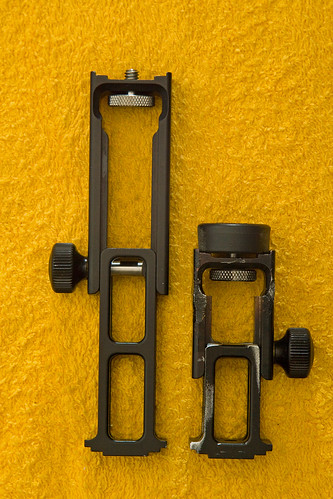
Fortunately I have a friend who can weld aluminum and he cut one of my Really Right flash extenders in half and welded it back together for me. Here are some images of it next to a non modified extender.
Both extenders closed:
Hacked extender open:

Both extenders open:
Here is an example of the kind of lighting I can get with the flash heads positioned like the image at the top of this post. Notice the detail in the dragonfly, and how well the area around it is lit:
It worked out really well, but I was using a small Novoflex ball head to get the second flash head where I wanted it, and it was a pain having to adjust it every time I put the rig together. I also didn’t need the kind of fine control that the ball head offered, so I went looking for a better way to position that second flash head.
Fortunately I have a friend who can weld aluminum and he cut one of my Really Right flash extenders in half and welded it back together for me. Here are some images of it next to a non modified extender.
Both extenders closed:
Hacked extender open:
Both extenders open:
Here is an example of the kind of lighting I can get with the flash heads positioned like the image at the top of this post. Notice the detail in the dragonfly, and how well the area around it is lit:
Friday, December 14, 2007
Macro Resolutions for the New Year
Last spring I had a decision to make; either get out of nature photography or get serious about it. I had opened an account on Flickr and wanted to add some of my best images from the previous year and out of several hundred photos I only had about two dozen that I thought were portfolio worthy. If I was going to continue to invest in new gear, and spend time shooting, then I needed to get better at taking images. So instead of ditching the DSLR and buying a point and shoot camera I came up with a list of macro resolutions and really pushed myself to see what I could do. Here they are, along with a new one for the coming year.
Become my own worst critic: I will never improve as a photographer unless I can subjectively analyze my work, figure out what I’m doing wrong, and correct the mistakes that I’m making so that I don’t keep making them. If one of my photos sucks I have to be the first to admit it. Get use to deleting photos that I would have kept in the past.
Don’t get hung up on the process: If I get locked into a specific way of shooting, or too hung up on one piece of equipment, then I will limit the subjects that I can photograph and reduce the odds that I’m going to get the image that I want. So let the subject dictate how I’m going to shoot and not let my gear, or the way I’m using it, limit the subjects that I can photograph. Be flexible.
Use Photoshop as an image editor, and not as a crutch: The computer will never be able to recover information that I did not take with the camera –and it will never be that smart. So I have to get it right before I press the shutter release and use post processing to “develop my negatives” and not use it to fix errors that I could easily correct with the camera. To keep from developing lazy habits the cropping tool is off limits –I have to compose my images with the view finder.
Shoot in multiple locations: If I shoot in the same areas all the time I’ll shoot the same subjects and I won’t have a diverse portfolio. My experience as a photographer will also be limited unless I’m shooting a wide variety of subjects. Even when I’m shooting in a familiar place I need to get into the habit of looking for new and unique critters. The other side of this goal is to pick a local species of insect and thoroughly document it. Learn its habits and get really good at photographing it so that I become a source for high quality images of a specific insect.
Go for the low hanging fruit: I need to stop wasting time shooting subjects that are difficult to reach, or that put me at a disadvantage due to the angle. By passing on situations that present a low probability of success I’ll have more time to photograph subjects in situations where I’ll have an advantage and my “keeper rate” will be higher.
Learn flash photography: It’s very difficult to use natural light above half life size so learning how to use a flash, and to control the quality of the light is very important. My ultimate goal is to get so good at flash photography that the color and contrast rivals early morning or late afternoon sunlight. I’ve made significant progress on this one, but I still have a long way to go…
Don’t become a magnification junkie: Let the composition dictate the magnification of the image. Some subjects don’t look good at high magnification and sometimes sacrificing some magnification for more depth of field is a good thing.
Don’t get hung up on diffraction: Getting sharp images is great, but only getting an insect’s eyes in focus because the depth of field is too narrow isn’t all that special. Composition is king, and if that means stopping the lens down to get more depth of field at the risk of losing some image sharpness then so be it. No one prints at 100% pixels…
Cherry pick ideas: Take the best of what I see others doing, and adapt it to my style of photography. Don’t copy other people’s work because I’ll never stand out that way, but put my own spin on their images.
Practice: Reading magazines and getting ideas from other photographers is good, but it’s not a substitute for having the camera in my hand. I have to get more practice shooting macro, especially in the winter months when the insects are gone.
Be unique: If my images look like everyone else’s images then I’ll never stand out. So look for new ways to photograph common subjects and develop my own style of photography. This is the new resolution for this coming year. In 2007 I spent a lot of time experimenting with different things to see what I liked and what I didn’t. 2008 will be the year that I zero in on a specific “look” and concentrate my efforts on perfecting it…
Tuesday, December 11, 2007
Motion Blur
Recently I wrote a post about diffraction, and how I think a lot of people blame it for soft images when the real problem might be motion blur or poor focus. From the reaction that I got you’d think that I stood up in a church and yelled “There is no God!”… ;)
Many of you argued that the flash duration, no matter how slow, is going to freeze motion –even thought the motion that I was referring too is no more than a few pixels (that’s all it would take to make an image look soft and you might not even recognize the effect as being motion blur). But then again some of those same individuals admit to bracing their cameras when they are shooting above twice life size because their images are sharper when they do…
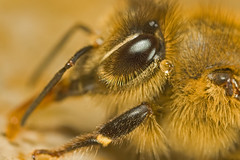
So what’s the deal: Can the flash freeze everything or not?!
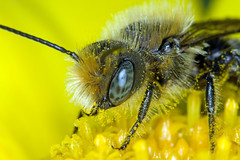
Nope, it can’t. I know from my own experience as a photographer that motion blur is a problem, especially when you’re not in full control of the flash duration. Since most of us shoot in E-TTL or some other automatic mode then we’re not controlling the flash, the camera is.
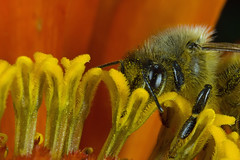
Want proof that the flash can’t freeze everything? Look no further than the image I’ve submitted with this post. The bee is using its wings to provide air conditioning to a bee hive in 37C (98F) degree heat. I took that shot at F16, 1/200 of a second, and ISO 100. I can shoot at 5x hand held at those same settings, and that image is only about one and a half times life size. It should have been easy for the MT-24EX to catch those wings, and yet they are a complete blur…
Granted that photo is an extreme example –that bee was pumping its wings so hard that you could put your hand next to it and feel the wind (I did). But I used it for this post because it’s easy to see the movement. Now imaging taking a shot and the subject moves just a few pixels during the exposure –it’s very possible when you look at those wings. Do you still think that diffraction is your biggest enemy when shooting at high magnification? I don’t.
You don’t have to use a tripod either –just look for ways to brace the camera…

Many of you argued that the flash duration, no matter how slow, is going to freeze motion –even thought the motion that I was referring too is no more than a few pixels (that’s all it would take to make an image look soft and you might not even recognize the effect as being motion blur). But then again some of those same individuals admit to bracing their cameras when they are shooting above twice life size because their images are sharper when they do…
So what’s the deal: Can the flash freeze everything or not?!
Nope, it can’t. I know from my own experience as a photographer that motion blur is a problem, especially when you’re not in full control of the flash duration. Since most of us shoot in E-TTL or some other automatic mode then we’re not controlling the flash, the camera is.
Want proof that the flash can’t freeze everything? Look no further than the image I’ve submitted with this post. The bee is using its wings to provide air conditioning to a bee hive in 37C (98F) degree heat. I took that shot at F16, 1/200 of a second, and ISO 100. I can shoot at 5x hand held at those same settings, and that image is only about one and a half times life size. It should have been easy for the MT-24EX to catch those wings, and yet they are a complete blur…
Granted that photo is an extreme example –that bee was pumping its wings so hard that you could put your hand next to it and feel the wind (I did). But I used it for this post because it’s easy to see the movement. Now imaging taking a shot and the subject moves just a few pixels during the exposure –it’s very possible when you look at those wings. Do you still think that diffraction is your biggest enemy when shooting at high magnification? I don’t.
You don’t have to use a tripod either –just look for ways to brace the camera…
Friday, November 30, 2007
Don’t Get Caught up in the Process…
A lot of people are interested in how I take my images and the gear that I use. I don’t mind talking about ether one –if I can save you some time or some money then I’m more than happy to do it! But don’t get too caught up in the “how” –the final image that you print or display on the web is infinitely more important than how you took it…
I run into people on a regular basis that are so sure their way of getting from point A to point B is the best path –everyone else is either wrong or just getting lucky. I don’t get worked up over them though, because in time their gallery will be the real test of their technique. In photography, where technique is concerned, there is no black and white. There are only different shades of gray. Just about the time that you think you’re “there” and there’s nothing left to learn someone will come along and show you just how far you really have to go ;)
As for my gear, and the way that I use it: Don’t get comfortable with it cause it’s going to change. As I learn more about photography and develop my own style of images the process, and the tools, are going to evolve. I let my style dictate the process, so the path I take to get from an idea to a final image is going to change as I get better. I might save you some money on hardware by posting what’s worked and what hasn’t –but that evaluation is based on my style and how I use the equipment. Something that works for me might not work for you, and if you follow too closely behind me you might end up wasting money with me. The photo included with this post is a prime example: I hate the ballhead and I’ve already changed the diffusers on my MT-24EX (I went back to using a set from Sto-Fen). The only reason why I posted that shot was someone wanted to see the Really Right Stuff bracket that I use.
I look at a lot of images taken by other photographers and I also learn from their techniques. But I “cherry pick” the best of what they do, and I apply what I see only if it fits into my style of shooting. That’s the best advice I can offer anyone who is reading this blog –pick the best parts out of it, apply what works for you, and ignore the rest. Don’t take anything you read here as gospel –no one is the last word on any photographic discipline, including me…
Saturday, November 24, 2007
Soap Bubbles
This type of abstract macro has been floating around in my head for a while but I just now got around to getting it out from between my ears and into the camera. The setup: Take a small glass bowl and fill it with water. Add dishwashing soap and food coloring (I used a neon blue). Place a flash configured for slave mode on the table next to the bowl with the flash head pointed at a 45 to 90 degree angle with respect to where you’ll be photographing (you don’t want the flash pointing toward you or directly away from you due to some possibly bad reflections from the flash). Then use a drinking straw to blow air into the water to make the bubbles.
I used an MR-14EX set as a master (the 430EX on the table ended up being a “C” channel flash) and an MPE-65mm macro lens set to around 3x to emphasize the gaps between the bubbles. Then I went looking for interesting compositions and lines in the mass of soap bubbles, often shooting well into the pile. Using the 430EX to pump light into the bowl really brought out the surface of the bubbles and where they intersected with each other.

I used an MR-14EX set as a master (the 430EX on the table ended up being a “C” channel flash) and an MPE-65mm macro lens set to around 3x to emphasize the gaps between the bubbles. Then I went looking for interesting compositions and lines in the mass of soap bubbles, often shooting well into the pile. Using the 430EX to pump light into the bowl really brought out the surface of the bubbles and where they intersected with each other.
Friday, November 23, 2007
You Say Diffraction, I Say Motion Blur
I’ve seen a lot of incredible photos taken with the MPE-65mm macro lens at apertures that should have made the image soft due to diffraction, and yet there is a lot of detail in them anyway. After looking at my own work and a lot of trial and error I’m beginning to think that a lot of what people call diffraction is simply motion blur.
Don’t get me wrong; diffraction is a problem and it does exist. The laws of physics can’t be changed –if you send light through a small opening it will have e tendency to bend. Wikipedia has an excellent article on diffraction if you want to dig deeper into the effect.
Unfortunately I think that a lot of photographers are too quick to blame diffraction for soft images, so they open up the aperture on their lens, get a sharper image, and then think that they’ve defeated diffraction by using a smaller Fstop. But by dropping down to a smaller Fstop (moving to a larger aperture) the exposure is also changing, so that the flash has to turn on for a shorter amount of time. Maybe the problem isn’t diffraction; maybe the real issue is motion blur due to a flash duration that’s just too long…
Take a close look at the image that I’ve included with this post. I shot it at F14 and 4x with an MPE-65mm macro lens and an MR-14EX set to a 2:1 ratio (too keep the light from looking flat) and with the flash assembly turned 45 degrees off axis. That shot, even though it’s at F14, has a lot of detail and all I had to do was brace the camera so that there was no movement.
Flash macro really is nothing more than a form of stop motion photography, and keeping the flash duration to a minimum can really make a difference in the quality of your images. To learn more about high speed photography and how flashes work see the HiViz web site.
Saturday, November 17, 2007
The Ansel Adams Excuse
This rant has been coming for a while; in fact it’s been on my mind since the very first post in this blog. I wasn’t sure how to explain it until recently but it finally dawned on me during a discussion of what makes a photo a photo. Buckle your seatbelt –the ride might get a little bumpy for some of you…
Ansel Adams is known for his mastery of the darkroom, and a lot of people use him as an excuse for why they use a certain tool in post processing. People will resort to an incredible degree of photo manipulation in Photoshop and when questioned about it will claim that they are only doing what Ansel did. Or if Mr. Adams had a copy of Photoshop then he would have used it too.
On the surface they are right…
But Ansel wasn’t just a master of the darkroom; he was also a master of light and composition. He lived in Yellowstone and he became so familiar with the weather patterns that he could tell if a sunset was going to be spectacular or if it was going to fizzle long before the sun got close to the horizon. Ansel knew when to press the shutter release, and when to pack up his gear and go home. Ansel Adams NEVER took snap shots and then tried to recover the images later in the darkroom. Granted he pushed the exposure limits of the film he was using, but he did it knowing what his post processing would do to the negative and the final print.
Mr. Adams used post processing as a tool to bring his creative vision to a print –he did not use it as a crutch to compensate for poor technique…
If you are justifying your post processing by claiming that Ansel Adams did it, or would have done it, then you are taking the man completely out of context! A big part of being a photographer is learning about all of the things that influence an image before you press the shutter release.
Note: Although it might look computer generated the image I’ve included with this post is a photograph and, like most of my images, I spent less than two minutes post processing it. As a photographer I don’t want the computer to become my primary photographic tool –that’s what the camera is for…
Friday, November 9, 2007
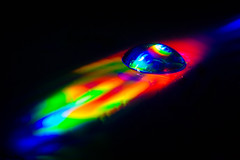
Abstract Macro
The bugs are almost gone, except for the jumping spider that has greeted me for the last few mornings on my living room floor, so I’m back to shooting abstract macro. There are two aspects that make shooting abstracts difficult for me. The first is all of the images that I’ve seen from other photographers -I can’t use them. I just don’t want to do what’s already been done because if I’m walking in someone else’s shadow my work isn’t going to stand out. So I have to put all of the images that I’ve seen out of my head and try to come up with a new idea that isn’t influenced by anyone else.
Then there is that little problem of taking that idea, once I have it, out of my head and into the camera ;)
A few weeks ago I was experimenting with a 3 watt LED and a DVD and I liked the results. So I decided to try shooting a small water drop while pumping the light form the LED into the DVD. The setup is pretty simple: I placed the camera on a Joby Gorillapod SLR-Zoom (highly recommended!) that I set on my living room table and then I stacked some books up so I could have a working surface even with the camera. Then I took a DVD and coated part of it with canola oil. Any light oil will work, but I used canola since it is almost completely clear. The oil serves two purposes; it keeps the surface of the DVD from looking completely smooth (so the final image has some “defects” in it and won’t look like it was computer generated) and it makes the surface tension between the DVD and the water drop higher so the drop doesn’t flatten out. Then I just placed a drop of water on the DVD and focused the lens by moving the books and adjusting the magnification of my MPE-65 to shift the point of sharp focus –kinda like a poor mans focusing rail.
The tricky part is getting the light and the color that I want. Moving the LED closer to the DVD effects how sharp and defined the light will look after it bounces off of the DVD and splits into the different colors. So I have to “focus” the light by changing the distance from the LED to the DVD. But the angle of the light also effects how the colors will split, so it can take a while to get the right combination of distance and angle –minor changes in either one can have a big impact on how the final image looks. Also what I see in the view finder isn’t always what the sensor captures. Fast shutter speeds seem to give me better results than slower ones, even though the image might look better in the view finder when the light levels are low.
A little imagination, and some trial and error, led to the image included with this post :)
Tuesday, November 6, 2007
Additional Musings on Flash Photography
I really struggled with flash photography when I first started shooting macro –and if the truth were told I’d have to say that I still struggle with it from time to time even today. Macro, defined as life size and higher magnification, is really a form of stop motion photography. No matter what you use to steady the camera there is still going to be movement. Vibration from the mirror, the wind blowing the subject or your tripod, etc. is all going to create minor displacement that wouldn’t normally be a problem for any other type of shooting. But when the image frame, at life size, is only 22.5 millimeters wide on a 1.6x crop factor camera it doesn’t take much movement to make an image look soft…
The key to getting good at flash photography is to understand how the flash works. I’m sure I’ve said this before but I’ll say it again: The intensity of the light that your flash produces does not change –ever. No matter what the exposure is the intensity of the light that the flash produces from frame to frame is always a constant. The only thing that does change is the duration of the light –darker scenes require the flash to turn on longer than lighter ones.
You’d think that getting more distance between the flash and the subject would be a good thing, but the duration of the flash has to increase to give you a correct exposure. Reflections become more of a problem because the light has more time to bounce off of shiny surfaces. Plus it gets more difficult to freeze motion since the light is on longer –there is more time for you, or the subject, to move.
I can’t tell you how much time I spent trying to get the flash away from the subject thinking that it would make the light less harsh and improve the quality of my images… *sigh*
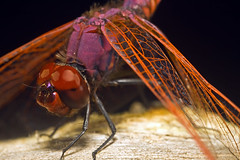
So how do you get a short flash duration and at the same time reduce reflections? Get the flash heads close to the subject, and then experiment with the angle of the flash heads. The flash duration will be low, so freezing motion and getting sharp images won’t be an issue. As for reflections; sometimes all it takes is a minor change in the angle of a flash head to cut most, if not all, of the reflections out of a scene. The image above is an example of getting the flash heads of the MT-24EX close to the subject and using one flash head as a fill light (positioned over the top of the dragonfly).
I tried experimenting with using the flash head that’s over the subject for the main light source and the other as a fill flash for the shadows by setting the ratio control on the MT-24EX to make the overhead flash twice as bright as the fill light. Here’s the result:
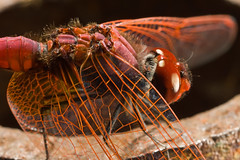
If you look at both of the images with this post you’ll see that the bottom photo doesn’t have as much detail in the eyes because the shadows are too strong. Also since the camera is metering for the entire scene the flash head that’s over the subject has to be on a lot longer to get the scene properly exposed (due to the distance and the angle of the overhead light source). I knew the flash duration was high because it was taking too long for the flash to recycle after each frame. So I went back to using the flash heads at equal power and the struggle continues… :)

The key to getting good at flash photography is to understand how the flash works. I’m sure I’ve said this before but I’ll say it again: The intensity of the light that your flash produces does not change –ever. No matter what the exposure is the intensity of the light that the flash produces from frame to frame is always a constant. The only thing that does change is the duration of the light –darker scenes require the flash to turn on longer than lighter ones.
You’d think that getting more distance between the flash and the subject would be a good thing, but the duration of the flash has to increase to give you a correct exposure. Reflections become more of a problem because the light has more time to bounce off of shiny surfaces. Plus it gets more difficult to freeze motion since the light is on longer –there is more time for you, or the subject, to move.
I can’t tell you how much time I spent trying to get the flash away from the subject thinking that it would make the light less harsh and improve the quality of my images… *sigh*
So how do you get a short flash duration and at the same time reduce reflections? Get the flash heads close to the subject, and then experiment with the angle of the flash heads. The flash duration will be low, so freezing motion and getting sharp images won’t be an issue. As for reflections; sometimes all it takes is a minor change in the angle of a flash head to cut most, if not all, of the reflections out of a scene. The image above is an example of getting the flash heads of the MT-24EX close to the subject and using one flash head as a fill light (positioned over the top of the dragonfly).
I tried experimenting with using the flash head that’s over the subject for the main light source and the other as a fill flash for the shadows by setting the ratio control on the MT-24EX to make the overhead flash twice as bright as the fill light. Here’s the result:
If you look at both of the images with this post you’ll see that the bottom photo doesn’t have as much detail in the eyes because the shadows are too strong. Also since the camera is metering for the entire scene the flash head that’s over the subject has to be on a lot longer to get the scene properly exposed (due to the distance and the angle of the overhead light source). I knew the flash duration was high because it was taking too long for the flash to recycle after each frame. So I went back to using the flash heads at equal power and the struggle continues… :)
Sunday, October 21, 2007
After the show...
Every year there is an international bazaar at the NATO base here in Naples, Italy and this year two other photographers and I got together to split the price of a booth so we could sell photos. It was my first time trying to sell my work (outside of the local art shop here in town) and it went really well! I didn't make a lot of money -truth be told I probably only cleared fifty Euro (about 70 USD) after paying my share of the booth and my printing costs. But I made a lot of contacts and got some very valuable feedback on images.
I didn't think my dragonflies would be popular, but they were!
I sold two loose, 20x30 centimeter prints of the dragonfly in this post, and there was even a lot of interest in my life size and higher magnification images. The coolest part of the whole experience came on the second day when the manager of the base Exchange walked up to use and asked why were weren't selling prints at her store!
In addition to the dragonfly I sold a few abstracts and even a scenic of Vesuvius. Plus I picked up some great advice from a more seasoned photographer who's been selling prints for a while. So all in all it was an excellent learning experience and I want to do it again! :)
Footnote: A special "thanks!" to my wife who helped me get organized and who worked at the booth setting up and selling my images!
Thursday, October 18, 2007
Busy as a...
Sorry about the lack of updates to the blog -I've been swamped. There is an international bazaar in town and I'm setting up a table to sell a few photos and getting ready for it, while juggling everything else (the day job, the family, etc.), has kept me pretty busy lately. I should have a few posts going up next week, and one of them will be my experimenting at seven times life size.
Saturday, October 6, 2007
Painting with Light series 1
It rained today and I was bored, so I broke out a 3 watt LED light that I bought just to experiment with. I wanted to see if the light would be bright enough to allow me to take abstract images without using a flash. The only thing I don’t like about doing abstracts with a flash is that I never know what I’m going to get until after I’ve taken the shot, since all of the light is coming from the flash itself. With the LED light I was hoping that I’d be able to see what I’d get before pressing the shutter release, but I ran into a problem.
I’d see this really incredible pattern reflected off of the DVD that I was pumping light into, but when I looked through the camera the pattern wasn’t there. It took me a minute to realize that the effect I saw reflected off of the disk depended on my distance to it, and I could change the effect by keeping the camera still and just changing the distance between the light and the DVD. The image attached to this post, and the rest of the photos in the Painting with Light series 1-1 to 1-7 are the end result of my rainy day experimenting.

I’d see this really incredible pattern reflected off of the DVD that I was pumping light into, but when I looked through the camera the pattern wasn’t there. It took me a minute to realize that the effect I saw reflected off of the disk depended on my distance to it, and I could change the effect by keeping the camera still and just changing the distance between the light and the DVD. The image attached to this post, and the rest of the photos in the Painting with Light series 1-1 to 1-7 are the end result of my rainy day experimenting.
Friday, October 5, 2007
Minimizing Reflections
I’ve spent the last month experimenting with different ways to mount the flash heads on my MT-24EX to minimize reflection. I like to use one flash head for fill, and the other as a direct light to bring out the detail in the critter that I’m photographing. Placing both flash heads close to each other at the top of the lens makes it easier to reduce reflections and to determine which one is causing problems if an area of the image is blown out.
What I found during all my trial and error was that it’s best to point the fill flash head toward the area where the subject would be, and then turn the flash head away from the lens “one click” –the MT-24EX’s flash heads can rotate a little and there are stops that you can feel as you turn them. So the fill flash is still pointed down, but not toward the subject.
The flash head I use to directly illuminate the subject can be pointed directly at the critter I’m photographing, but I sometimes have to point it down “one click” to avoid reflections from it. The down side to using the flash heads that way is that sometimes the resulting image is a little under exposed, but usually by no more than 2/3 of a stop –easy to correct for in post processing.
The image with this post is an example of what I’ve been able to do with the MT-24EX. There are some hot spots on the nose, but nothing that’s completely blown out.
When shooting close to life size sunlight reflecting off of shiny areas can be a problem as well, so pay attention to any hot spots that you see in the view finder. Eliminating them can be as simple as shifting your position no more than a few millimeters.
Wednesday, October 3, 2007
Novoflex Flash Arm
Recently I ordered this Novoflex flash arm hoping that I could use it to support the flash head that I use for fill (see this post for details). The flash arm itself didn’t work out for what I wanted to do, but the ball head did since it detaches and has a quick release plate for the MT-24EX. So I’ve been mounting it to my Really Right Stuff flash bracket and using the ball head so I can position the flash head closer to the subject. The photo included in this post is one of many that I’ve taken with the ball head and I’m pleased with the results. The only down side is that the ball head does not mount flush against the RRS flash bracket, so I’m looking for something to act as a spacer.
Instead of buying the flash arm to get the ball head the Novoflex Neiger 19P Mini Ball Head should also work equally well and it’s about $55 cheaper. But at $40 it’s still pretty expensive...
Once I get everything ironed out I’ll post an updated photo of my macro rig and list all sources for the parts.
Saturday, September 15, 2007
The Real Power of the MT-24EX
I really like the way that natural light macro looks, with the subject and the background equally well lit. But there is never enough low contrast natural light for the kind of hand held images I like to take, and using a tripod is out of the question. By the time I got setup the critter would be long gone, and even if it didn’t take off the slightest little movement would ruin the shot anyway…
So what I need is the background illumination that’s possible with natural light, but the motion stopping power of a low duration burst of flash light. With the MT-24EX and a flash bracket it’s possible to get both.
I have a Really Right Stuff flash bracket and some extenders for it. So I set one flash low to the lens and pointed it directly at the dragonfly in the photo included with this post. I set the other flash head on an extender and positioned it above the critter and pointing down to use it as fill flash for the area I’m shooting. I got a little bit of reflection from the direct flash –and I think I can work that out in time. But look at the overall illumination in the frame. Not too bad…
You don’t have to use a Really Right Stuff bracket and extender –you could put one flash head on the standard Canon flash mount for the MT-24EX and then place the other flash head on a bracket. The advantage to using the RRS bracket and extender is that I can position both flash heads toward the top of the lens where it’s easier for me to keep from bumping into things with them. I also have more angles available to me with the RRS mount than I can get out of the standard flash mount that comes with the MT-24EX.
Using one flash head for fill also works well when you’re shooting an insect from the side and you want to illuminate the area directly behind it. Just angle the “fill flash” so that it is pointing toward the area you want to light up.
So far I’ve tested using one flash head for fill all the way to 4x and the flash cycle time is fast –meaning that the flash duration is short and I’m able to freeze motion. Not only am I stopping the motion of the subject, but I’m stopping my own motion as well with just one flash head without having to go above ISO 100. Sweet…
Sunday, September 2, 2007
Shooting Bees
If you’ve read my other posts on shooting insects (Shooting Butterflies and Shooting Dragonflies) then you can photograph the majority of the critters out there. But there are a few more useful tips that I can give you for shooting bees that are different than photographing other creatures so I’m listing them here.
Bees feed in a predictable pattern, both in the area that they are in and on the flowers that they get nectar from. If you see a bee feeding on a flower and it takes off odds are it will be back later (or one just like it). Honey bees communicate the location of the food sources that they discover, so if there is a flower that they like they’ll tell the hive where to find it. Bees feed on different flowers in different ways; Some flowers are shallow and it’s easy for the bee to feed from it –maybe they’ll only stay a second or two. Other flowers require the bee to go deep to get the nectar out, so they’ll stay in the flower longer –and you’ll have a better chance of getting the image you want…
Another thing to watch for is that bees move around a flower in a predictable way. I often frame the image and simply wait for the critter to get into the picture. The photo I’ve included with this post is a prime example –all I had to do is wait for the bee to move into the area I wanted it in and then press the shutter release. It was hot that day, the bees were very active, and yet I got a clear shot at twice life size. Easy, once you know what to look for…
A lot of insects, bees included, will occasionally stop to clean themselves. So if you see a bee that's actively feeding, but moving too fast to photograph, watch it for a while and see if it stops to clean the nectar from it's legs or antenna.
All insects get a little lethargic when the temperature rapidly drops, and bees seem to have a habit of getting caught out in the open when spring or fall storms roll in. Before, or after, it rains look for bees that have been slowed down by the changing weather so you can photograph them when they are barely moving.
If you are getting frustrated by fast moving bees put a little corn syrup in an area where they are feeding and photograph them while they eat. One word of warning: Use a little bit of corn syrup –putting a lot of it down won’t attract bees any faster than using a little, but you might empty an entire bee hive if you use a lot of it at once…
If the bees are actively feeding on a particular type of flower then simply use a syringe to inject some corn syrup into it. Once the ladies find it and start feeding they'll usually let you get close for a few photos.
On hot days put out a little water in a shallow dark colored saucer and photograph bees that stop for a drink.
Some bees are very aggressive and if they start acting threatening then leave them alone. I’ve had some honeybees bees go from casually feeding to being in my face faster than you can snap your fingers, and I’ve been chased out of an area on more than one occasion. They key to not getting stung is to not push them –if the bee wants you to leave then leave…
Last, but not least, never swat a bee that lands on you. Most of the time it's just stopping to take a breather and the bee has no intention of stinging you. I’ve had them land in my hair and all I had to do was shake my head to get it to leave. If you take a swing at one and miss odds are it will come back at you, and this time you will get stung. Honey bees not only communicate the location of food sources, but they can also tell the hive where to find that irritating photographer…
Friday, August 31, 2007
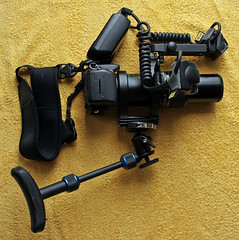
The Bazooka part II
Here's the equipment list:
Canon Xti, MPE-65mm macro lens, and MT-24EX modified with home made diffusers and cable management.
Novoflex Chest Pod with the camera mount removed and replaced with a Really Right Stuff 25mm ball head. Shoulder strap also removed. The arm between the shoulder brace and the camera mount is adjustable and retracts about 5cm (2 inches) from what you see in the photo.
Really Right Stuff flash mount with an extender for the top most flash head. The extender is only necessary when shooting above 4x. I also have a second flash mount for the MT-24EX (since it has two flash heads) and a lens plate to mount the flash bracket to the MPE-65mm's tripod collar (note: that link is for Canon's 100mm macro lens, but it's the same tripod collar that the MPE-65mm uses). I like the Really Right Stuff flash mount because it does get the flash heads away from the lens (great when I'm trying to get the camera as low as possible). I also use the mount that Canon supplies with the MT-24EX.
It's a little heavy, but it's easy to manage and I can quickly move the camera when I'm following a subject that won't sit still. I tried using a monopod for a month (a tripod is just too slow) and I went back to the Novoflex Chest Pod...
Tuesday, August 21, 2007
MR-14EX verses the MT-24EX
One of the reasons why I started this blog was to answer common questions, and one of them is “What’s the difference between the MR-14EX and the MT-24EX?”. I’m no expert, but I own both of those macro flashes so here is my .02 on their strengths and weaknesses and what really separates them. In a nutshell I could say that the MT-24EX allows greater freedom in where the flash heads are placed and call it a day. But things are never quite that easy are they… ;)
MR-14EX
The MR-14EX has two semi-circular flash heads built into a circular ring that clips directly on to Canon’s EF-S 60mm, MPE-65mm, and 100mm macro lenses, and it will also clip on to Canon’s 180mm macro lens (or any other macro lens) with a macrolite adapter. Canon makes adapters for 52mm, 58mm, and 72mm lenses. The adapter just supplies a groove for the flash head to clip on to. The flash heads are fixed in the ring and cannot be moved, but you can turn the entire assembly to move the position of the flash heads (I normally shoot with one flash head at the top of the lens and the other flash head at the bottom).
The diffuser plastic on the flash heads is a milky white color and produces light that is “warm” –colors really “pop”. The light is not flat as long as you enable ratio control on the flash controller. I had mine set to a 4:1 ratio so that the “A” flash head was brighter than the “B” flash head and I placed the “A” flash head toward the top of the lens by rotating the flash assembly 90 degrease (which also places the “B” flash head at the bottom of the lens since the flash heads cannot be independently moved). You can also turn one flash head completely off and just use the other one.
Reflections from shiny surfaces are a problem for any flash, but it’s particularly bad for the MR-14EX. Some people like the “half moon” flash reflection that the flash heads produce, and some don’t. Also since the flash heads are longer than the MT-24EX’s the reflections can be a lot more difficult to edit out of an image. In my opinion reflections are not a huge problem for the MR-14EX, but you do need to be aware of it.
The MR-14EX has two modeling lights located between the flashes to help you focus by illuminating the scene for 20 seconds or until you fully press the shutter release, and they are bright and well diffused so they cover a wide area. But you have to press a button on the controller to activate them which means taking your eye off of the viewfinder. After you take a photo the modeling lights turn off, so you have to reach up and turn them on for the next shot –dumb…
Bottom line: Set the ratio control from 2:1 to 4:1, attach the flash to your lens, and take pictures –the MR-14EX is really that easy to use. The quality of the light is extremely good, and E-TTL flash metering is very accurate. It’s an excellent choice if you don’t need more diversity in the placement of the flash heads and you don’t want to spend a lot of time experimenting with diffusers. Very, very, easy to use…
MT-24EX
I’ve had a “love / hate thing” with the MT-24EX. The light that it produces is harsh, since the diffuser plastic is clear (what a stupid idea!). So I tried various ways to lessen the glare and most of them didn’t work very well. I finally settled on a home made diffuser for the flash that’s giving me good light quality –comparable to what I was getting with the MR-14EX.
The MT-24EX has two flash heads that connect to a lens mount. The heads are shorter than the MR-14EX’s flash heads and they extend out from the lens about an extra centimeter. You can place the MT-24EX’s flash heads anywhere on the lens mount, or remove them and place them anywhere you want. Several third party manufacturers make lens mounts for the MT-24EX –I own a Really Right Stuff mount and can recommend it (more on why I like it later on in this article). Edit 30 November 2011: I no longer use a Really Right Stuff flash bracket with my MT-24EX (I just use the flash mount that comes with the flash). Being able to place the flash heads in a wide variety of configurations is a plus, but in my opinion it’s not a big deal since the further you get the flash heads from the subject the harsher the light becomes, and the flash duration increases (so freezing motion becomes more difficult). Just because you can separate the flash heads over a meter apart doesn’t mean that you should…
Ratio control is available, but now I hardly use it on the MT-24EX. I normally have the flash heads set about 90 degrees apart so I can get shadows without using ratio control, or I have one flash head pointed at the subject and the other pointed out toward the background. Being able to use one flash head to illuminate the background in a scene is one of the best features of the MT-24EX.

The MT-24EX has modeling lights built into each flash head, and if you enable a special function on the flash you can turn them on by double half pressing the shutter release and they will stay on for 20 seconds or until you fully press the shutter release. So you can turn the modeling lights on without having to take your eye off of the view finder –cool! But the lights are yellowish in color and they are not diffused like the modeling lights on the MR-14EX so the flash heads have to be pointing almost directly at the subject or you won’t see them in the viewfinder. In one way it makes sense, because if you can see the modeling lights then you at least know that the flash is pointed toward the image frame. But the modeling lights are useless if you need them, but don’t want the flash heads pointed directly at what you are photographing…
Another annoying aspect of the MT-24EX is the cables that run between the controller and the flash heads. They are coiled, but still pretty long and they have a tendency to flop around. Not a big deal until you are right next to a critter and one (or both) of the cables move and all you’re looking at is a place where an insect use to be. I added my own cable management to solve the problem, but you’d think that Canon could have built something into the flash heads to hold the cables a little tighter.
Bottom line: If you need more control over where the flash heads are placed, and you don’t mind experimenting with diffusers, then the MT-24EX is an excellent flash! But don’t expect to take it out of the box and get good light quality with it…
MR-14EX
The MR-14EX has two semi-circular flash heads built into a circular ring that clips directly on to Canon’s EF-S 60mm, MPE-65mm, and 100mm macro lenses, and it will also clip on to Canon’s 180mm macro lens (or any other macro lens) with a macrolite adapter. Canon makes adapters for 52mm, 58mm, and 72mm lenses. The adapter just supplies a groove for the flash head to clip on to. The flash heads are fixed in the ring and cannot be moved, but you can turn the entire assembly to move the position of the flash heads (I normally shoot with one flash head at the top of the lens and the other flash head at the bottom).
The diffuser plastic on the flash heads is a milky white color and produces light that is “warm” –colors really “pop”. The light is not flat as long as you enable ratio control on the flash controller. I had mine set to a 4:1 ratio so that the “A” flash head was brighter than the “B” flash head and I placed the “A” flash head toward the top of the lens by rotating the flash assembly 90 degrease (which also places the “B” flash head at the bottom of the lens since the flash heads cannot be independently moved). You can also turn one flash head completely off and just use the other one.
Reflections from shiny surfaces are a problem for any flash, but it’s particularly bad for the MR-14EX. Some people like the “half moon” flash reflection that the flash heads produce, and some don’t. Also since the flash heads are longer than the MT-24EX’s the reflections can be a lot more difficult to edit out of an image. In my opinion reflections are not a huge problem for the MR-14EX, but you do need to be aware of it.
The MR-14EX has two modeling lights located between the flashes to help you focus by illuminating the scene for 20 seconds or until you fully press the shutter release, and they are bright and well diffused so they cover a wide area. But you have to press a button on the controller to activate them which means taking your eye off of the viewfinder. After you take a photo the modeling lights turn off, so you have to reach up and turn them on for the next shot –dumb…
Bottom line: Set the ratio control from 2:1 to 4:1, attach the flash to your lens, and take pictures –the MR-14EX is really that easy to use. The quality of the light is extremely good, and E-TTL flash metering is very accurate. It’s an excellent choice if you don’t need more diversity in the placement of the flash heads and you don’t want to spend a lot of time experimenting with diffusers. Very, very, easy to use…
MT-24EX
I’ve had a “love / hate thing” with the MT-24EX. The light that it produces is harsh, since the diffuser plastic is clear (what a stupid idea!). So I tried various ways to lessen the glare and most of them didn’t work very well. I finally settled on a home made diffuser for the flash that’s giving me good light quality –comparable to what I was getting with the MR-14EX.
The MT-24EX has two flash heads that connect to a lens mount. The heads are shorter than the MR-14EX’s flash heads and they extend out from the lens about an extra centimeter. You can place the MT-24EX’s flash heads anywhere on the lens mount, or remove them and place them anywhere you want. Several third party manufacturers make lens mounts for the MT-24EX –I own a Really Right Stuff mount and can recommend it (more on why I like it later on in this article). Edit 30 November 2011: I no longer use a Really Right Stuff flash bracket with my MT-24EX (I just use the flash mount that comes with the flash). Being able to place the flash heads in a wide variety of configurations is a plus, but in my opinion it’s not a big deal since the further you get the flash heads from the subject the harsher the light becomes, and the flash duration increases (so freezing motion becomes more difficult). Just because you can separate the flash heads over a meter apart doesn’t mean that you should…
Ratio control is available, but now I hardly use it on the MT-24EX. I normally have the flash heads set about 90 degrees apart so I can get shadows without using ratio control, or I have one flash head pointed at the subject and the other pointed out toward the background. Being able to use one flash head to illuminate the background in a scene is one of the best features of the MT-24EX.
The MT-24EX has modeling lights built into each flash head, and if you enable a special function on the flash you can turn them on by double half pressing the shutter release and they will stay on for 20 seconds or until you fully press the shutter release. So you can turn the modeling lights on without having to take your eye off of the view finder –cool! But the lights are yellowish in color and they are not diffused like the modeling lights on the MR-14EX so the flash heads have to be pointing almost directly at the subject or you won’t see them in the viewfinder. In one way it makes sense, because if you can see the modeling lights then you at least know that the flash is pointed toward the image frame. But the modeling lights are useless if you need them, but don’t want the flash heads pointed directly at what you are photographing…
Another annoying aspect of the MT-24EX is the cables that run between the controller and the flash heads. They are coiled, but still pretty long and they have a tendency to flop around. Not a big deal until you are right next to a critter and one (or both) of the cables move and all you’re looking at is a place where an insect use to be. I added my own cable management to solve the problem, but you’d think that Canon could have built something into the flash heads to hold the cables a little tighter.
Bottom line: If you need more control over where the flash heads are placed, and you don’t mind experimenting with diffusers, then the MT-24EX is an excellent flash! But don’t expect to take it out of the box and get good light quality with it…
Sunday, August 12, 2007
Photography Tip from an Engineer
Even if you don’t have your own web site, or know how to write a single line of code, you probably do have a gallery hosted by one of the many photo viewing sites on the web. You also have a first and last name –or at least you should. So you, like me, could go to a site like Network Solutions and register your first and last name. At the same time you can set up a DNS redirect so that when someone surfs to your name they get redirected to your gallery.
If you go to www.johnkimbler.com you’ll get my Flickr gallery –cool, no? :)
It may sound trivial, but it’s very convenient to register a domain name to use for your gallery. It’s easier for potential viewers to remember, as your photos become popular people will learn your name, and if you change your gallery to a different site in the future you can always change your DNS redirect to send people to your new gallery (it does take 24 to 48 hours for the change to propagate out to all the DNS servers).
Another advantage has to do with the signature that you use on all the forums that you post to. Since I registered my name all I have to do is use www.johnkimbler.com in my signature file to promote my gallery. If I change from Flickr to another gallery site I don’t have to go to all the forums I post to and change my signature –I just change the DNS redirect (and it’s very simple to do).
I’ve even registered no-cropping-zone.com and set up a redirect so that when you surf to www.no-cropping-zone.com you get this blog…
Monday, August 6, 2007
MT-24EX cable management
I got tired of the cables on the MT-24EX flopping around and scaring the critters when I’m shooting from 1x to 3x so I used some Rip Tie cable managers to take up some of the slack. The Rip Ties have an adhesive on one side and they're just big enough to cover the back of the flash heads.
No more floppy cables…
I can leave the cables secure all the way up to 5x on the MPE-65, but I decided to go with a solution that I could undo if I get a longer lens.
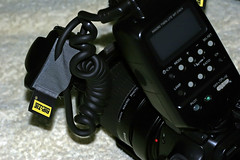
No more floppy cables…
I can leave the cables secure all the way up to 5x on the MPE-65, but I decided to go with a solution that I could undo if I get a longer lens.
Saturday, August 4, 2007
MPE-65 Aperture Settings
After some experimenting on my own, reading an excellent review on the MPE-65 at Juza Nature Photography, and more experimenting using his “In Case of Emergency” setting here are my aperture settings for the MPE-65mm macro lens:
1x and F16 –tack sharp. I’m usually at F14 just because I have a habit of changing back and forth between 1x and 2x and I don’t want to have to mess with changing the aperture.
2x and F14 –but F11 is better. If I’m shooting between 2x and 3x I’ll set the lens to F11 at 2x and leave it.
3x and F11 –sharp enough but F8 is better. I don’t mind trading a little image sharpness for a little more depth of field.
4x to 5x and F8 –but F5.6 is sharper. At F8 I’m getting acceptable image quality. The image with this post was shot at 5x and F8 and the only reason the nose is a little soft is that it’s not in the plane of sharp focus –the depth of field is just too thin at 5x. Stopping the lens down just makes the entire image uniformly soft…
Update 28 November 2007: After a productive summer of experimenting with shooting at high magnification and high Fstops it seem that the MPE-65 performs pretty good at F14 above twice life size. For some odd reason F16 is noticeably softer, and I think it might be something as simple as a focusing issue within the lens itself. Some lenses perform better at certain apertures than others, and the MPE's "sweet spot" seems to be around F11 to F14. Now I'm not saying that you won't see diffraction softening -so put down the flame thrower ;) But if you need more depth of field at high magnification then try F14. You might be pleasantly surprised...
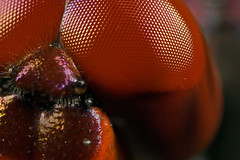
Tuesday, July 31, 2007
Image Sharpening
I’m probably the wrong person to blog about sharpening images –especially since I just started doing it. But after reading several articles on the subject, and everyone agreeing that it should be done, I decided that I needed to do some sharpening. The problem is that no one agrees about how much sharpening to apply. I’ve read too many horror stories about people who had to go back and re-edit all their photos because they went too far with Unsharp Mask –and I just don’t have time to fix hundreds of photos…
So I went looking for something that would clean up the “haze” in my shots but not get me into trouble later. I found it in Photoshop Elements 5. I just use the Auto Sharpen option under the Enhance menu. According to the help file Auto Sharpen will increase the clarity of an image without the risk of over sharpening.
Since I started using this past weekend I’ve noticed a significant difference in the sharpness of my images –a difference that I can see without resorting to viewing a photo at 100% pixels. No guess work, no risk of over sharpening, and it won’t sharpen a dull image so I still have to nail the focus. As an added bonus it’s fast, so my post processing time is still less than two minutes for any single image.
Perfect…
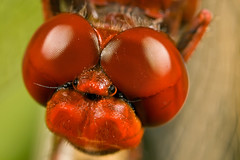
Monday, July 30, 2007
Color, contrast, and the MPE-65mm
If I could have only one lens in my camera bag it would be the MPE-65mm! Granted the working distance at life size is only four inches, and sometimes I find myself bumping the plant that the critter is on and scaring them off. But the color and contrast is so good that I can't make myself break out the 100mm, 500D diopter, and a 25mm tube for a twice life size shot like the one I've included with this post, even though the working distnace would be double (close to 5" with the 100mm rig instead of 2.5" with the MPE-65 set to 2x).
I didn't do a levels adjustment on that image cause it didn't need it...
I converted from RAW with some minor adjustments in exposure (actually decreased the contrast) and used Neat Image to remove sensor noise. Then I lightened shadows, darkened highlights, and increased mid-tone contrast by 5 percent. Then I rubbed out the dust spots with the spot healing brush after I used the auto sharpen option in Elements 5. Fixed some minor reflections with the clone stamp tool and saved it as a jpg file. I spent all of two minutes in post processing and the colors "pop".
I might be able to get the same results with the 100mm + tubes + diopter, but it wouldn't look as good nor would it be as sharp...
Check out this review at Juza Nature Photography. I agree with his results, and since I don't mind a little diffraction in my images I shoot with his "in case of emergency" settings (although I normally shoot at F14 from 1x to 2x instead of F16).
If you own a Canon camera and you shoot above life size then you owe it to yourself to check out the MPE-65mm...
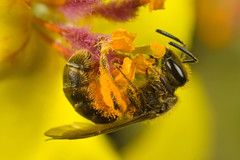
Tuesday, July 17, 2007
Using a 70-200 F4 L for closeup photography
Most telephoto lenses are soft at the minimum focusing distance of the lens -by design. The primary use for a telephoto is to take images of distant subjects, so they are built to be sharp when focused toward infinity.
If you're finding it difficult to get sharp images of critters close to the lens then it might not be your technique, it may just be the glass.
One way around the limitation is to use a diopter (like the 500D) since it will fix the focus at about 1/2 of a meter (approximately 18 inches) from the front of the lens. Since the focus is fixed (the focus ring will only change the area of sharp focus by about a centimeter or ½ inch) you can set the focus ring toward infinity and the resulting images are pretty sharp. The focal length of the lens changes the magnification, so to get “closer” to the subject all you have to do is zoom in.
The image with this post was taken with Canon’s 70-200 F4 L and a 500D diopter. Notice how smooth the background is –another advantage to using the diopter is that it improves the bokeh of a lens.
I have a 500D on my 100mm macro lens all the time just for the bokeh…
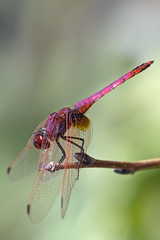
Monday, July 9, 2007
Diffused MT-24EX results
So, how does the home made diffuser for the MT-24EX perform? I'll let this shot of a butterfly taken at three times life size speak for itself. No FEC and minimal post processing...
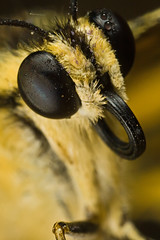
Wednesday, July 4, 2007
Home made diffuser
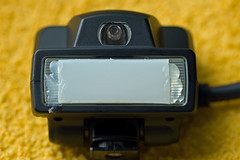
Note 05 May 2009: I am no longer using this method to diffuse my MT-24EX. See my recent blog posts if you want to know what I'm doing to tame the flash. I've left this post intact as way for me to gauge just how much I've learned about flash photography since it was originally written. I would never diffuse my flash this way now -the diffuser is just too small and it's better at blocking the light than at diffusing it...
Disclaimer: Hot gluing plastic to your flash may void the warranty. I am not responsible for any mistakes that you might make...
I know it looks like crap, but it works and I wanted something that didn’t stick out from the flash. I made it by cutting the plastic from a fruit juice bottle and then hot gluing it to the flash heads.
Note to Canon: Pretty sad that a $650 flash doesn’t come with a decent diffuser like the $450 MR-14EX–even the modeling lights on the MR-14EX are better…
A few notes on diffusing a flash: Due to the way that E-TTL metering works there is no need to adjust the exposure. The flash sends out a pre-flash burst that the camera uses for metering, so any diffuser won't make a difference since the camera will compensate for it automatically.
Choose the material for your diffuser carefully. The intensity of a flash is always the same, irregardless of the exposure. But the duration of the flash changes depending on how much light is needed to expose the scene. If your diffuser blocks a lot of light the duration of your flash is going to increase and it's possible that your photos will start to get soft due to motion blur because the flash is "on" long enough for your movements, or the movement of you subject, to become a problem.
Sunday, July 1, 2007
Shooting with an MPE-65mm macro lens
The MPE-65 does not really have a focus ring -it is always focused at maximum magnification. No auto focus either -the focus indicators in the view finder don't work as well. So you have to be good at focusing the scene with nothing to aid you other than the image you see in the view finder. I try to key off of textures like hair, scales, etc. If you are using a standard macro lens now then get use to focusing it without using the focus indicators in the view finder -it will make moving to the MPE-65 a lot easier.
There is a ring on the lens that controls a variable length extension tube, and as you turn it you can go from life size to five times life size and every magnification in between. So you will only be shooting macro with it -not possible to get a shot with a lower magnification than life size.
The advantages: No need to add or subtract anything from the lens -to adjust the magnification you just turn a ring. If you've ever juggled a lens and tubes out in the field you'll understand how easy it is for the MPE to spoil you!
Image quality is on par with "L" glass -I do very little editing and I can get the colors to "pop". As an example I opened the RAW file for this shot of a dragonfly in Elements 5's RAW editor but made no changes, then went into Elements and removed sensor noise, auto adjusted levels, and bumped the highlights by 5%, and removed a few dust spots. Saved the file and uploaded it to Flickr. Total time in post processing was less than two minutes -if it were not for the dust spots I wouldn't even bother shooting RAW...
The downside to every macro lens is the working distance. I wish the MPE had more, but I could say that about every macro lens. It's not about getting close to the critters -I can do that no matter what I'm shooting with. But it's nice to have a lot of room to maneuver when I'm trying to compose a shot. The dragonfly is one of two frames I took at 5x. The working distance is 1.6" from the lens -less if you subtract the MT-24EX macro flash. If you shoot above life size and enjoy it then the MPE-65 is worth the money. But, like me, you'll find yourself wanting a solution for closeup photography...
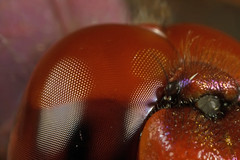
Sunday, June 24, 2007
Macro flashes and eating crow
Back when I was using the MT-24EX I struggled with glare. It’s a very powerful flash unit, and the light that it produces can be harsh. So I added Sto-Fen diffusers to the flash heads and it still wasn’t enough. Then I stuffed a variety of materials into the diffusers and got close to what I wanted but it wasn’t great. Finally I picked up an MR-14EX and it seemed to solve some of the problems I was having but glare was still an issue.
*sigh*
Since I’ve got an MPE-65 coming in the mail I decided to give the MT-24EX another try. Like always I set the ratio control to 4:1 and set the flash heads almost 180 degrees apart –and I got that ugly glare. Mark Plonsky looked at my photos and wondered why I was shooting at a 4:1 ratio since he rarely uses ratio control at all and when he does it’s never more than 2:1. What he does to get shadows is move the flash heads closer together (not 180 degrees apart) or he changes the angle of the flash heads.
I really felt stupid…
I should have thought about it myself, but instead I was stuck on setting the flash heads at opposite ends of the lens and using a ratio that guaranteed a bad reflection.
*sigh squared*
So I turned off the ratio control and set the flash heads at a 90 degree angle to each other. The results can be seen in the photo attached to this post. Nice shadows and the only minor reflection that I got were off of the fly’s wing –not bad.
Thanks again Mark for getting me to think outside the box!...
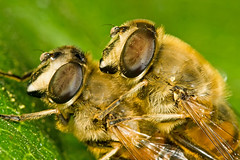
Friday, June 15, 2007
Focusing Tips
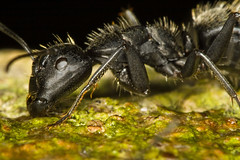
I often get asked how I get so much depth of field in my photos. There isn’t any magic to it really, it’s just technique. Here are some tips to help you get as much depth as possible.
Don’t be afraid to stop the lens down. Diffraction can be a problem, but I frequently shoot at F16 when I’ve got all my tubes and a diopter attached to my lens (about 2.75 times life size). Rarely does diffraction become a big issue with Canon’s 100mm macro lens unless you go above F16, and I’d probably shoot at F22 for life size shots if I needed the extra depth of field. If you don't like the diffraction softening then bring the Fstop down to F11 at 2x or F8 at 3x.
Remember that the plane of sharp focus is perpendicular to your lens and although it’s flat it has some “thickness” to it. If you move in toward a critter until its eyes are in focus, and then press the shutter release, then the plane of sharp focus starts at the eyes and ends somewhere between the critter and your lens –possibly out in the middle of nowhere in an area that you don’t need it! Often I move in toward an insect until the eyes are in focus and I keep moving in until they go out of focus again, and then I move away from it until the eyes are sharp and then take the shot. That way the area of sharp focus starts at the critter’s eyes and extends into its body where I need the extra detail…
Look for “magic angles”. Since the plane of sharp focus is perpendicular to the lens you can lay it over your subject so that it covers the critter like a blanket. You can make a scene look like there is more depth of field than what is really there. If you are shooting an insect from the side it’s a good idea to make sure the lens is perpendicular to the plane of its body so that the entire length of critter is in sharp focus –but it’s not necessary to do it all the time. You can use a shallow depth of field to draw the viewers attention to a particular area in a scene, so going for maximum depth of field all the time might be a mistake...
For the shot I’ve attached to this post I wanted the front leg to be in focus since an out of focus leg close to the ant’s face might be distracting. So I moved in until the eyes were in focus and then looked for “texture” –in this case the hair on the ant's legs. Once you’ve been shooting a particular critter for a while you can start to pick up on their unique textures. Body hair, scales, the lenses in the compound eyes, etc are all good examples. Use those textures as a visual clue to tell you when the area of sharp focus is where you want it to be.
I always take more than one shot of a particular composition, and I refocus the lens for every shot. I frequently shift the area of sharp focus from frame to frame just a little because sometimes a scene that looks good through the viewfinder doesn't look good when I get the image on my computer. Also shifting the focus can change the way a photo looks and feels -something that might not be easy to see in the view finder but very noticable on screen or in a print…
These are just tips and not rules etched in stone. How you use depth of field is a part of developing your own photographic style, so experiment and practice –lots of practice…
Happy shooting!
Footnote: After reading the first comment and looking over this post it dawned on me that I didn't mention the mechanics of focusing the scene. You can use the focus ring on the lens, or you can set the focus ring to any magnification you desire (most macro lenses have magnification marks on them) and move your body to adjust the focus. Either way is fine, and is really up to you. Last year I used the focus ring almost all the time and I locked my body in place. This year I use the "rock back and forth" method almost exclusively. And sometimes I use the focus ring like a course focus to get the composition that I want and then move my body to fine tune the scene. The best advice I can give you is to simply experiment and see what works for you...
Sunday, June 3, 2007
The Bazooka
My current rig for shooting above life size.
All Canon gear: Xti + 62mm of extension tubes + 100mm macro lens + 500D diopter. Magnification: 2.75x life size.
MR-14EX ring flash (notice that I have it turned so that one ring is on top of the lens and the other is on the bottom).
Novoflex Chest Pod with the neck strap and camera mount removed. Really Right Stuff 25mm ball head mounted to the chest pod. Normally I use it like a gun stock, but I can swing the whole thing down and use it like a miniature monopod if I need to.
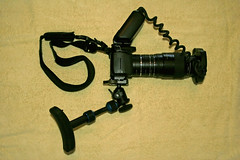
Using a Canon 500D diopter
In one of the conversations that I had with Mark Plonsky he mentioned that he had used a 500D diopter with his 100mm macro and he liked the bokeh that the diopter produced. Since I had been having problems with isolating the subject in the areas where I shoot, and I hate spending time in Photoshop doing things with the computer that I could be doing with the gear, I decide to give the 500D a try.
Mark, as usual, was right -the bokeh is excellent!
The 500D does take a little getting use to. I don't think that it gives me less depth of field, but it seems to compress the area of focus in the sense that a scene goes from being in sharp focus to being completely out of focus over a shorter distance. The area of sharp focus is the same as not using it, but the area between sharp and blurry is reduced -if that makes sense. Take a look at the background in the image with this post. I shot that female Violet Darter in a peach orchard, but all you see is s diffused sea of green due the way the 500D smoothes out the background.
There is no loss in image quality -period.
The 500D is designed to correct for chromatic aberration and it helps to keep the image circle sharp and, unlike an extension tube, there is no loss of light. The magnification that I get with the diopter is almost the same as a 25mm extension tube (1.375x for the 500D verses 1.39x for the 25mm tube). Given the choice between using the 500D and a teleconverter I'll take the diopter. But there is one problem...
Don't use a teleconverter with the 500D.
Stacking tubes between the camera and the lens with the 500D is no problem (all of my recent shots above 2x were taken with the diopter and tubes), but I wouldn't recommend using a teleconverter with the diopter -way too much glass and there is no increase in working distance.
I've had the 500D on the end of my 100mm macro lens since I've bought and only took it off once to shoot some bees in flight...
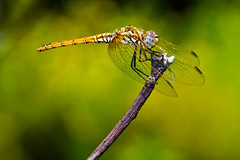
Friday, June 1, 2007
The Working Distance Myth
The Internet is filled with a lot of wonderful things. Unfortunately it’s also filled with a lot of misinformation. You’ll hear people claim that some lenses are better than others due to the working distance, and how one lens is a better “bug lens” than another because the working distance is better. Well, I’ve only been shooting macro for a year and a half but I’ve already learned one important aspect about shooting insects. Critters fall into two distinct categories:
Those that will let you get close and those that won’t…
It really doesn’t matter what macro lens you have attached to your camera. If an insect stays put, then it will let you get close and you’ll take a picture of it -period. The lens, and the gear in general, does not decide how close you can get –the insect does. Now you might find it easier to work with a 100mm lens over a 60mm simply because you’ve got more room to maneuver with the longer lens. But shooting with a long focal length macro lens will not guarantee close shots of anything.
You’re skill at getting close is what counts.
Take the head shot that’s included with this post. I saw several dragonflies that day, but few would let me get next to them. But I know from experience what to look for and when I spotted one feeding from a perch I tried my luck. I got the full body shot that I wanted, so I backed up and added 62mm of extension tubes to my Canon 100mm macro and the 500D diopter (it was already on the lens) for about three times life size magnification. This dragonfly really liked that perch –he was hunting bees from it and if you look closely at the whiskers you’ll see pollen stuck in them (click on the photo for a larger image). So I knew I could get close and the working distance of my 3x rig, 9cm (about 3.5 inches), made no difference. I know several shooters who are taking insect shots at life size and higher magnification with Canon’s EF-S 60mm lens and it has a working distance of less than 4 inches (about 10cm).
It’s not the gear that makes the difference –it’s you…
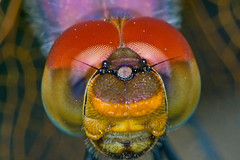
Monday, May 28, 2007
The Diffraction Myth
Don’t get me wrong, diffraction is a real problem. But it’s not as bad as some would have you believe. I thought my limit for shooting at three times life size was F8 –any higher and diffraction would rob me of the detail that I'd get from any increase in depth of field. At least that’s what I read. But then I saw Cyrus’s gallery and was blown away by the images! Granted, he is losing image detail to diffraction but the overall composition and lighting of the photos makes up for it.
It’s the image that matters –how you get there is irrelevant…
So after looking at Cyrus’s gallery, doing some experimenting, and deciding what my own acceptable level of detail is I made a few adjustments. I’m now shooting at 3x life size with my Fstop set to 16 instead of 8. I’m getting twice as much depth of field and there is still some detail in the ant’s compound eye. At F22 that eye looks flat and I don’t like it, but if I need the extra depth of field I wouldn’t hesitate to stop the lens down.
I could resort to focus stacking to get more depth of field as soon as someone tells me how to completely freeze an ant’s motion –without putting the critter in the freezer… ;)
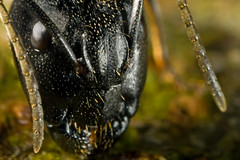
Wednesday, May 23, 2007
Pattern Recognition
I’ve been asked how I spot all of the things that I shoot. The simple answer is that I stop and look –but it’s hard to say that and not make someone offended ;)
But the more I shoot a particular critter the easier it is to find them, and I think it’s due to some sort of simple pattern recognition. There is so much information in a scene that the mind has to find a way to quickly process it all, and one way to do it is to throw out the objects that aren’t in memory and concentrate on the ones that are. After you start looking for a particular pattern that shape gets added to memory so that when you see it you know what it is, or you know that something is out place.
The more time you spend looking for an object the easier the pattern is to find.
Take the image with this post. I was shooting a single butterfly when I noticed an odd pattern at the end of that grain stalk. From the distance (about 10 meters) and the angle it looked like leaves, but leaves don’t grow that high on that pant. So I knew that something was out of place and I went over to check it out. Glad I did, because it turned out to be the very first mating pair of butterflies that I’ve ever seen outside of a magazine…
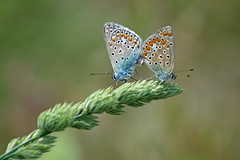
Saturday, May 5, 2007
Shooting Butterflies
As beautiful as they are fragile, butterflies are one of my favorite subjects to shoot –and one of the most difficult to get close to in the wild. I’m often asked how I get so close to them and here is what I’ve learned.
Shoot them when they are distracted.
Like all insects, butterflies are more likely to stay put if they are occupied. Go looking for them early in the morning when they are trying to dry out from the previous night’s dew and feeding. In the heat of the day they are very active and less likely to let you get close. Although I’ve never encountered a mating pair, if they are anything like dragonflies then you should be able to get close if you find a couple coupled ;)
Don’t act like a snake.
Predators, like snakes and lizards, move slowly when they are trying to get close to a victim and then speed up for the kill. If you get excited and speed up as you are getting close to a butterfly then you are simply mimicking the motion of a predator. Keep you movements even and slow…
Picture the image in your mind.
Know what image you want before you get into position and compose for it as you are getting close. Often a butterfly will only give me one or two frames before taking off so I have to picture the image in my head and position myself to get it –I won’t get the chance to recompose. If you have access to a butterfly sanctuary then go there and practice composition. If I had access to one I think my initial success rate would have been higher since I’d have a better understand of how to compose my shots.
Cast no shadow.
Butterflies are on just about every back yard predator’s buffet table and are hard wired to react to changes in light. If your shadow falls over a butterfly then you can forget about shooting it. Even flash photography can be a problem since butterflies perceive any change in light as movement. Most modern flashes produce a small pre-flash burst of light that the camera uses for metering, and butterflies are so fast that they can jump as the shutter is opening. If you find that you’re taking a lot of “action shots” of blurry, jumping butterflies then turn off your flash.
Use the focus ring.
One last tip that I, as a macro shooter, take for granted. Butterflies are also sensitive to vibration so you may have to turn off the auto focus on your lens and do it “old school”. Part of my success getting within inches of wild butterflies is probably due to the fact that I’ve almost worn out the focus ring on my 100mm macro lens.
Good hunting and good luck! ;)
Subscribe to:
Posts (Atom)