Sunday, February 24, 2008

40D First Impressions


Signs of Spring series 2-3
Originally uploaded by Dalantech.

This won’t be a review –there are at least half a dozen web sites out there written by people more qualified than me. This is just my initial few days with the 40D –an excellent camera for macro if I can just iron out a few bugs…

I'm having problems with flash exposure that I haven't been able to wrap my head around yet. I've solved a couple of problems already: With the 20D I had a bad habit of hitting the AE / FE Lock button with my thumb. On the 20D I could disable the button but all I can do on the 40D is switch its function with the AF ON button -and that just places it closer to my wandering digit. So I've started to get very conscious of that button and not hit it.

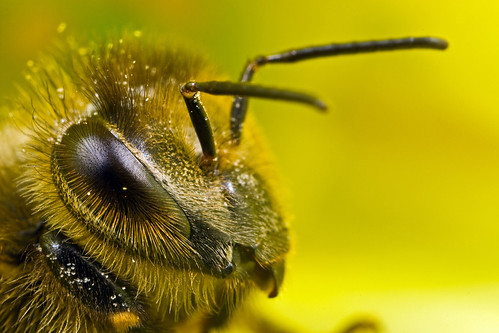
I have also taken a few shots where the flash fired at full power –ruined what would have been a real “wall hanger”. That kind of blow out is usually caused by the camera not communicating flash duration information with the flash, or the data is scrambled in transmission. Normally the fix is to make sure that the flash is seated properly on the camera’s hot shoe and tightened down. Unfortunately it’s not happening from the beginning of a shooting session –the camera and flash will be operating just fine and all of a sudden the flash will pump out enough light to genetically alter the critter I’m shooting. If you see a bee with six wings it’s my fault…

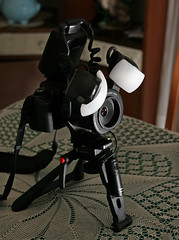
The 40D’s flash shoe is different, in that it was designed to mate up with the new weather resistant 580EX II. Maybe the MT-24EX just isn’t seating properly, the contacts on the flash need cleaning (a red eraser works very well for scrubbing corrosion), or I’m just not tightening the flash down enough. I’ll get back to you when I know something definite…

The last part of my recent adventure with the 40D is related to shooting at ISO 200. I’m use to shooting more at ISO 100 with the Xti (due to noise issues) but with the 40D I want to wean myself off of it and shoot at higher ISOs. It seems to me that, when shooting at ISO 200 and at life size in bright sunlight, there is so much natural light getting into the camera that it’s difficult for the flash to fire without blowing something out. The flash heads of the MT-24EX are just too close to the subject when I have them on the Canon mount. Setting the FEC to -1/3 to -2/3 has eliminated most of the “hot spots”. There does seem to be a difference in the way that the metering system in the Xti and the 40D. I think the Xti under exposed a lot, even the flash. The 40D is giving me more accurate exposures and I’m going to need some time to get use to it.

Can I recommend the 40D for macro? Sure –easy to do with the large bright view finder. But I think I should go back to ISO 100 for a while, iron out issues while I’m in my comfort zone, and then experiment with new techniques…

Footnote: I think my exposure problems are due to the light meter in the 40D -it's VERY accurate! The Xti would always under expose a little...

Friday, February 22, 2008

How I use the MT-24EX


Flash Head Position
Originally uploaded by Dalantech.
Due to the number of questions I’ve received lately I feel the need to do a step by step guide on how I set up and use the MT-24EX. But before I dive in there are a few things that you need to understand…

I’ve spent the last six months or so experimenting with the MT-24EX and looking for a way to get the light I want from a flash that, out of the box, is really harsh. I started by learning how a flash works by reading the HiViz web site and reading the tutorials at Strobist. There is a huge difference between getting good results with a flash and understanding how you’re getting the light that you’re seeing in your images. If you’re not willing to invest a little time to read those two sites then, IMHO, you should stop reading this post now. Odds are I’m going to confuse you in the long run because you’re not going to understand what you’re doing –and you’re not going to understand why the things that I do work…

The last disclaimer before we get into the nuts and blots of things: I am not now, now will I ever be, the last word on any photographic discipline. There are a lot of ways to get from point A to point B and I’m only giving you one of them –my way. Take what you read here and elsewhere and experiment. Make your photography look like it’s coming from you and not me –otherwise you will always be walking in my shadow…

Let’s get started by going over what I’ve learned about ratio control on the MT-24EX.

The light that the MT-24EX produces is harsh. Enabling ratio control just makes one flash head a lot harsher that the other –but the light is still harsh.

You do not need ratio control to get good shadows, so turn it off. The only time you should have ratio control enabled is if the flash heads are 180 degrees apart on the flash mount and even then if you have the heads angled differently you still don’t need ratio control. If you do feel the need to use ratio control then don’t set it higher than two to one –and keep in mind that I do not use it…

You can get really good shadows and images that look three dimensional just by placing the flash heads as close together as possible at the top of the flash mount. The image included with this post is how I have my flash heads positioned on the ring for 90% of the images that I take. The other 10% varies with the scene that I’m shooting, like if I’m trying to keep the flash heads from being blocked by leaves or other obstacles. It helps if you can visualize in your head how the light is going to hit the subject and then adjust the position of the flash heads on the ring. This next image is a prime example –there were flower petals close to the bee’s face and I had to play with the positioning of the heads to get the light from both of them into the scene. If you look at the reflection in the eye you can see where the flash heads were pointing.

Caught in the Cold series 1-2

I usually have one flash head at the very top center of the lens and the other flash head is off to the side. Which flash head is at the top or on the side depends on the subject. If the critter is facing to my left I turn the flash mount so that one flash head is to my left and the other is on top, and if facing to the right I turn the mount so that one flash head is on my right and the other is on top. It doesn’t always work though. This shot of a bee is good example since the bee has its face buried in a flower. Placing one of the flash heads to the right would cause the bee’s face to fall into a shadow from the flower. Again look at the eyes to see where I have the flash heads positioned –they are both toward the top of the lens.

Signs of Spring series 1-2

The angle of the individual flash heads can also make a big difference. I usually keep them both pointed directly at the subject and at the same angle. If I’m getting some glare that I don’t like and I have time to correct it then I’ll angle the flash head that’s causing problems either toward the lens or toward the subject –it depends on the scene. Also the magnification that I have the MPE-65 set to determines how I have the flash heads angled, and it’s kinda tough to show it in a photo so I’m going to do my best to explain it.

If you own the MT-24EX then you know that the flash heads make a clicking sound when you move them up and down. So as a starting point push the flash heads all the way down so that they are pointing toward the lens. For life size bring both flash heads up two clicks. For twice life size and higher magnification bring both flash heads up one click. My method of angling the flash heads at the various magnifications keeps them pointed directly at the subject, and it keeps the flash duration short. In some situations you might what to change the angle to eliminate bad reflections, but the angle that I set the flash heads to works most of the time.

You can also turn the flash heads from side to side, and you might want to depending on the subject and if you’re getting a bad reflection. But I rarely turn the flash heads.

Because the light from the MT-24EX is so harsh the key to getting the quality of light that I want from it has been to get the flash heads pointed right at the subject, get them as close to the subject as possible, and to diffuse them. The end result is that people are starting to think that my images are taken in natural light and that tells me that I’m on the right track. My goal when I started experimenting six months ago was to get flash photos that didn’t look like flash photos. But keep in mind that I’m still learning, still experimenting, and that you should do the same…

I’ll end this post with a shot that I took toward the end of last summer when I was working on reducing reflections –something that got me to think more about how the light was hitting the subject.

October Dragons series 4-2

Wednesday, February 20, 2008

Extension Tubes verses Close-up Filters

A frequent question that seems to pop up a lot is “What’s better; extension tubes or close-up filters?” and the answer isn’t as simple as some of you might think…

The general theory is that an extension tube is going to give you a sharper image because it’s an air gap and, unlike a close-up filter, there is no additional glass. An extension tube magnifies an image by increasing the size of the image circle that a lens projects onto the sensor, so the only negative aspect is a decrease in light reaching the sensor and a dimmer image in the view finder. On the surface that seems like a logical answer, but it’s just not that simple…

Non-macro lenses are designed to be sharp when focused toward infinity, and not when focused at the minimum focusing distance of the lens. Adding an extension tube to a non-macro lens just makes the problem worse since any image softness at the minimum focusing distance is just getting magnified.

But a close-up filter, like the 500D, changes the way that a non-macro lens focuses and it will actually cause a lens to be just as sharp at minimum focus as it normally is at infinity –something that an extension tube won’t do. The effect is so profound that you can see the difference in image quality without having to view a photo at 100% pixels. So the answer to the “What’s better?” question really depends on what lens you’re using…

If you’re shooting with a macro lens then you could argue that the extension tube is better, since a macro lens is designed to be sharp at minimum focus and the tube is just air. But as long as it’s a high quality, dual element, close-up lens like the 500D the image quality is just as good as using a tube.

There is one other advantage to using a close-up filter over an extension tube: The filter magnifies the light before it enters the lens, so there is no light loss and having a brighter image in the view finder makes focusing the scene a lot easier…

Tuesday, February 19, 2008

Exposing for Two Light Sources

Signs of Spring series 1-2
Originally uploaded by Dalantech.
Sometimes I like a black background because it helps to isolate the subject –very handy in situations where the background might ruin the shot because there’s just too much going on. But what about those situations where you want to show the subject in its natural environment? When shooting close-ups it’s easy: Just set you camera to shutter or aperture priority and use a little flash for fill. The range of exposures will be limited by the amount of natural light and the ISO you want to use, but you’ll get even lighting throughout the frame.

But what if you don’t want to be limited by the available light? What if you’d like to shoot at life size with a small aperture to get more depth and at the same time get some ambient light into the scene? All you have to do is put your camera in manual mode and set the shutter speed and aperture for the subject. In this case I set the shutter to 1/200 (the highest sync speed for the flash) and to F11 so I could get some depth. I set the ISO to 400 so that there would be enough ambient light to illuminate the background (the flash exposes the subject and I just let the camera's E-TTL flash metering do the work). The image attached to this post is the end result of a “dual exposure” –natural light for the background and flash for the subject and it works only in manual mode. If I had the camera set to aperture or shutter priority the bee would have been properly exposed but the sky would have been blown out.

The real trick here is to brace the camera and to shoot a subject that isn’t moving too much. There is some ambient light that’s reflecting off of the bee and getting recorded by the sensor –not much, but enough to make camera shake a potential problem. Although I didn’t use it, it’s not a bad idea to set your shutter to second curtain sync for this type of photography so that the flash is the last light source that the sensor records –it might help you freeze motion a little better if you’re having trouble getting sharp images using this technique.

Also if the ambient light is too harsh or colors don’t look saturated then lower the ISO. Likewise if the background looks too dark then increase the ISO until you get the color and light level you’re looking for. You could adjust your shutter speed as well, but it’s not a good idea because you might end up shooting too close to the ambient exposure for the subject and you might need a faster shutter speed to help freeze motion.

Too get a better understanding of how this technique works see this post at Strobist. Even though the scene is different, and he’s adjusting his shutter speed to shift the ambient exposure, the end result is the same.

Monday, February 11, 2008

Working with the New Diffusers


Feeding Seed Bug series 1-2
Originally uploaded by Dalantech.
Just a quick note since I haven’t posted much this month –I’ve been busy shooting. I’ve been using a technique that George Lepp is known for, and that is using one flash head as a fill light (to illuminate the area) and another as a key light to bring out details in the subject. But Mr. Lepp used two normal camera flash units on each side of the lens. With the Canon flash mount for the MT-24EX it can still be done, and it’s really pretty simple: I place both flash heads as close together on the ring as possible, but I turn the whole ring assembly so that one flash head is centered above the lens (the fill) and the other flash head is on one side (the key). I place the key flash on the same side that the subject is looking toward, so that the key light is pointed right at the critters head. How does it work? Just check out the image with this post: shot at twice life size this Seed Bug was, oddly enough, eating a seed between the cracks in an old stone wall. The key light is on the left and the fill light is at the very top of the lens. Notice the detail in the bug and the absence of any reflections.

I’d say the Gary Fong Puffer diffusers are doing pretty well… ;)

Friday, February 1, 2008

Macro Rig for 2008


My Current Macro Rig
Originally uploaded by Dalantech.
At some point you have to stop experimenting and just get out and take photos, and after a lot of trial and error this is pretty much the rig that I’ll be using this year. I’m going to describe what’s in the photo to the right and then talk about the new diffusers.

I have the camera mounted on an Ergo Rest Multi Stand Tripod. I don’t use it if I can brace an elbow on my knee, but when I’m standing I can swing the wide two leg section out and brace it against my chest. Horizontal camera movement is pretty easy to control, but vertical movement isn’t and that’s what the Ergo Rest eliminates.

I have a remote release cord attached to the front leg of the Ergo Rest with Velcro. I use my right hand to hold the tripod and trip the shutter while adjusting the magnification with my left. I also use the tripod when shooting close-ups with a telephoto lens –very stable…

The rest is pretty standard hardware if you are a regular reader of this blog: Canon Xti (has been replaced with a 40D) with an MPE-65mm macro lens and an MT-24EX macro twin light flash. With the MPE-65 magnification starts at life size and can be increased all the way to 5x but there is no infinity focus –so this setup is strictly for macro photography.

Let’s talk about those diffusers…

Looking at the photos I took last year I noticed that the light was more diffused as I increased the magnification of the MPE-65. I’ve used all sorts of plastic hot glued directly to my MT-24EX to try to soften the harsh light it produces, but I wasn’t getting good diffusion with it until I hit about 3x.

I’m a big fan of Strobist, and no matter what photographic discipline you’re into his articles on light are priceless! His piece on Apparent Light Size got me to thinking that the diffuser I was using wasn’t large enough, since his rule of thumb for subject distance to diffuser size ratio is 2 to 1. As the magnification increase the working distance between the lens and the subject drops, so eventually I’d reach a point where I’d hit that 2 to 1 ratio with my diffuser and the light would get soft. But for a subject distance of 4 inches at life size I need a diffuser that’s at least 2” –not one that’s no bigger than the bare flash head.

After looking at Gary Fong’s Puffer Diffuser I thought I’d give it a try since it looked big enough and maybe the fact that it’s curved instead of flat would reduce reflections even further. A bit of a leap since I wasn’t sure if the diffusers would fit on the flash heads or if the flash heads would then fit on the standard Canon flash mount after I attached them. But not only are they just about a perfect fit for the MT-24EX, but I can put the flash heads on the Canon mount and they don’t touch –there’s about a centimeter and a half of clearance between the two diffusers when the flash heads are pointed all the way down. With both flash heads as close as I they can be I get about 160 degrees of light, and by turning the flash mount I can choose where the shadows will be.

New Diffusers

The end result of all that diffusion? The photo at the bottom of this post was taken at 2x. Notice how soft the shadows are and how “warm” the light looks…


Jumper 2008 series 1-3


If you don't want to use hot glue on your flash heads I'm sure double sided tape or Velcro would work just about as well.