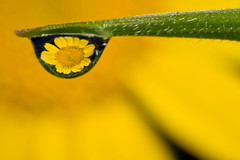
Here’s a fun and easy thing to do when you’re out early and you can’t find any critters. Just pick a wild flower (I chose a daisy for this shot) and place it about an inch (2.54cm) behind a blade of grass that has a dew drop hanging from the end of it. Look for a drop that’s about 2mm in diameter (the bigger the better) and shoot the refraction of the flower at twice life size. I set my aperture to F14 just to get a good balance between depth of field and image sharpness. The only hard part, at least for me, was getting the flower sharp in the dew drop –the area where I was shooting was shaded and the modeling lights on the MT-24EX are almost a joke. I also paid attention to the angle I was shooting at since I wanted to get as much of the grass blade in focus as possible, and I was looking for a dual composition –the flower in the drop and the out of focus flower in the background.
Shooting the refraction of an object in a dew drop isn’t a new idea –far from it. But I like the results and it’s something to do on cool mornings when the critters are still sleeping :)

Monday, January 28, 2008
Wednesday, January 23, 2008
Shooting Close-ups in Harsh Light
Last year I took a lot of close-up photos but I shot like a landscape photographer in that I waited for the good light. Of course you get the best color and contrast early in the morning, late in the evening, or on days with light high altitude clouds. Shooting in low contrast light makes colors pop. But there are times when the light is harsh and I want to shoot close-ups. Unfortunately there aren’t too many options that will work without causing the subject to take off…
What I did for the image with this post is to shoot in aperture priority with the camera set to -1 EV. I took it in noon day sun, but under exposing by a stop caused the background to darken and the color in it to saturate a little. I also set the flash to -2 FEC and diffused it with a Lightsphere II aimed directly at the subject.
But after discussing the problem of shooting in harsh light at the Strobist Flickr Group I felt kinda stupid. One shooter suggested that I use the sunny 16 rule with a diffused flash. Well it would be pretty simple to just set the ISO to 100 and the shutter to 1/200 and I’d be at about -1 EV at F16. So that’s how I’m going to have my camera setup the next time I’m shooting close-ups in harsh light, dropping the Fstop down if I need more light to maintain the -1 EV under exposure. I’ll use the same diffused flash only this time set to 0 FEC and just let E-TTL take care of the exposure for the subject.
Now all I have to do is wait for the weather to change –it’s turned cold again…
Footnote: I had a chance to experiment yesterday and I've made a few changes. The image stabilization on the 70-200 F4 L IS works with the 500D, but it takes a few seconds to stabilize and by the time the image gets steady the critter is gone or in a position that doesn't work. So I turned the IS off and set the exposure to F11, 1/400, and ISO 100. That's still the sunny 16 rule at -1 EV but with an Fstop that gives me the best combination of depth and image sharpness.
Monday, January 14, 2008
Baby’s Breath Deconstruction
I thought I’d take an image and explain how I took it. If these types of posts turn out to be popular then I’ll do more of them this season.
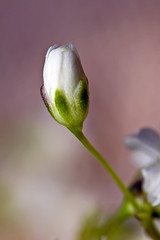
The subject in this image is Baby’s Breath, a very common flower that you always seem to get as dressing for bigger flowers. I thought they might look good under a macro lens and after a little trial and error decided that they looked best at twice life size. I also wanted the depth to be very shallow to emphasize single flowers and to keep the threads in the cloth that I was using as a background from showing up in the image (more on that cloth later). Last I set the ISO to 100 because I wanted to keep the noise as low as possible since I would be under exposing the images to saturate what little color is in the flowers.
I set the MT-24EX to +2/3 FEC for an under exposed image –nope, not a typo. The flowers are white so most of the pre-flash that the MT-24EX sends out for the camera to meter off of will get reflected back to the light meter and it will react to it by setting the exposure too low (the duration of the main flash will be too short). Even though I set the MT-24EX to +2/3 FEC the resulting photos still came out 1 full stop under exposed…
Under exposing causes the colors to saturate later when I bring up the exposure in post processing. It also keeps the flash from blowing out the fine details in the flower petals.
With the lens at F8 the depth of field is shallow at 2x, so I chose to use the green “petals” underneath the flower as my point of sharp focus. If that area of the image were out of focus, or even a little soft, you’d notice it and the composition as a whole might not work. The depth also kept me from getting too much detail in the cloth that I was using as a background. I wanted it to show up as a “grain” in the back of the images, but not in a checkerboard pattern where you could see the individual threads.
I placed the MT-24EX’s flash heads on the Canon supplied flash mount and positioned them both at the top of the lens so that they would act as a single light source –something that I think looks better when shooting a flower. I’m currently using pieces of a LightSphere II that I hot glued to my flash heads to diffuse them. The resulting light has a really good quality to it that just seems to make colors “pop”. Also since the working distance was short, and I was getting a lot of reflected light off of the table cloth, the light from the flash wrapped around the flower. It wasn't even, so it doesn't look flat. But the contrast was low and the shadows weren't too heavy.
Post processing in Elements 6 was simple: This was going to be a series of images and since I was in full control of the light I wanted to process all of the them in the same way to maintain a constant look. Initially in RAW I used the “auto” option on all of the photos, but after reviewing the images I've decided that they look better if I leave the exposure alone and simply adjust levels later to lighten the images. It looks good and it was an easy way to keep the photos consistent.
I set Clarity to 50, Vibrance to 35, and Saturation to 20. I also adjusted the Luminance and Color noise reduction while viewing the image at 100% -something that there is no science for so you’ll just have to see what looks good to you.
In the main editor under Enhance / Adjust Lighting / Levels I used the Auto option and since it looked good I kept it. With some images I just set a black point, and I tried that with this set but I didn’t like the results. Also under the Enhance/ Adjust Lighting menu I went into Shadows / Highlights and set Darken Highlights to 5% and Midtone Contrast to 10%. These are settings that you’ll have to play with –there is no right or wrong here. The settings I chose just fit what I was looking for.
I then used the Enhance / Auto Sharpen option to sharpen the image. Not too necessary with this type of photo since I’m not going for high detail, but it does make the prints look better. Also the auto sharpen option in Elements is the only sharpening that I do to an image other than the default sharpening that’s applied by the RAW editor. There are a lot of people out there who say that you have to sharpen a digital image, and I don’t disagree with them. Unfortunately none of them can agree on how much to sharpen photos so I stick with auto sharpen since it won’t over sharpen an image.
Last I rub out dust spots with the Spot Healing Tool and sometimes use the Close Stamp Tool as well (depends on where the dust is). I then add my copy right to the EXIF data via the File / File Info menu and save the image as a JPG. Total time in post processing: Less than two minutes. Although how I take a photo changes depending on the subject and what I’m trying to do with the image my post processing routine is always short –I’d rather put more time into my technique with the camera.
Sunday, January 13, 2008
Dead Time
Just a post to let the three people who read this blog know that I'm still here -kidding of course (there are at least four of you ;) ). Not much going on right now. The weather is typical for January with sunshine one minute and rain the next. I wanted to do some experimenting with blending natural light and flash while shooting closeups but the sunlight is too "cold" today (way too overcast). So I shot some coins for a challenge over at the Fred Miranda Macro Forum while I'm waiting for better conditions.
I'll also be testing a new flash bracket soon. Novoflex makes one with adjustable rods that they call, oddly enough, a flash bracket with adjustable rods. Someone in marketing needs to go back to school for that one. No idea how well it will work, so don't go out and buy it yet -wait for me to play Guinea Pig and save your money... ;)
Hopefully the weather will start to warm up and I can get back to chasing critters with the camera...
Wednesday, January 9, 2008
Getting Published
I was contacted via Flickr by a teacher in Singapore who was writing a book for elementary students and he wanted to use one of my photos. Their budget is small so they can’t afford to pay for images, but they were more than willing to give me a photo credit in the book. Of course I said yes –the idea that my work would be useful to school children is incredibly satisfying (I teach about networking and computers in my day job). But I was curious about which image he wanted to use so I sent him a Flickr mail but got no response.
So I asked again, still nothing.
I asked one last time (adding that I wasn’t sure about the image he wanted to use since I have almost 1000 photos in my gallery) but my hopes were starting to fade. I’ve had people ask me for permission to use my images before only to never hear from them again. But he did contact me with this message late last night:
“Hi John,
Actually, its 2am here and my work here has stopped for tonight because I have spent the last 2 hours looking at your 1000 photos!! They are the best macros I have come across!
With your permission, I would like to include about 10 images into the books - we have many chapters that include references to arthropods. Because we are only in the prepress stages, I do not know exactly which images will make it to final press. Basically, I have downloaded 10-15 images and have asked the designer to incorp.
Please do give me your direct email and I will keep you informed. You can contact me at (email address withheld).
Thanks again
Matt”
I’m looking forward to seeing the book :)
If you are an instructor and you need images for a book or magazine article just send me an email and we'll work something out. All it cost Matt was a photo credit and a link to my gallery in the book...
Saturday, January 5, 2008
Keep Trying Different Things
While I was in the toy section of a store with my yungins today I saw some Creepy Crawlers Official Plasti-Goop (it’s some sort of liquid plastic). I wasn’t going to buy the stuff for my 6 year old daughter and 4 year old boy –not if I wanted to stay on my wife’s good side at least. But as I was looking at the stuff I wondered how well it would work in my water drop studio so I bought some of it.
After several attempts I just couldn’t come up with a decent shot of a splash and it took a little while to realize that the liquid plastic was just too viscous –if I could drop it from a couple of meters I might see something, but otherwise the force of the impact wasn’t enough to produce a splash. Not wanting to give up I decided to put some of the yellow Plasti-Goop on my splash target and hit it with some milk that I had colored blue just to see what would happen.
Well I got the plashes I was looking for and the milk wouldn’t mix with the liquid plastic, so I could take multiple photos and not get a puddle of green on my splash target. The resulting images are some of the best splash photos I’ve taken to date and my wife doesn’t think I’m crazy for playing with a kid’s toy ;)
Friday, January 4, 2008
Honest Analysis
My photography greatly improved once I reached a point where I could take a look at one of my images and really pick it apart. If one of my images sucks I'm the first to admit it -and the last because those shots normally get deleted. I was going to make a post about being able to honestly analyze your own work but Strobist beat me to it and after reading his post I can't top it, so go on over and check it out yourself. Here's a quote:
"If you can be easily swayed by what the other people in the room think of your shots (good or bad) you begin to be less of a thinking photographer, and more of a weather vane. This inhibits your growth as a photographer and will almost certainly preclude you from developing a strong personal style."
Well said...
Subscribe to:
Posts (Atom)