Sunday, August 18, 2019

Do No Harm

Feeding Sawfly
National Geographic posted an article concerning How to photograph wildlife ethically and I wanted to write on the subject from the perspective of a macro photographer. If I'm being completely honest, and if I didn't want to stress out any of my subjects, I probably wouldn't shoot any higher than 1/3 life size and I'd use a 300mm prime that would give me a working distance of about two meters. Sometimes I get lucky while photographing a dormant subject and it wakes up either completely acclimated to me, or I'm so large in its field of view that it really can't recognize what I am. That's pretty much what happened with the Sawfly pictured to the right. It just woke up and decided to have breakfast. But not every dormant subject that gets active finds my presence acceptable. When this European Wool Carder Bee managed to get its metabolism going it went into full "fight or flight" mode, and I barely had time to take this single frame...

Wool Carder Bee on the Move


While talking to my wife about not stressing out the critters by getting too close she reminded me that gardening does the same thing...

Bating Subjects

Taking macro photos of insects that are already active, and by active I mean they are in motion all the time (lets exclude the occasional cooperative jumping spider), is pretty much impossible without a little help in the form of bait. But there's a right way and a wrong way to do it. One of the better ways to give a critter a reason to stick around is to inject a flower with either some simple white sugar syrup, or Agave Nectar. It will modify their feeding behavior, because they'll start passing over flowers that haven't been injected in favor of the ones that have. But at least the resulting image will be of a bee feeding on a flower and after a little while they'll go back to their normal foraging habits.

Feeding Honeybee VIII

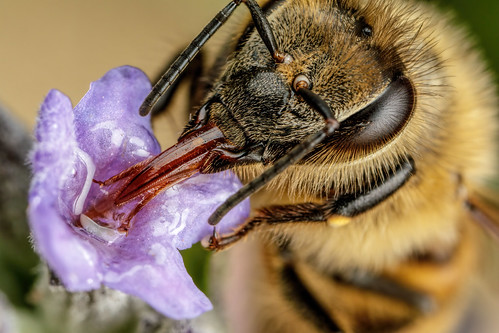
I'd avoid indiscriminate spraying of plants with sugar water though. The resulting images will be of an insect licking a leaf, which they normally don't do, and it's a big departure from their normally feeding behavior. It's also a bad idea to put out so much bait that you end up emptying out a hive or attracting a swarm. One word of caution though: Sometimes baited bees start aggressively competing with other insects for the sweet stuff, and they might not recognize you as the one that's putting it out. So if they do seem to be getting aggressive, and increasing in numbers, it's best to back off and try again some other time. Sometimes they'll realize that you're the one putting out the bait, and you can pull off shots like this one...

Finger Fed Bumblebee


Focus Stacking

If you follow my photography you know I don't focus stack. Not that there's anything inherently wrong with it (almost, will cover that in a second), it's just that focus stacking comes with some of the same limitations as using a tripod and a focusing rail -you gotta find a subject willing to sit still long enough to finish all the frames for a stack. Since I prefer to shoot semi-active to hyperactive subjects that are moving, focus stacking pretty much isn't an option. But if you stack you can do it in an ethical manner. Photographers like LordV (Brian Valentine) helped to popularized focus stacking more than a decade ago and Brian, to my knowledge, has never harmed a subject for a photo. He's always left them like he found them, alive and kicking. But there's been a disturbing trend over the years to take ever increasingly sharp images of the small world's inhabitants that's led a lot of focus stackers to either refrigerate, or euthanize, their subjects. IMHO macro photographers have a responsibility to change hearts and minds concerning insects, to get people to see them as more than "just bugs" before we send them all into history by either poisoning them out of existence with chemicals or starving them to extinction by reducing their habitat. Killing a critter for a photo sends the wrong message, and people are pretty much bored with seeing razor sharp photos of dead insects. Some of you may claim that you're killing and focus stacking your subjects in order to catalog them. But the folks at the USGS Bee Inventory and Monitoring Lab are not only doing a better job of photographing dead critters than 99.9% of you, they are infinitely more qualified. Add to that the backlash I've seen on social media to dead insect photography and you're better off switching to lethargic subjects to get your focus stacking fix. Although the general perception is that the subject is dead in every focus stacked image, and it makes me feel sorry for the folks that have some genuine skill focus stacking live critters.

As always if you have comments or concerns just post them. Comments are moderated, but I post all of them unless you're selling yourself (that's the reason why moderation is enabled -sigh). Until next time happy shooting!

Footnote: I can't help but think that some of the people who focus stack are taking an ungodly number of frames just to one up each other, or for bragging rights. There has to be a point of diminishing returns, and it makes me wonder if they're into macro photography just to focus stack. Kinda boring, to be honest...

Sunday, August 11, 2019

Sharpening a Diffraction Limited Image

Leaf Cutter Bee IV
I've been shooting single frame macro for over a decade, and yet I still get asked "How many frames did you take for that focus stack?". There are two key aspects to getting a lot of apparent depth and detail in an image. The first is looking for and/or creating Magic Angles. I'll frequently look for an area in a scene where I want the focus to start, lock that area so that it stays in focus, and then twist and turn my wrist to push another edge of the camera's sensor deeper into the frame. A recent example is the image to the right. I focused on the leading mandible, locked that part of the scene in place, and then pushed the upper left corner of the camera deeper into the frame while twisting my wrist to the left. Very minor movements to be sure but once you build up the muscle memory for it gets easy, and after a while you'll create those magic angles without having to really think about it.

The second thing you can do to make people think that you focus stack when you don't is to get good at sharpening your images in post. I want to make it clear that what I'm about to tell you won't allow you to recover detail that you didn't capture with the camera. Once you press the shutter release you've captured all of the detail that you're gonna get. Sharpening an image will highlight edges and fine details so that you can see where one element of the subject stops and another one starts. Like the edges between a critter's compound eyes. But diffraction, to varying degrees, is going to eliminate some texture detail. I keep my flash as close to the subject as I can (to keep the duration of the flash to a minimum) and use techniques that keep the motion in the scene to a minimum so that diffraction doesn't get amplified by motion (an effect that I call Macro Motion Blur). So the detail that I'm losing to diffraction is kept to a minimum, so all I have to do is carefully sharpen an image so that the edges between different features in the subject are clearly defined. The hard part is sharpening an image without introducing any obvious artifacts that are going to make a shot look over sharpened. To see how I do it lets start with what is pretty much a worse case image for me, a shot at 5x and F11. For this first image I've adjusted exposure in the Photoshop Elements RAW editor, and I've rubbed out the dust spots. But there is no in camera or in post noise reduction or sharpening.


Link to full size image.

Now I'll be the first to admit that I need to get better at post processing, in fact I consider it to currently be the weakest area of my photography. But I am learning, and one of the things that I've realized is that it's better to sharpen an image in stages than to do all of the sharpen at once. To do that I use two Topaz Labs plugins, applications that I bought and paid for with my own money (so this isn't an add in disguise). The first is Topax Labs Denoise AI. It's really good at removing image noise and preserving detail, and I like to remove sensor noise before I apply a sharpening layer. But Denoise AI is going to sharpen the shot a little. Here's the same image as the first one but I've created a new layer and I ran Denoise AI:


Link to full size image.

I then created a new layer from the one and ran Topaz Labs Sharpen AI. Sharpen AI has some pretty cool features that can allow you to recover an image even if there is motion blur. Not gonna recover any lost detail, obviously, but it could potentially mean the difference between having a photo you can use verses one that you sent to your digital trash can. Here's the frame after sharpening with Sharpen AI using the focus option:


Link to full size image.

The last thing I do is duplicate the layer that I sharpened and run Topaz Labs Clarity, mostly for contrast and saturation adjustments but it too will sharpen an image a little bit more. Here's the final shot:


Link to full size image.

Not too bad for a photo taken at 5x and F11, and I could probably sharpen the image a little more but didn't want to push it. That's all for this one folks, until next time happy shooting!

Footnote: The quality of the light that you're using also plays a part in how much detail you can capture with the camera, as well as how much you can push the sharpening in post. A poorly diffused light source creates a lot of micro contrast (areas in the scene where the pixels are blown out). A photo with a lot of micro contrast will look "artificially sharp" and at first I thought it wasn't a bad thing. But all those little areas of blown out pixels not only rob the scene of detail, but they also limit how much an image can be sharpened in post before it looks over sharpened. So light that's very diffused actually works best, even though the out of camera sharpness seems reduced when compared to an image taken with less diffused light. So many variables...

Monday, August 5, 2019

What do the Tech Specs Mean?

Before I get into the "meat and potatoes" of this article I gotta explain a few things. How I take a photo, or how anyone takes a photo, doesn't matter. The only thing that does matter is the final image. So why post the tech specs with my photos? Well for two reasons really. The first is so that I have a historical record of how I took a shot, and in the future if I want to have another go at a particular composition I at least have a starting point. The second is that inevitably someone is gonna ask me how I took a particular image, either because they are a macro shooter or they just took an interest in one of my photos. People generally don't care about how an image was taken unless there is something about it that gets their attention. With that being said I'm going to explain, in some detail, what the tech specs mean and try to give you a sneak peak into my thought process. So lets use a photo that I posted just this morning.

Snoozing European Wool Carder Bee VI


This is what I posted with that image:

A snoozing European Wool Carder Bee. This time I set my Canon MP-E 65mm to 5x.

Tech Specs: Canon 80D (F11, 1/250, ISO 100) + a Canon MP-E 65mm macro lens (5x) + a diffused MT-26EX-RT with a Kaiser adjustable flash shoe on the "A" head (the key), E-TTL metering, -1/3 FEC, second curtain sync). This is a single, uncropped, frame taken hand held.

Canon 80D (F11, 1/250, ISO 100)

I start out by posting the camera I used to take the shot and how I have the camera configured. For this image I set the Fstop to 11. I really don't care about diffraction softening since the techniques that I use allow me to take control over the motion in the scene, my motion and the subject, so diffraction softening isn't going to be that bad. Most of the image softness that gets blamed on diffraction is actually an effect that I call macro motion blur. The flash isn't going to be able to freeze all the motion, especially as the magnification goes up since the flash is going to have to turn on longer to expose the scene. The longer the duration of the flash the more of a problem motion becomes. 1/250 of a second because that's the max flash sync speed for the Canon 80D. If I could sync the flash at a higher speed I would, since I want to avoid any natural light being recorded by the sensor for that photo. High Speed Sync (HSS) does not work for this type of shooting, since HSS pulses the flash while the shutter is open and any movement will get recorded. A single burst of light from the flash is better for freezing motion. ISO 100 just because I want to take advantage of the low noise and high dynamic range of the 80D at that ISO. Although I can get perfectly usable images all the way to ISO 400, I prefer to shoot at ISO 100.

+ a Canon MP-E 65mm macro lens (5x)

The Canon MP-E 65mm macro lens is the reigning king of macro lenses. I'm not a Canon fan boy, I'm just spoiled at being able to look at a scene and simply dial the magnification to exactly what I know I'll need for the framing that I want. Also note that when I say 5x, or almost 3x, or whatever I'm listing the magnification that I read from the lens barrel (the MP-E 65mm has magnification markings on it). Some of you, incorrectly, think that the crop factor of your sensor is giving you more magnification. But you'll never reveal more detail in a scene by cropping it, either with a smaller than full frame sensor or in post (both cropping mechanisms are the same). There are lot of misconceptions about crop factor sensors.

+ a diffused MT-26EX-RT with a Kaiser adjustable flash shoe on the "A" head (the key), E-TTL metering, -1/3 FEC, second curtain sync)

I've been using macro twin flashes for a long time, not because it's the best flash for macro but simply because they fit my photographic style. I spent, off and on, about three years experimenting with different diffusion materials to get to the diffusers that I use today. I like shooting with two light sources in a key and fill configuration, just like portrait photographers use, because it allows me to partially wrap light around the subject and I have a lot of control over where the highlights and shadows are going to be. Putting the key on a Kaiser Adjustable Flash Shoe allows the key to be at a different angle relative to the fill, and makes the subject look more 3D. I use E-TTL metering, along with a little Flash Exposure Compensation (FEC) because I don't have time to adjust the flash manually when dealing with semi active to active subjects. Second curtain sync just helps to give me a sharp image if there happens to be enough natural light for the sensor to record -the flash will fire right before the shutter closes so any motion is frozen at the end of the movement by the flash. You can see a video of my current rig, and get some more info on the light, in this blog post.

This is a single, uncropped, frame taken hand held

All of my images so far have been single, uncropped frames, taken hand held (except for some water drop splash shots I took several years ago using a table top support). I don't focus stack for the same reason I don't use a tripod: Both are just too limiting. I also don't allow myself to crop in post, and prefer to do all of my framing with the view finder. Anyone who tells you that cropping is suppose to be a part of your post processing is trying to sabotage your photography. Framing with the view finder will hone your composition skills, and framing with the cropping tool in post won't. Also I frequently see other compositions while I'm framing for a shot, and if I were to see those same compositions while cropping an image in post it would be too late to take them.

That's all for this one, if you have any question just post them and I'll get to you as soon as I can. Until next time happy shooting! :)

Footnote: Here's a short video showing the field studio that I set up for the image in this article.