Flash macro is an exercise in Catch 22s -it really is a no win situation sometimes. The best light for both portrait and macro work is light that’s soft and very diffused. A portrait shooter has all kinds of studio sized toys to play with to get the light just right. Most portrait photographers also use the edge of their lights on the subject, rarely resorting to pointing the flash directly at the person they are shooting.
A macro photographer, for the most part, can’t carry all those goodies out in the field. If you want to be flexible enough to shoot a wide variety of creatures then your lighting gear has to be small and easy to manage. There’s also one other little problem;
The best light for macro is direct, in the critter’s face, lighting…
Flash macro is really nothing more than a form of high speed stop motion photography. The flash duration has to be low so you can freeze the motion of the subject and, if you hand hold the camera like I do, you also have to freeze your own motion. Short duration bursts of light from the flash mean sharper images (even if you have your rig on a tripod). So getting the flash close to the subject, and pointed directly at it, is almost a must. But then you have to worry about glare and about the quality of the light being too harsh.
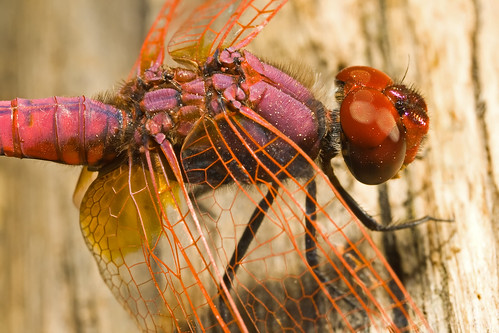
So last night, armed with a pair of heavy duty scissors, I cut up a Lightsphere II Cloud diffuser and hot glued a strip to each of my MT-24EX’s flash heads. I had been using the L2C for some other lighting projects around the house and was amazed at how good it was at giving me the quality of light that I like, even when I was shooting directly through the diffuser while hand holding one of the MT-24EX’s flash heads. As luck would have it I no sooner finished with the hot glue gun when one of my yungins spotted a huge fly in the house. The image with this post is the result of my first session with the new diffuser. It’s the quality of light that I’ve been looking for –warm, diffused, great color (even in a critter that doesn’t have much color to begin with). Plus I had the flash heads on Canon’s flash mount pointed directly at the fly and my flash duration, as judged by the recycle time of the flash, was short. Once I slipped at 4x and took two shots back to back and both times the flash fired. It wasn’t even a fresh set of NiMH batteries…
Sorry Mr. Fong for butchering one of your diffusers -but maybe you should be making them for macro too…

Sunday, December 30, 2007

Saturday, December 29, 2007
Saturday, December 22, 2007
Water Drop Studio
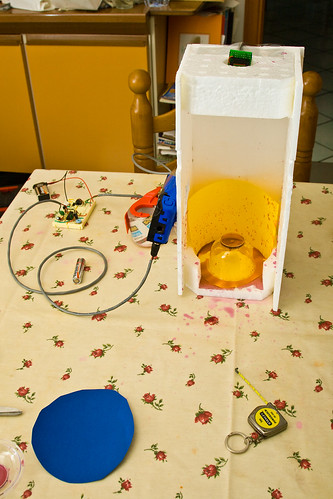
Setting up some sort of delay timer for water drop photography has been something that I’ve wanted to do for a quite a while. There are a lot of pre-built controllers out there, but I wanted to roll my own after seeing the kits at the HiViz web site. So I ordered the last kit on this page and received it a few days ago for $25 USD counting first class priority shipping.
I have a remote cable on order for my Xti and I was going to use the controller to trigger the camera so I can use multiple flashes. But I couldn’t wait to try out the new “toy” so I picked up a couple of used disposable cameras from a local shop and rigged the trigger circuit to the switch in the camera that controls the flash. I also soldered over the switch that you would have to hold down to get the flash to charge. One word of caution: There is a large capacitor inside the camera that could still have a charge even after the battery has been removed. If you follow me on this project then be careful when you open the camera, and use an insulated screw driver to discharge the capacitor (just place the screw driver across the capacitors leads). You can get instructions on how to take apart a disposable camera from Make. They also have a kit in the Make store for 120 USD that looks pretty good, and if you what a controller with an LCD display there is the Mumford Time Machine.
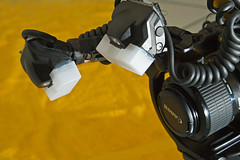
I took the Styrofoam ends from the box that my 70-200 F4 L IS came in and hot glued some foam panels that I had from some other box. I made the tower small thinking that I’d need as much light as possible from the disposable camera’s flash. It turned out that I could shoot at ISO 100 and F22 and get images that were a little over exposed. The next “studio” will be bigger so I don’t get water on the material that I’m using for a background…
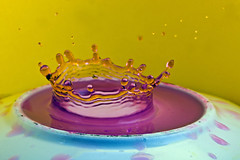
The next studio will also have an easy way to set up flowers and photos so that I can shoot water drops falling in front of them (the image gets refracted in the falling drop). For now here is a shot of “Beta Studio 1”:
I have a remote cable on order for my Xti and I was going to use the controller to trigger the camera so I can use multiple flashes. But I couldn’t wait to try out the new “toy” so I picked up a couple of used disposable cameras from a local shop and rigged the trigger circuit to the switch in the camera that controls the flash. I also soldered over the switch that you would have to hold down to get the flash to charge. One word of caution: There is a large capacitor inside the camera that could still have a charge even after the battery has been removed. If you follow me on this project then be careful when you open the camera, and use an insulated screw driver to discharge the capacitor (just place the screw driver across the capacitors leads). You can get instructions on how to take apart a disposable camera from Make. They also have a kit in the Make store for 120 USD that looks pretty good, and if you what a controller with an LCD display there is the Mumford Time Machine.
I took the Styrofoam ends from the box that my 70-200 F4 L IS came in and hot glued some foam panels that I had from some other box. I made the tower small thinking that I’d need as much light as possible from the disposable camera’s flash. It turned out that I could shoot at ISO 100 and F22 and get images that were a little over exposed. The next “studio” will be bigger so I don’t get water on the material that I’m using for a background…
The next studio will also have an easy way to set up flowers and photos so that I can shoot water drops falling in front of them (the image gets refracted in the falling drop). For now here is a shot of “Beta Studio 1”:
Sunday, December 16, 2007
Really Right Stuff Hacking
This past summer I did a lot of experimenting with the MT-24EX flash heads and placing them in different positions to see what effect it would have on the lighting. I finally settled on one flash head centered above the lens and pointed directly at the subject to bring out the details in it (it works really well especially in the shadows) and the other flash head next to it, but up above the subject to illuminated the area around it. I can also point the second flash head toward the background if I want to light that area.
It worked out really well, but I was using a small Novoflex ball head to get the second flash head where I wanted it, and it was a pain having to adjust it every time I put the rig together. I also didn’t need the kind of fine control that the ball head offered, so I went looking for a better way to position that second flash head.
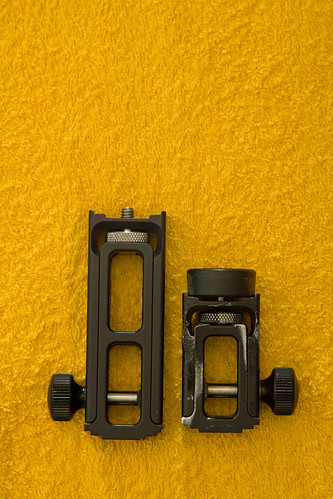
Fortunately I have a friend who can weld aluminum and he cut one of my Really Right flash extenders in half and welded it back together for me. Here are some images of it next to a non modified extender.
Both extenders closed:
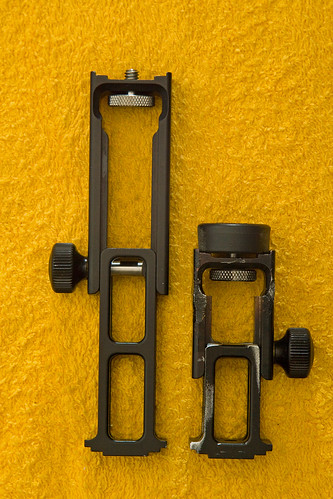
Hacked extender open:

Both extenders open:
Here is an example of the kind of lighting I can get with the flash heads positioned like the image at the top of this post. Notice the detail in the dragonfly, and how well the area around it is lit:
It worked out really well, but I was using a small Novoflex ball head to get the second flash head where I wanted it, and it was a pain having to adjust it every time I put the rig together. I also didn’t need the kind of fine control that the ball head offered, so I went looking for a better way to position that second flash head.
Fortunately I have a friend who can weld aluminum and he cut one of my Really Right flash extenders in half and welded it back together for me. Here are some images of it next to a non modified extender.
Both extenders closed:
Hacked extender open:
Both extenders open:
Here is an example of the kind of lighting I can get with the flash heads positioned like the image at the top of this post. Notice the detail in the dragonfly, and how well the area around it is lit:
Friday, December 14, 2007
Macro Resolutions for the New Year
Last spring I had a decision to make; either get out of nature photography or get serious about it. I had opened an account on Flickr and wanted to add some of my best images from the previous year and out of several hundred photos I only had about two dozen that I thought were portfolio worthy. If I was going to continue to invest in new gear, and spend time shooting, then I needed to get better at taking images. So instead of ditching the DSLR and buying a point and shoot camera I came up with a list of macro resolutions and really pushed myself to see what I could do. Here they are, along with a new one for the coming year.
Become my own worst critic: I will never improve as a photographer unless I can subjectively analyze my work, figure out what I’m doing wrong, and correct the mistakes that I’m making so that I don’t keep making them. If one of my photos sucks I have to be the first to admit it. Get use to deleting photos that I would have kept in the past.
Don’t get hung up on the process: If I get locked into a specific way of shooting, or too hung up on one piece of equipment, then I will limit the subjects that I can photograph and reduce the odds that I’m going to get the image that I want. So let the subject dictate how I’m going to shoot and not let my gear, or the way I’m using it, limit the subjects that I can photograph. Be flexible.
Use Photoshop as an image editor, and not as a crutch: The computer will never be able to recover information that I did not take with the camera –and it will never be that smart. So I have to get it right before I press the shutter release and use post processing to “develop my negatives” and not use it to fix errors that I could easily correct with the camera. To keep from developing lazy habits the cropping tool is off limits –I have to compose my images with the view finder.
Shoot in multiple locations: If I shoot in the same areas all the time I’ll shoot the same subjects and I won’t have a diverse portfolio. My experience as a photographer will also be limited unless I’m shooting a wide variety of subjects. Even when I’m shooting in a familiar place I need to get into the habit of looking for new and unique critters. The other side of this goal is to pick a local species of insect and thoroughly document it. Learn its habits and get really good at photographing it so that I become a source for high quality images of a specific insect.
Go for the low hanging fruit: I need to stop wasting time shooting subjects that are difficult to reach, or that put me at a disadvantage due to the angle. By passing on situations that present a low probability of success I’ll have more time to photograph subjects in situations where I’ll have an advantage and my “keeper rate” will be higher.
Learn flash photography: It’s very difficult to use natural light above half life size so learning how to use a flash, and to control the quality of the light is very important. My ultimate goal is to get so good at flash photography that the color and contrast rivals early morning or late afternoon sunlight. I’ve made significant progress on this one, but I still have a long way to go…
Don’t become a magnification junkie: Let the composition dictate the magnification of the image. Some subjects don’t look good at high magnification and sometimes sacrificing some magnification for more depth of field is a good thing.
Don’t get hung up on diffraction: Getting sharp images is great, but only getting an insect’s eyes in focus because the depth of field is too narrow isn’t all that special. Composition is king, and if that means stopping the lens down to get more depth of field at the risk of losing some image sharpness then so be it. No one prints at 100% pixels…
Cherry pick ideas: Take the best of what I see others doing, and adapt it to my style of photography. Don’t copy other people’s work because I’ll never stand out that way, but put my own spin on their images.
Practice: Reading magazines and getting ideas from other photographers is good, but it’s not a substitute for having the camera in my hand. I have to get more practice shooting macro, especially in the winter months when the insects are gone.
Be unique: If my images look like everyone else’s images then I’ll never stand out. So look for new ways to photograph common subjects and develop my own style of photography. This is the new resolution for this coming year. In 2007 I spent a lot of time experimenting with different things to see what I liked and what I didn’t. 2008 will be the year that I zero in on a specific “look” and concentrate my efforts on perfecting it…
Tuesday, December 11, 2007
Motion Blur
Recently I wrote a post about diffraction, and how I think a lot of people blame it for soft images when the real problem might be motion blur or poor focus. From the reaction that I got you’d think that I stood up in a church and yelled “There is no God!”… ;)
Many of you argued that the flash duration, no matter how slow, is going to freeze motion –even thought the motion that I was referring too is no more than a few pixels (that’s all it would take to make an image look soft and you might not even recognize the effect as being motion blur). But then again some of those same individuals admit to bracing their cameras when they are shooting above twice life size because their images are sharper when they do…
So what’s the deal: Can the flash freeze everything or not?!
Nope, it can’t. I know from my own experience as a photographer that motion blur is a problem, especially when you’re not in full control of the flash duration. Since most of us shoot in E-TTL or some other automatic mode then we’re not controlling the flash, the camera is.
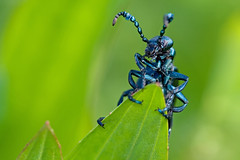
Want proof that the flash can’t freeze everything? Look no further than the image I’ve submitted with this post. The bee is using its wings to provide air conditioning to a bee hive in 37C (98F) degree heat. I took that shot at F16, 1/200 of a second, and ISO 100. I can shoot at 5x hand held at those same settings, and that image is only about one and a half times life size. It should have been easy for the MT-24EX to catch those wings, and yet they are a complete blur…
Granted that photo is an extreme example –that bee was pumping its wings so hard that you could put your hand next to it and feel the wind (I did). But I used it for this post because it’s easy to see the movement. Now imaging taking a shot and the subject moves just a few pixels during the exposure –it’s very possible when you look at those wings. Do you still think that diffraction is your biggest enemy when shooting at high magnification? I don’t.
You don’t have to use a tripod either –just look for ways to brace the camera…

Many of you argued that the flash duration, no matter how slow, is going to freeze motion –even thought the motion that I was referring too is no more than a few pixels (that’s all it would take to make an image look soft and you might not even recognize the effect as being motion blur). But then again some of those same individuals admit to bracing their cameras when they are shooting above twice life size because their images are sharper when they do…
So what’s the deal: Can the flash freeze everything or not?!
Nope, it can’t. I know from my own experience as a photographer that motion blur is a problem, especially when you’re not in full control of the flash duration. Since most of us shoot in E-TTL or some other automatic mode then we’re not controlling the flash, the camera is.
Want proof that the flash can’t freeze everything? Look no further than the image I’ve submitted with this post. The bee is using its wings to provide air conditioning to a bee hive in 37C (98F) degree heat. I took that shot at F16, 1/200 of a second, and ISO 100. I can shoot at 5x hand held at those same settings, and that image is only about one and a half times life size. It should have been easy for the MT-24EX to catch those wings, and yet they are a complete blur…
Granted that photo is an extreme example –that bee was pumping its wings so hard that you could put your hand next to it and feel the wind (I did). But I used it for this post because it’s easy to see the movement. Now imaging taking a shot and the subject moves just a few pixels during the exposure –it’s very possible when you look at those wings. Do you still think that diffraction is your biggest enemy when shooting at high magnification? I don’t.
You don’t have to use a tripod either –just look for ways to brace the camera…
Subscribe to:
Posts (Atom)