Also you'll have to forgive the pauses in my voice: We have a pair of three month old kittens that waited until I started shooting to begin their version of championship wrestling. Very distracting! :)

Sunday, November 10, 2013
Current Lighting Setup
Current because I'm in this never ending cycle of working on my lighting, compositions, and post processing. So what you see today might not be what I'm using a month from now. I said it in the video, but you really need to experiment with your lighting and not just copy what someone else is doing. If your lighting, and your photographic style, are not unique then your work will never stand out. If you reach a point where you can't compare what you're doing to what everyone else is because your images as so different then you're probably doing something right...
Also you'll have to forgive the pauses in my voice: We have a pair of three month old kittens that waited until I started shooting to begin their version of championship wrestling. Very distracting! :)
Also you'll have to forgive the pauses in my voice: We have a pair of three month old kittens that waited until I started shooting to begin their version of championship wrestling. Very distracting! :)
Saturday, November 9, 2013
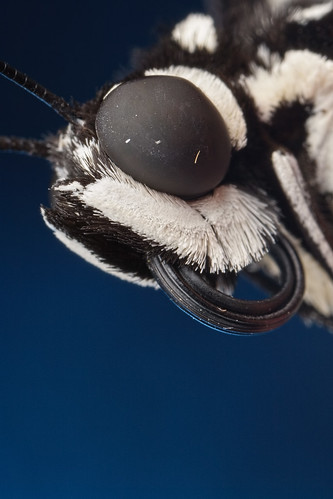
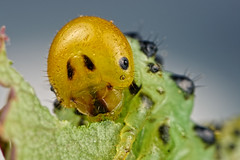
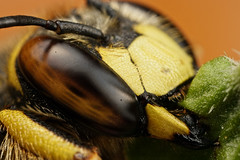
Butterfly Exhibit
Living in southern Italy has its advantages, but one of the disadvantages for me was no locally accessible butterfly house. I can shoot them in the wild, but getting up close and personal is tough. So I was pretty excited when I saw a flyer announcing an exhibit at the Caste Café, a relatively new coffee bar that had opened up across from the castle in Bacoli (the town where I live). According to the advert the experience would last about an hour and photography was allowed!
There was almost an hour of instruction on the life cycle of a butterfly and about 10 minutes in the exhibit…
Frustrated by not having enough time with the critters, and dealing with curious onlookers who wanted to see what I was doing, I didn’t get too many usable frames. So I sent the image at the top of this post to the curator and told him that I’d be willing to trade prints for greater access to the butterflies. He agreed, and gave me an hour and a half between tours to be alone with the critters.
Sometimes it pays to prostitute yourself :)
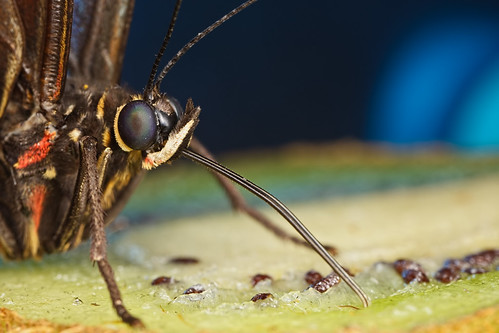
The exhibit consisted of a four meter canvas dome about three meters high that looked just like an igloo, with a chamber at the entrance that separated the dome from the exit to keep the butterflies from escaping. The only natural light inside the dome was provided by some small plastic windows, so I had to rely on the flash to do all the heavy lifting. I tried to take some life size shots of the butterflies feeding, but I just didn’t like the way the backgrounds looked and the color balance between the subject and background was just too far off. So the images that I’ve edited and posted on my gallery have been at twice life size or higher magnification and flash only. For the backgrounds I either held the subject close to a leaf, or used a piece of blue Plexiglas that I keep in my camera bag (I put aluminum foil on the back side of it to act as a reflector). I know quite a few macro photographers that just accept flash falloff as an occupational hazard, and it’s a mistake…
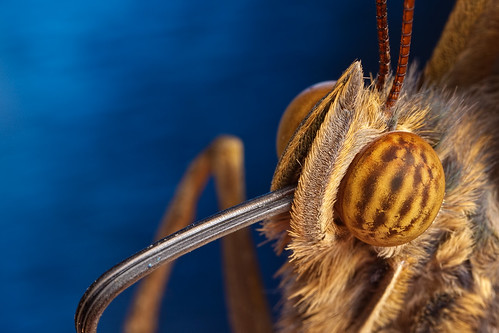
Now for the pros and cons of shooting at a butterfly exhibit:
It was so warm and humid inside the enclosure that I thought I was going to short out my gear by sweating all over it, and after an hour and a half my arms and shoulders were complaining about having to hold about three kilos of camera gear. I love the dynamic range that I’m getting with the 1D MK III, but it wasn’t really meant to be hand held. I’d like to go back to a 1.6x crop factor camera, but I don’t want take a hit in image quality to do it. Canon you desperately need stop adding more pixels to already overcrowded sensors! One other “lesson learned”; at high magnification Kiwi seeds look like poop…
On the bright side the butterflies were pretty much tame. There were a few species that didn’t like me getting close, but for the most part I could shoot at any magnification and working distance that I wanted. When I’m out shooting I frequently get compositions stuck in my head, and working with cooperative subjects was a really good way to get some of those compositions into the camera. It also gave me the opportunity to slow down and look for some unusual angles. I ended up with some pretty unique looking images, and it was definitely worth the effort and the forty euros that I spent on prints for the curator of the exhibit.
There was almost an hour of instruction on the life cycle of a butterfly and about 10 minutes in the exhibit…
Frustrated by not having enough time with the critters, and dealing with curious onlookers who wanted to see what I was doing, I didn’t get too many usable frames. So I sent the image at the top of this post to the curator and told him that I’d be willing to trade prints for greater access to the butterflies. He agreed, and gave me an hour and a half between tours to be alone with the critters.
Sometimes it pays to prostitute yourself :)
The exhibit consisted of a four meter canvas dome about three meters high that looked just like an igloo, with a chamber at the entrance that separated the dome from the exit to keep the butterflies from escaping. The only natural light inside the dome was provided by some small plastic windows, so I had to rely on the flash to do all the heavy lifting. I tried to take some life size shots of the butterflies feeding, but I just didn’t like the way the backgrounds looked and the color balance between the subject and background was just too far off. So the images that I’ve edited and posted on my gallery have been at twice life size or higher magnification and flash only. For the backgrounds I either held the subject close to a leaf, or used a piece of blue Plexiglas that I keep in my camera bag (I put aluminum foil on the back side of it to act as a reflector). I know quite a few macro photographers that just accept flash falloff as an occupational hazard, and it’s a mistake…
Now for the pros and cons of shooting at a butterfly exhibit:
It was so warm and humid inside the enclosure that I thought I was going to short out my gear by sweating all over it, and after an hour and a half my arms and shoulders were complaining about having to hold about three kilos of camera gear. I love the dynamic range that I’m getting with the 1D MK III, but it wasn’t really meant to be hand held. I’d like to go back to a 1.6x crop factor camera, but I don’t want take a hit in image quality to do it. Canon you desperately need stop adding more pixels to already overcrowded sensors! One other “lesson learned”; at high magnification Kiwi seeds look like poop…
On the bright side the butterflies were pretty much tame. There were a few species that didn’t like me getting close, but for the most part I could shoot at any magnification and working distance that I wanted. When I’m out shooting I frequently get compositions stuck in my head, and working with cooperative subjects was a really good way to get some of those compositions into the camera. It also gave me the opportunity to slow down and look for some unusual angles. I ended up with some pretty unique looking images, and it was definitely worth the effort and the forty euros that I spent on prints for the curator of the exhibit.
Saturday, October 19, 2013
Working on Backgrounds
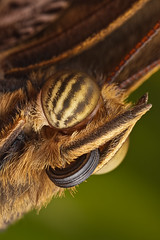
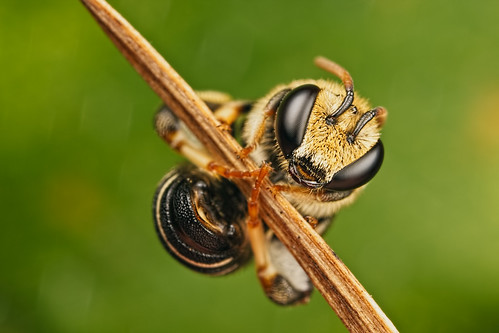
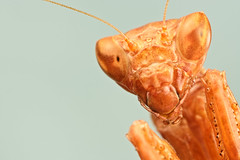
Still experimenting with different materials and techniques. First up is a mantis that I shot in front of a piece of light blue construction paper. II though that since the paper had a matte finish it would make a good background, but oddly enough it looked kind of grey in some of the images that I took. Also notice that the pseudo pupil is almost missing in the critter's left eye -that effect is caused by the way the flash reflects off of the compound eyes (a mantis doesn't really have a pupil). The second flash that I was using to illuminate the background all but washed it out, and what's left is in the wrong position. In the future if I use a second flash when shooting a mantis I'll place it directly behind it.
For this next shot I used a vinyl table cloth, and shooting against a reflective surface works a lot better than shooting against one that has a texture.
There's no natural light in those first two shots, but this next one is a mix of natural light and flash. I set the shutter to 1/20 of a second to expose the reeds in the background, and then let E-TTL metering expose the subject with the flash. This is my preferred method for keeping the background from being black, especially when I can get a good mix of natural light and flash. Even though the sunlight was pretty harsh (taken at about 3PM on a cloudless day) the color and saturation in the background look good because it's out of focus and a little under exposed. A digital sensor reacts to under exposure in the same way as color positive slide film -colors saturate. The downside to this method is that there can be enough natural light to partially expose the subject which makes freezing motion difficult.
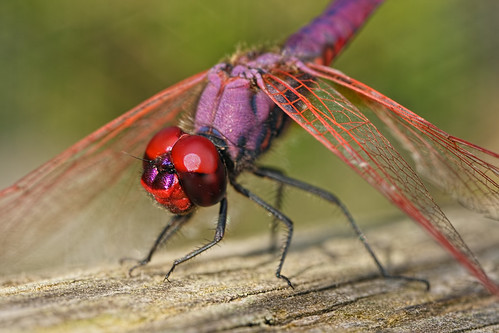
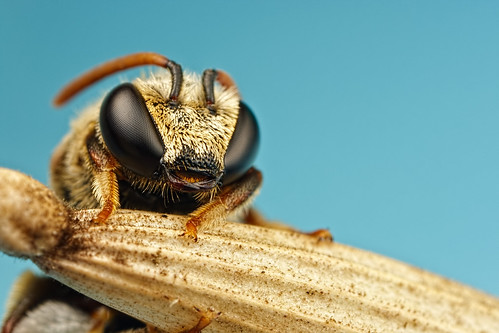
I've also noticed that when creating artificial backgrounds that smooth backgrounds do not look as good as ones that have some color or texture variation (especially if the background is not blue). The brain sort of expects vegetation to keep the background from looking smooth. Compare the dragonfly in the previous image with the bee in the next shot -this one is all flash:
For this next shot I used a vinyl table cloth, and shooting against a reflective surface works a lot better than shooting against one that has a texture.
There's no natural light in those first two shots, but this next one is a mix of natural light and flash. I set the shutter to 1/20 of a second to expose the reeds in the background, and then let E-TTL metering expose the subject with the flash. This is my preferred method for keeping the background from being black, especially when I can get a good mix of natural light and flash. Even though the sunlight was pretty harsh (taken at about 3PM on a cloudless day) the color and saturation in the background look good because it's out of focus and a little under exposed. A digital sensor reacts to under exposure in the same way as color positive slide film -colors saturate. The downside to this method is that there can be enough natural light to partially expose the subject which makes freezing motion difficult.
I've also noticed that when creating artificial backgrounds that smooth backgrounds do not look as good as ones that have some color or texture variation (especially if the background is not blue). The brain sort of expects vegetation to keep the background from looking smooth. Compare the dragonfly in the previous image with the bee in the next shot -this one is all flash:
Tuesday, October 1, 2013
Macro, the 1/f Rule, and Flash Durations
Many, many, moons ago Fred Vachss made a really interesting post over at DP Review concerning the 1/f rule and flash durations as they pertained to macro photography. Basically we were all wondering what shutter speed (or flash duration) was necessary for freezing motion at different magnifications. The mistake that a lot of people made back then was jumping all over the lowest flash duration (flash at minimum power) and claiming that the flash could freeze anything. Unfortunately you'll almost never be shooting with a flash at minimum power, so you'll rarely see those lightning fast bursts of light. The only time I've been able to expose a brightly colored subject at life size magnification and 1/64th power with the MT-24EX is when the flash heads are bare. Not exactly the best light quality... ;)
If you boil Fred's post down here's the 1/f rule for macro photography: Shutter speed = 1/f((1+m)2) where f = focal length of the lens and m = the magnification you're shooting at. So at life size magnification you need a shutter speed that's four times faster than using the same focal length lens for a non macro photo, at twice life size your shutter needs to be six times faster, etc. Substitute flash duration for shutter speed if you're using a flash as the primary, or only, light source. Also keep in mind that the 1/f rule, even modified for macro photography, is a minimum requirement. To "be safe" you'd never want to get close to 1/f rule speeds. Now let's add insult to injury and explain why: Noticeable diffraction is defined as light rays spreading out so that they strike half way into adjacent pixels. The 1/f rule assumes that you're trying to keep the motion in the scene to less than one pixel, and not to less than one half of a pixel. So how easy is it to amplify diffraction with very small amounts of motion, less than the width of half a pixel, while the flash is firing? It's always been my contention that diffraction isn't the monster that most people have made it out to be, and that there is a very synergistic effect between motion and diffraction. You won't necessarily see motion blur in your images but if you're not doing everything you can to minimize movement, and to keep your flash durations as short as possible, you'll have difficulty getting a lot of detail when you shoot at high magnification and high Fstops.
One of these days, just for the focus stacking crowd, I'm going to make a post about how your photos may be diffraction limited even if you're shooting with a lens that's wide open. It has to do with the diffraction limit of green light being four micro meters at F2.8, at the center of a digital sensor (as you move away from the center of the sensor diffraction gets worse). So if your camera has pixels that are four micro meters wide (like the 50D, 60D, and 70D), or smaller (like most of the Power Shot models), you're already recording diffraction at F2.8...
P.S. Not that I have anything against focus stacking -it's just another tool in your tool bag, and some day I might actually stack an image or two. But I do think that a lot of the people who stack their images are actually doing more to defeat macro motion blur than diffraction...
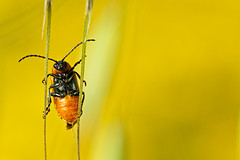
Saturday, September 28, 2013
Reminders
I'm dialing up the way back machine for this image (I took it back in May of 2007). It's a reminder for me of three things: How far I've progressed as a photographer since I took this frame, the need to back off and show my subjects in their surroundings more, and to look around for opportunities to take a shot that I really didn't intend to take. I was chasing a butterfly and not having any luck at all when I turned to my right and saw this beetle that seemed to be watching me chase the butterfly. Could have sworn I heard him laughing... ;)
Friday, September 27, 2013
The Universe Says "No!".
While I was out at the lake testing a new diffuser I noticed that there was something odd going on with the light. At first I blamed the diffuser, but then I realized that my MT-24EX was firing at almost full power, even though I was only shooting around 3x at ISO 100 and F11. Later on that evening I realized what was going on while taking some test images at my kitchen table -the "B" flash head was only firing intermittently.
That's two hardware failures in as many weeks -bummer.
I guess if the gear is going to fail I'd rather it happen now then early next spring. Canon has already given me a repair estimate on my MPE-65mm (about 200 USD) and I sent the MT-24EX to the service center in New Jersey this morning. With any luck I'll have all my toys back in about two weeks. Until then I'm going to explore using a standard camera flash on a bracket.
Sometimes the universe says no... ;)
Tuesday, September 17, 2013
Oops I Did it Again
Not long after I photographed the Weevil to the right my MPE-65mm macro lens started giving me the dreaded "Error 01" message.
Oops...
The least time it happened it set me back about $300 for parts and labor. I'll be sending the MPE back to New Jersey for repairs today. For now it's back to the EF-S 60mm and tubes.

Oops...
The least time it happened it set me back about $300 for parts and labor. I'll be sending the MPE back to New Jersey for repairs today. For now it's back to the EF-S 60mm and tubes.
Friday, September 13, 2013
What are You Trying to Accomplish?
I was reading a piece over at Strobist and one of the questions in it is the title of this post. For me the answer isn’t all that simple. Early on I knew that I didn’t want to paint myself into a corner by using a lot of gear. Tripods and focusing rails are slow, and really limit what you can and can’t photograph. I had actually given up on using tripods back when I use to shoot landscapes, because I realized that all a tripod was really doing was forcing me to slow down and evaluate a scene before I set it up –cause there’s just no sense in taking the time to put the camera on one if there isn’t a decent shot to take. So I simply got into the habit of pausing for a moment, evaluate the scene and my surroundings, and then decide if I’m there’s a photo to take and how I’m going to take it. I do the same thing today, often passing on opportunities to take images that I know I won’t keep.
It’s a little tough to chase a honeybee with a tripod...
Keeping the gear to a minimum allows the subject to dictate how I’m going to photograph it, instead of using a lot of equipment and restricting myself to only those subjects that conform to my gear. It can also be said that any serious discussion on hardware is kinda pointless, since my choice in camera equipment might be completely alien to you and counterproductive to your way of shooting. So there’s no right or wrong here, just differences in style.
The other thing I want to do with my photography is to change your perspective of the small world. I want you to see insects as more than “just bugs”. Shooting at their eye level allows you to connect with them, to see some personality. Whether or not you believe insects have a personality isn’t important, but my being able to project the impression of a personality in the way that I photograph them is.
So, what are you trying to accomplish?
Saturday, September 7, 2013
High Magnification, High Fstop, and High Detail
Note: If you firmly believe that you have to use a tripod, or focus stack, or both to get a lot of detail at high magnification and Fstops then stop reading this post right now –I’ve got nothing for you.
When I first got into macro back in 2006 there were two prevailing themes: You had to use a tripod to get sharp images, and diffraction is the primary reason why you can't stop a lens down and get those sharp images. But something really odd was happening over at the Fred Miranda Macro Forum: Occasionally someone would post a really sharp image taken at high magnification and high Fstop that wasn’t focus stacked. I remember there being more than one person doing it and they wouldn’t explain how; either they wanted to keep the technique to themselves, or they were afraid of going up against overzealous focus stackers who believed that the only good macro images were those that are razor sharp at 100% pixels (unfortunately even today some still equate sharpness with quality). I was curious to know how they were pulling off such highly detailed images at high Fstops, and I finally figured out part of the puzzle sometime around 2008, but the last piece didn’t come together until several years later.
I wanted to let the subject dictate how I shot it, and to go after moving targets, so I came up with the Left Hand Brace Technique for taking control of the motion in a scene so I could get the compositions that I was looking for without using a tripod (and without cropping in post). I started to realize that the more control I had over the motion in the scene the sharper my images were (the first piece of the puzzle) not because some of them were suffering from noticeable motion blur but because slight motion, as little as the width of half a pixel, can amplify diffraction. I started to think of the phenomenon as “macro motion blur”. To explain how motion blur can mimic diffraction you first have to really understand what diffraction is.
The classic definition of diffraction is light bending as it passes through a small opening, and that's true. But there's a little more to it than that: The rays of light actually expand, like a cone, so that light rays that should hit a single pixel are now bleeding over into adjacent pixels. When that bleeding over reaches half way into those adjacent pixels you'll see a loss in image quality -diffraction has taken your lunch money.
But if you can wrap your head around expanding light rays causing a loss of detail then couldn't slight motion, as little as half a pixel of movement during the exposure, amplify diffraction? My experience has taught me that it can.
Right about now some of you are thinking "But wait a minute Mr. Macro Motion Blur, why do my images get sharper when I decrease my Fstop?!" To answer that question we have to first determine what your actual shutter speed is.
At macro magnification, high Fstops, and low ISOs, the light that your flash is producing is the only significant light source in a scene. To prove it just set your camera to manual mode, F11, 1/200 of a second (or whatever your maximum flash sync speed is for your camera), ISO 100, and go out and take a photo on a bright sunny day with your macro lens set to its minimum focusing distance (life size magnification). You'll have to shoot something really bright or reflective to get anything to show up in the resulting image. Then turn on your flash and take the same shot -there will be a major difference in what you can see in the photo. At higher magnifications, if the flash doesn't fire, you'll just get a completely black image. So your flash duration is really your shutter speed, since it's the major, or only, light source -the actual speed of the shutter doesn't matter...
So you set your camera to manual mode, F11, 1/200, and ISO 100. You've got a rig that will let you shoot at 3x, you take a shot hand held, and the resulting photo isn't very sharp. You then set your camera to F8, take the same shot, and this time the image is a lot sharper. See, no more diffraction! Well there's only one little problem -when you went from F11 to F8 you opened up the aperture in your lens to let about twice as much light into the camera. Through The Lens (TTL) metering compensated for the increase in aperture (decreasing Fstop) by turning the flash on for about half as long -so your shutter speed (the flash) nearly doubled. Did you defeat diffraction or macro motion blur?...
For me the answer is simple, since I can get sharp images at up to three times life size at F13, and four to five times life size at F11 with Canon's MPE-65mm macro lens. The key is to get the flash as close to the subject as possible (to keep the flash duration as short as possible), use a diffuser that really diffuses the light (not one that just blocks the light), and look for ways to take control of the motion in the scene.
Diffraction does exist, but it's not the monster that most macro photographers make it out to be.
The second piece of the puzzle is to use a well diffused light source. If your flash produces really strong specular highlights you’ll end up with high “micro contrast” (a term coined by SteB). Those little bright areas will make an image look sharper than it really is, and you might think at first that high micro contrast is a good thing. But those same bright areas will limit how much sharpening you can apply during post processing. So what you really want are “soft” specular highlights where you can actually see texture and possibly even a little color behind them. The softer the light the more sharpening you can apply during post without making your images look over sharpened. Getting your flash as close as possible to the subject won't just help you to keep your flash duration short, it will also make your light look more diffused.
Since you're getting the flash close to the subject you don't need a long focal length lens -you don't need more working distance if the flash is close to the subject anyway, and short focal length lenses will give you more magnification when you start shooting with extension tubes. There's no such thing as a "bug lens" -all you have to do is learn a little about the habits and quirks of the subjects you want to photograph.
With this post I’ve pretty much given you the keys to the candy store…
Footnote: When I first published the Left Hand Brace Technique I got several hate emails and angry private messages on a few forums. It seems that quite a few macro photographers had been using the technique, but were keeping it quiet, and were really pissed off at me for writing about it.
Last but not least: I do lose some texture detail to diffraction –I can’t cheat physics. But there is so much depth and detail in my photos that people frequently ask me if I focus stack. I do not focus stack, and although there is nothing wrong with the technique (it’s just one tool of many) I’ve pretty much proven that it’s not necessary...
Tuesday, September 3, 2013
Friday, August 30, 2013
Eat Your Vegtables Studio
A short video showing the "studio" that I set up for this shot, and the tools I carry in my camera bag.
Thursday, August 22, 2013
When to Focus Stack
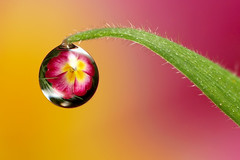
The photo to the right is not mine, it belongs to a very talented macro photographer named Brian Valentine (LordV). Since I don't focus stack, and I wanted to show you an example of an image that really needs to be focus stacked, I asked Brian if I could use one of his images.
Take a close look at that water drop. The surface of the water has a texture to it and it's very fine grained. In order to make that water drop look round you have to record the texture detail on the surface, and that texture can be very easily erased by diffraction. So to get that texture you have to shoot with a small Fstop to avoid as much diffraction as possible. At the same time though you have to get enough depth to get the leading surface of the water drop, and the outside edge, in focus. So for an image like this dew drop refraction you really don't have any choice but to focus stack it
Edit: Brian reminded me that there's another reason to focus stack a dew drop refraction -the focus point of the flower is actually in front of the dew drop itself (the drop is acting as a lens).
There are a lot of really small subjects that, in my humble opinion, also need to be stacked to retain the texture detail in them. But is it really necessary to focus stack a large subject? For me the answer is no, I don't mind losing some extremely fine detail for more depth and it's one of the reasons why I don't focus stack. I'd rather spend my time getting the compositions and framing that I want, and since I shoot active subjects (or subjects that are going to get active soon) I don't have a lot of time.
Even though I shoot with a lens that's stopped down (usually F11 or higher) I still get a lot of detail in my images, and there are a couple of "tricks" to it: I look for ways to minimize movement, both mine and the subject's, because there are limits to how much motion the flash can freeze. Motion as little as the width of half a pixel while the flash is firing can amplify diffraction. It won't look like traditional motion blur, you'll just lose some fine detail. I'm convinced that macro is a form of flash based stop motion photography. Although it may not be as obvious as photographing a balloon in mid pop, or a bullet going through an apple, the principle is the same.
The other trick is to use a very well diffused light source. If the specular highlights in an image are strong (almost harsh) it can make an image look sharp, so you might think that using a light source that gives you those strong specular highlights is a good thing. But if the specular highlights are too strong the amount of sharpening that you can apply in post processing will be very limited, and it will be easy to over sharpen an image. Soft specular highlights that you can see texture, and even a little color, behind them are actually a lot better because you'll be able to apply a lot more sharpening in post.
Focus stacking a is a very useful tool, but it's not "the tool" for shooting macro. If you are just getting into macro then I'd encourage you not to focus stack. Get use to shooting single frames, and making the most out of what little depth you have by looking for angles that make the most of it (called "magic angles"). Once you have a grip on the mechanics (or muscle memory if you shoot hand held like Brian and I), and you're compositional skills are good, then take a look at focus stacking if you feel that you need it.
The last thing the macro discipline needs is one more photographer taking razor sharp poorly composed images. We're all practically drowning in them. Getting razor sharp images, at the expense of composition, is a prime example of not being able to see the forest because the trees are in the way...
Friday, August 2, 2013
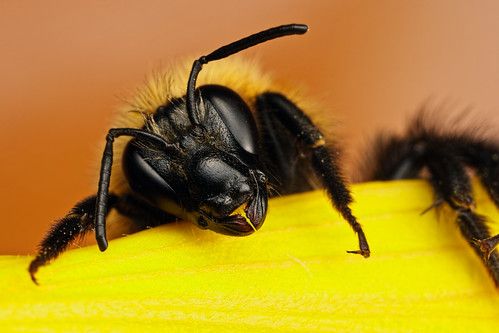
Impersonal Angles
I dialed up the way back machine to 2007 so I could show you an example, from my own gallery, of what you shouldn't do when composing your subjects. The image that I've included isn't necessarily bad -it has a lot going for it from a compositional perspective. But one thing that it's lacking is the connection between the subject and the viewer because you're forced to stare at the top of the critter's head, instead of seeing it at "eye level", and it's almost impossible to connect to it.
You wouldn't photograph the top of a persons head, so why shoot an insect from the top down?...
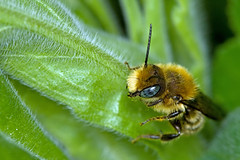
When composing your subjects try to do it from an angle that's at their level. It's much easier to convey a sense of personality when the viewer can make eye contact with the subject, like this shot:
I recently showed that image to one of my daughter's friends and she laughed because to her it looked like the bee was smiling. Changing people's perceptions of insects is one of the things that I'm trying to do with my photography, to get them to see the critters as more than just "bugs".
Truth be told I think that they do have distinct personalities, but their personality won't show in your work if you're shooting from impersonal angles...
You wouldn't photograph the top of a persons head, so why shoot an insect from the top down?...
When composing your subjects try to do it from an angle that's at their level. It's much easier to convey a sense of personality when the viewer can make eye contact with the subject, like this shot:
I recently showed that image to one of my daughter's friends and she laughed because to her it looked like the bee was smiling. Changing people's perceptions of insects is one of the things that I'm trying to do with my photography, to get them to see the critters as more than just "bugs".
Truth be told I think that they do have distinct personalities, but their personality won't show in your work if you're shooting from impersonal angles...
Tuesday, July 23, 2013
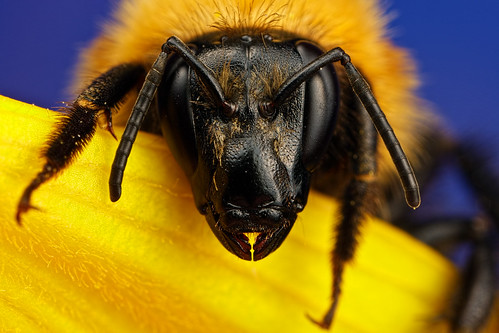
Get Out of My Face Deconstruction
Another day, another sunflower missing a petal -a victim of my hobby. I like to photograph the critters in place, disturbing their habitat as little as possible. It just wasn't going to happen with this one, since the petal it was perched on was above my head. Plus I really wanted to take this solitary bee to the picnic table on my patio so I'd have full control over the scene.
Fortunately sunflowers have a lot of petals :)
The Mrs. had spotted this creature the night before I shot it, but I waited until morning knowing that it had a really good chance of becoming active. Even though it was a little bit cooler in the morning it was still 24C (around 74F) and I was only able to work with the bee for about 20 minutes before it flew off.
Because of the way the antenna were positioned across the eyes shooting from the side for a portrait was pretty much out. I have a few portrait frames, but I think the antenna are just going to be too distracting. Even if I had focused stacked it the scene still wouldn't work -the antenna would be in focus, but still laying right across the eye. So I went looking for a head on composition that would make the most out of a single frame, the result is the image I've included with this post.
The background was a big concern, and also one of the reasons why I didn't shoot it in place (the background would have been either black or yellow). I selected two books from my wife's collection, one that was orange and one that was dark blue. Both of them had glossy book covers, and the colors of them changed a little under the flash. The critter's fur blended in with the orange background a little too much, so I switched the the blue one and managed a few frames before the bee got tired of me and took off.
Focusing and framing were pretty easy, since I was holding onto the petal with my left index finger and thumb (for the framing) and sliding the lens on my left hand (to focus the scene). I got the mandibles in focus, and then rotated the camera vertically until I could see texture in the bee's forehead. Because the antenna are swept back they fell into the plane of acceptable focus. The trick is to get the subject as parallel to the sensor as possible, so none of the depth is wasted. Easy, it just takes practice.
Until next time, happy shooting :)
Sunday, July 21, 2013
Habitat Lost
One of the reasons why I haven't been shooting as much as I use to, other than I got burned out and needed a break, is that a lot of the areas I liked to shoot in are gone. I use to find the Wool Carder Bee, included with this post, at Lago de'Averno, sleeping in the Lavender that was planted along the jogging trail around the lake. Some of the people who visited the lake couldn't resist picking that flower, and what the locals didn't take a very voracious beetle ate the rest. Now that the city is paying someone to maintain the jogging trail there aren't any wildflowers around the lake either, so the only habitat for these magnificent creatures is on private land that I don't have access to.
Now that I'm living in a house with a yard I'm looking at the flowering plants and I'm trying to make sure that the critters have something to eat year round. Just this morning I spotted a male Wool Carder Bee tackle and mate with a female while she was feeding on the flowers in my basil. Hopefully it's the beginning of my own population of them :)
As for the photo itself: I spotted this bee sleeping in my basil in the evening, but waited until the next morning to photograph it. Large solitary bees like this one can get their metabolism going pretty easy, so had I tried to shoot it that evening it just would have flown away. Even though it was cooler in the morning it was still able to put up its front legs in a defensive posture, so I had to move slowly when approaching it with the camera.
I cut the flower that it was perched on with a pair of scissors, again being careful not to move it too fast. I then cleaned off the basil flowers in front of it, since they'd just be in the foreground and out of focus (too distracting). Then I simply held on to the basil flower with my left hand, rested the camera on that same hand so that everything was on the same "platform", and focused by sliding the lens on my hand (what I call the Left Hand Brace Technique). Being in full control of the motion in the scene leaves very little motion for the flash to freeze, and it's one of the reasons why I can get a lot of detail in a macro image even though I'm shooting at a relatively high Fstop. A lot of the image softening that most people blame on diffraction is really just motion blur...
Controlling the angle between the bee and the sensor on the camera is as easy as moving the flower between my thumb and index finger. What I look for is a "magic angle" that will make the most of what little depth I have in a single frame. Looking for new compositions and angles is easy since I'm not restricted by a focusing rail, and now that I've been shooting hand held for several years the muscle memory needed to move the subject and focus the scene is permanent (I can go months without holding a camera and still nail the focus and angle).
Last but not least: I'm not special, anyone can shoot the way I do -it just takes practice. Until next time happy shooting :)
Friday, June 28, 2013
Look for Something Interesting
In May of this year I moved into a villa, and we now have a small back yard that we’ve been filling with flowers. My wife bought a vine with large white flowers and a small species of solitary bee took up residence in it. Since this is our first year here I thought about leaving them alone, but I just couldn’t resist the temptation to take one flower apart and take a few photos. It’s been a long time since I’ve taken any macro photos and I needed the practice.
The bee was really small, only about a millimeter wide and a few millimeters long, and due to the way that it has anchored itself to the flower’s stamen my first attempt at framing the critter were really poor. Looking at the images that I had taken, and at the bee’s perch, I decided to look for a different angle. If I couldn’t find something more interesting I’d have to call the entire session practice and bin all of the photos that I took. After completely rearranging my table top studio I managed to get the scene I was looking for and it’s was then that I noticed something really amazing…
The bee had anchored itself to the flower’s stamen with its proboscis!
I’ve never seen that behavior before; normally a bee will clamp onto a plant stem with their mandibles when they sleep. But this one was using its tongue :)
I shot a short video of the studio that I set up so you can see how I took the shoot. Pretty simple really, but the clamps allow me to use both hands to steady the camera.
Wednesday, January 9, 2013
Extreme Macro -the Art of Patience eBook
Extreme Macro -the Art of Patience is now available as an eBook.
You can also order it via iTunes
Subscribe to:
Posts (Atom)