Friday, December 31, 2021

Extreme Macro the Art of Patience Volume II

It only took me 12 years, but I finally published Extreme Macro the Art of Patience Volume II today. It is available in several formats and should already be available in Apple eBook format from Blurb (from Apple as well as soon as they accept it). The add for it on the sidebar to the right.

In my last post I spoke about my adventures in cropping, something that I had to do for the book to an extent because the 3x2 aspect ratio of my images did not always fit the aspect ratio of the book. But there is another reason why I am going to crop more in the future, and it is an issue of technique. I look at a scene and try to figure out what magnification I need for the shot that is in my head, set the MP-E 65mm to that mag, and then attempt to grab onto whatever the subject is on with my non camera hand. I then rest the lens on that same hand so that critter and camera are on the same "platform". I focus by sliding the camera on my hand and then "bend" the area of acceptable focus by twisting my wrists(s) so that it is falling where I think it needs to be in the frame. Odds are once I get into place I cannot back out and make changes to the magnification without spooking the subject. While photographing this Chafer Beetle eating pollen...

Chafer Beetle Eating Pollen II

...I though the framing was not tight enough, so I backed out to increase the magnification. But, unfortunately, the critter noticed me and took off. If I had just stayed where I was and continued shooting, I could have simply cropped in post to get the subject framing that I wanted without spooking the subject. As an added benefit I can take advantage of the depth and detail from shooting at a lower magnification. So, although I will continue to do all of my framing and composition with the view finder, I am going to crop in post more. Since Elements 2022 can upscale a crop to the original pixel count, I do not have to worry about how my images will look in print. So cropping is going to be a win win option for me if I can break some old habits...

Wednesday, December 29, 2021

Painting Myself Out of a Corner

Back when I started shooting color positive slides in the late 80s there was a lot of emphasis on using the viewfinder for composition, and to crop in post only when necessary. Composing with the viewfinder has made me a better photographer, and in time while framing one scene other compositions would pop into my head. Subject permitting, I can get those scenes into the camera so composing with the viewfinder is a good thing. I also wanted to keep as many pixels as possible because when I make prints, I like to print them poster size (90CMx60CM on matte canvas and gallery wrapped). Back when I was shooting with 10MP and 12MP cameras not cropping in post was beneficial for making those large prints.

But not cropping at all in post has been detrimental to my photography because no matter how much effort I put into composing with the camera sometimes I do not see a better way to frame the subject until I can view the image on a bigger screen. Plus, I like to shoot active critters and they do not seem to cooperate. So, nailing the framing with the view finder is not always possible. Also due to the way that I shoot, holding on to the critter's perch with my non camera hand, I must guess what the magnification needs to be to get the framing that I want before I move in to take a shot. Once I am in position it is difficult to back out and make changes without spooking the subject. So, if I start shooting and realize that the framing is not what I want I am better off just cropping in post. Since I am shooting with a 24MP sensor I can afford to toss out a some of the pixels without sacrificing print quality, so I decided to start cropping when it makes sense to do it.

I use Photoshop Elements 2022 for my image editing and while cropping a shot I got a nice surprise: If I set the aspect ratio to the same aspect ratio as the original image, at 300 DPI, I end up with a 24MP image even after cropping. Elements must be extrapolating out the data and, so far, it looks good. I have been cropping after color correction and sharpening, and the detail seems to be holding up. One of the benefits of being able to crop and keep the mega pixel count high is that I can shoot at lower magnifications than I normally would and get more depth of field. So, cropping an image in post is going to be good for making the most out of the limited depth in a single frame. I took this shot at about 1.5x and cropped it slightly to eliminate some dead space to the right of the subject. The composition of the original shot is fine, but making it tighter looks better to me.

Red Beetle

I will still compose with the view finder, but I am not going to avoid the cropping tool if it will make my images look better...

Thursday, November 25, 2021

Bugslife Bug Photography Second Place Award

I took second place in the Bugslife Bug Photography Awards in the flies, bees. ants, and wasps category for this shot:

Emerging Red Mason Bee

Sunday, August 22, 2021

The Global Billboard Project

I am a contender in the Global Billboard Project. If you like my work, then please go to the Global Billboard Project web site and the Twitter post and give me a like. Thanks!!!

Saturday, August 14, 2021

I Should Start Cropping

This video pretty much shattered my preconcieved notions about the number of pixels needed for a large print. I have even made poster size prints with 10MP and 12MP images that looked great, so why am I still hung up on not cropping my photos? Maybe I should not be...

Specular Light

I have posted about this before, both here at my blog and on various forums. But for the most part it was in bits and pieces until recently, and I need to not only boil the whole concept down but also to have it in one single article. Nothing here is really new, and the tl;dr is "Stop shooting in bad light". But you might not understand why the light you are shooting in is working against you.

Light has two basic properties: It is either hard or soft, specular or diffused. Soft/hard light depends on the size of the light source relative to the subject. The larger the light relative to the subject the softer it will look (called Apparent Light Size) and you can see it in the shadows because they will look kind of grey, and the transition area between what is lit and what is in shadow will be kind of fuzzy. If the light is hard the shadows will be dark and the transition areas between the shadow and the light will be very well defined (almost like a line).

If the light is diffused then the specular areas in the scene will have color and texture in them, and the more diffused the light is the smoother the transition between non specular and specular areas. If the light is specular (not diffused well) then the specular surfaces will return the color of the light source and you will lose detail. Also, the transition area between non specular and specular areas will be very short and well defined (easy to see).

In a studio, using studio light modifiers, soft light will equal diffused light most of the time. Most studio light modifiers are designed to allow the light from the flash to spread out before it hits the diffusion surface, so the light that the subject sees is even with little to no hot spot in it. The only thing you have to worry about is the size of the light source relative to the subject -the closer you get it to what you are shooting the softer and more diffused it will be.

As a macro shooter I see a lot of people using a flash setup that can best be described as soft/specular. Soft because it is large relative to the subject so the shadows will be soft. But since their diffuser is short there is not enough room for the light from the flash to spread out before it hits the diffusion surface that the subject sees. There will be a hot spot due to a poorly diffused flash, that hot spot is acting like a point source, and there will be a loss of detail in the specular areas of the scene. The light is erasing detail in the specular surfaces, and that loss has nothing to do with exposure. I frequently see people who focus stack that lose more detail to poor light quality than I lose to diffraction in my single frame images.

Sweat Bee in a Geranium Flower

If you are shooting in noon day sun, with nothing to diffuse the light, then the big yellow ball is acting like a point source and the specular surfaces in the scene will return the color of the light and not the color of the underlying surface. The result is a loss of detail in the specular areas of the scene. Plus, the contrast will be too high, and the colors will be muted. You can sort of “fix” the color and contrast issues in post -but your images will look much better if you are shooting in diffused sunlight. No amount of under exposure will correct for the detail loss due to harsh (specular) light. I took this next shot when there were some thin clouds acting as a diffuser for the sun.

Sweat Bee Approaching a Sunflower

Much better color, contrast, and detail than shooting in harsh light. Do not be afraid to increase the ISO so you can choose the shutter speeds and apertures necessary to get the shot when the light is good.

Wednesday, June 23, 2021

It's All About the Light...

A lot of you are shooting in natural light that is specular (not diffused) and it is killing your image quality. Bright sunlight is great for getting high shutter speeds and higher Fstops at lower ISOs, but it is terrible in terms of color and contrast. Better to shoot in the golden hour right after sunrise, or before sunset. You can also wait for light cloud cover to act as a diffuser for the big yellow ball or use a scrim (or similar) diffusion material.

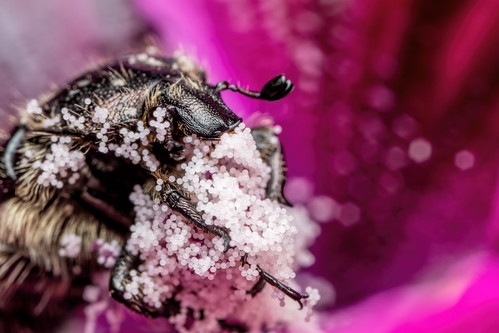
For those of you using a flash I would say many of you are shooting with light that's "soft specular" -soft because the light source is large relative to the subject, so the shadows are soft. But specular because there is a hot spot in your diffuser, and it is erasing a lot of the detail in your images. The light from that hot spot hits specular surfaces in the scene and those surfaces will return the color of the light source, and not the underlying color of the specular surface. Even if you under expose the shot the light from the specular surfaces in the scene will be the color of your flash/diffuser. I have seen people post triple digit focus stacks that had less detail than my single frame images due to poor light quality.

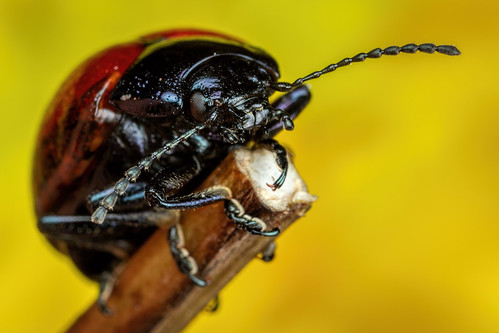
I am like a hamster on a wheel going round and round with my photography. If I am not working on technique, then it is composition or lighting or post processing -you get the point. Now I think that post processing is still my weakest area, but I am at that point in the hamster wheel. I have come to realize that my light quality is good enough, so I can take a break on that one for a little while. That light is allowing me to change my post processing and really improve the overall quality of my photos, and the light is doing most of the heavy lifting. I have started to shoot at F14 to get a little more depth (the MP-E 65mm has a hard time producing a sharp image circle at F16 that cannot be explained just by diffraction) and with the improvements that Topaz Labs has made to Sharpen AI this is what I am able to do at almost 3x:

European Wool Carder Bee

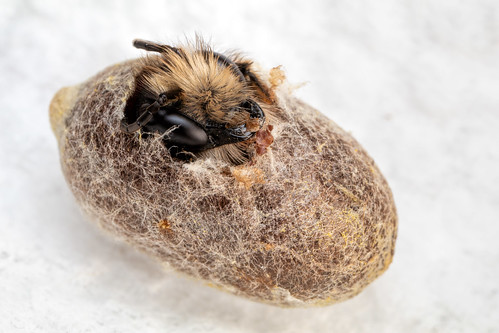
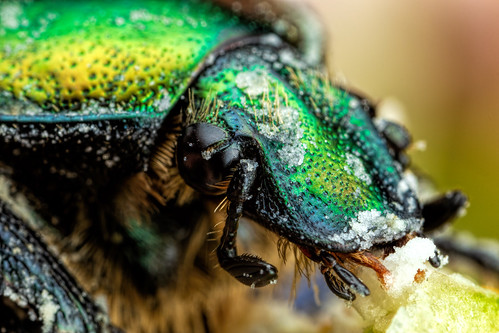
Granted if that were a focus stacked shot the trailing eye would be in focus, but due to the way our brains are wired it does not need to be. Plus, that critter was active and was not sitting still. It was already feeling warm here when I took that shot at 6am this morning. Maybe someday the tech will get good enough and I can take limited stacks of critters in motion. But that day is not here yet, and the stacked images of critters in motion that you see from time to time around the web are staged. Due to the number of people faking images of active subjects I get people asking me if the subjects that I shoot are dead. They are all alive and kicking though, some more lethargic than others due to early morning temps. Some are just hungrier than afraid:

Feeding Chafer Beetle

If you have any questions about diffusing light for field macro, then post your questions here and I will answer them. I have post moderation enabled due to all the spam posts but, if your post is not spam, I will approve it even if it is something negative about me or my photography. Just do not include a link with it unless you want me to look at your gallery.

Footnotes: Some of you have gotten bent because I include "This is a single, uncropped, frame taken handheld." with every image I post. I am not bragging or trying to rub your nose in the fact that I do not focus stack. I simply get tired of answering the same questions over and over.

I recently had to change the way that I list the magnification that I am shooting at because people see the depth in my photos and think that I am using a lower magnification and including the crop factor of the sensor (1.6x). But cropping does not change the magnification that an image was taken at, it simply creates an enlargement of the subject in the frame. So instead of listing the mag as “2x” or “over 3x” etc. I am now listing it as “set to 2x” or “set to over 3x” to avoid yet another question. The apparent depth in my images is due to the way that I am controlling where the area of acceptable focus falls in the frame, and not due to the lens I am using. At the same Fstops and magnifications Canon’s MP-E 65mm has the same depth of field as any other macro lens.

The MP-E 65mm is not less diffraction prone, but it does have a floating lens group that corrects the focus as the magnification changes. Lens sharpness, or lack of sharpness, can amplify diffraction softening. PSA: Even though an extension tube is an air gap it can still decrease image sharpness because all lenses are designed to produce a sharp image circle at a fixed distance from the image plane (film or sensor). So, adding tubes can make a lens “softer”.