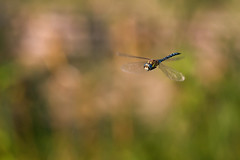
Given the choice I’d much rather shoot dragonflies on the ground, but there are some species that always seem to be in motion when I’m out with the camera. After a few attempts at shooting them in flight, and a lot of trial and error, I found a way to take shots of airborne dragons that seems to work pretty well –at least for me ;) Hopefully there will be something in this tutorial that you can use or adapt to your own style of shooting.
I don’t have a high end camera so my 40D only has nine auto focus points. Since I’m into composing with the view finder and will not allow myself to crop there never seems to be a usable auto focus point –the critter is rarely under one of them and the camera is much more likely to lock onto the background. So with the auto focus turned off on a 250mm macro lens (the 180mm L + a 1.4x teleconverter) I set the focus ring on my lens somewhere between the 2 and 5 meter mark –the critter is going to have to be close otherwise it’s going to look too small in the frame. I have the phrase “Clockwise gets close” stuck in my head, since turning the focus ring clockwise will bring the focus point toward me…
I set the camera to manual mode and either F5.6 to F11 depending on how much natural light is in the scene. I want to keep my shutter speed at or higher than 1/640 of a second since I’m hand holding a long lens (forget the 1/focal length rule for this type of shooting –it doesn’t work) and while looking through the lens in the general area where I expect to take the photo I want to see that the light meter is hovering around the -1 EC mark. I’ll adjust the ISO as necessary, but it’s pretty common for me to shoot natural light close-ups at ISO 400. NoiseWare Professional is extremely good at removing sensor noise and preserving detail, and for this type of shot I don’t need to see every lens in the dragon’s compound eye anyway.
Lately I’ve been using a 580EX II camera mounted with a 1/8” grid (to keep from throwing light everywhere) and with a ¼ CTO gel (to warm up the light from the flash). Since I’ve got an 81A warming filter on the lens I can turn what would be a rather harshly lit scene into one that looks more like it was shot in the early morning or late evening. Adjusting the white balance in post does not have the same effect, but if you don’t want to use the warming filter then you might not want to use the CTO either. In post you’ll have two completely different light sources (harsh ambient and warm flash) and there won’t be much that you can do to fix it.
I have the flash in E-TTL mode without any flash exposure compensation and it seems to work really well for subjects that are at least one meter from the front of the lens. Closer than a meter and I’m usually at -1 FEC or more. The reason for using the flash is simple: In post I’m going to raise the exposure and the gridded flash causes the subject to be exposed at a slightly higher level than the background. When I raise the exposure I can keep the background darker relative to the subject and it makes the dragonfly “pop” off of the page. I can also keep the background under exposed a little to keep the colors saturated –so that mid day sun doesn’t look like mid day sun…
Now all I have to do is wait for the dragonfly to get within range and hover, and I can usually tell where to stand by watching its feeding habits. Most insects are creatures of habit and dragonflies are no exception –they’ll get into a pattern of stopping in certain places. Once the critter hovers I quickly course focus the lens by turning the focus rind and then fine tune the focus by slighting moving my body back and forth. I refocus for every shot and I take, and delete, a lot of frames…
In post I raise the exposure, bump the contrast, sharpen the image with Focus Magic (easier to use than USM –less of a chance that I’m going to over sharpen the photo), run NoiseWare to remove sensor noise, adjust the levels to set a black point, add my copyright info to the EXIF data and save the image.

Monday, October 27, 2008
Friday, October 24, 2008
Masters of Macro Interview Series
When I was in university I had the hardest time with my electives. I’d frequently ask my professors “Why do I have to take Chinese Underwater Basket Weaving 101?! It has nothing to do with becoming an Electronics Engineer!” Their sage advice was always “To give you a well rounded education. Now shut up and finish my basket!”. To that end I give you the Masters of Macro Interview Series. Over the next few months I’m going to interview a wide range of photographers in the macro discipline to expose you to many different photographic styles. I’ve often said that the best advice I can give to new shooters is to cherry pick what you see other people doing and add your own style to it. Now’s your chance to do just that from some of the best in macro!
I should have the first interview up in a week –stay tuned…
I should have the first interview up in a week –stay tuned…
Wednesday, October 8, 2008
Shooting Close-ups in Harsh Light
Often I find myself shooting in less than ideal conditions and if I waited for perfect weather or light I’d rarely get a chance to shoot, so one of the things that I wanted to teach myself was how to photograph insects using a mix of natural light and flash. Since portrait photographers often under expose the ambient light in a scene and then use a flash to expose the subject I thought that would be a good place to start. After reading several examples at Strobist (a site that you should all be reading as well) I set out to play. This is what I’ve learned so far…
The trick is to keep the sun at an angle that's either to the side or behind you. The sun is going to be your light source for the background, and the sun + the flash will be your light source for the subject. You want to under expose the background to force the colors to saturate (I'm not shooting in good light) and to use just enough flash to keep the subject from being too dark to see any detail. I shoot in manual mode, and I set the aperture to F8 because it’s usually enough depth for the magnification that I’m shooting at (usually 1/3 life size). I set the ISO high enough to allow me to use a shutter speed of 1/640 of a second or higher –tripods and I just don’t get along. On a few rare occasions I find myself at ISO 800, but for the most part I’m shooting at ISO 400. Don’t worry about noise, since you’re going use noise removal in post (I use NoiseWare Professional because it’s great at removing noise and preserving detail). Since the ambient light in the scene is going to be under exposed you’ll actually have a lot of latitude in how you set up the camera.
I’m currently using an MR-14EX ring flash as my fill light just because I like the quality of the light that I get from it and the balance of that flash –all the weight is back by me. Any diffused light source will work just fine though. Set your flash to manual mode and the power level will depend on the flash you use and the scene that you’re shooting. I have the MR-14EX (on a Canon 180L macro lens) set to 1/32 power most of the time. If you use E-TTL then set the flash to at least -2 FEC.
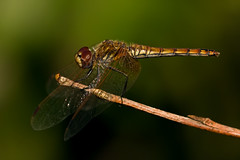
Once you find a willing subject take a shot and look at the histogram -you don't want to see any blown color channels and the overall exposure should be to the left (dark). Do not use the preview image on the LCD to gage exposure or sharpness -for the most part. For the grape vine that the dragon is perched on in the sample that I’ve included in this tutorial I wanted it to look brown on the preview. If the shade of that vine was too pail then I'd either under expose the ambient more if the background looked too bright (increase the shutter speed), or decrease the power from the flash if the background looked good to me. The image you see on your camera's LCD should look very under exposed. Later when you get the photo on the computer you simply raise the exposure during RAW processing. While watching the histogram increase the exposure, stopping right before one or more color channels blow out. Increasing the contrast will also give you a little more room to increase the exposure.
I then run NoiseWare Professional, adjust the levels to set a black point and shift the grey point, use the auto sharpen option in Elements, and add my copyright to the EXIF data. Save the image as a JPG and I’m done.
The trick is to keep the sun at an angle that's either to the side or behind you. The sun is going to be your light source for the background, and the sun + the flash will be your light source for the subject. You want to under expose the background to force the colors to saturate (I'm not shooting in good light) and to use just enough flash to keep the subject from being too dark to see any detail. I shoot in manual mode, and I set the aperture to F8 because it’s usually enough depth for the magnification that I’m shooting at (usually 1/3 life size). I set the ISO high enough to allow me to use a shutter speed of 1/640 of a second or higher –tripods and I just don’t get along. On a few rare occasions I find myself at ISO 800, but for the most part I’m shooting at ISO 400. Don’t worry about noise, since you’re going use noise removal in post (I use NoiseWare Professional because it’s great at removing noise and preserving detail). Since the ambient light in the scene is going to be under exposed you’ll actually have a lot of latitude in how you set up the camera.
I’m currently using an MR-14EX ring flash as my fill light just because I like the quality of the light that I get from it and the balance of that flash –all the weight is back by me. Any diffused light source will work just fine though. Set your flash to manual mode and the power level will depend on the flash you use and the scene that you’re shooting. I have the MR-14EX (on a Canon 180L macro lens) set to 1/32 power most of the time. If you use E-TTL then set the flash to at least -2 FEC.
Once you find a willing subject take a shot and look at the histogram -you don't want to see any blown color channels and the overall exposure should be to the left (dark). Do not use the preview image on the LCD to gage exposure or sharpness -for the most part. For the grape vine that the dragon is perched on in the sample that I’ve included in this tutorial I wanted it to look brown on the preview. If the shade of that vine was too pail then I'd either under expose the ambient more if the background looked too bright (increase the shutter speed), or decrease the power from the flash if the background looked good to me. The image you see on your camera's LCD should look very under exposed. Later when you get the photo on the computer you simply raise the exposure during RAW processing. While watching the histogram increase the exposure, stopping right before one or more color channels blow out. Increasing the contrast will also give you a little more room to increase the exposure.
I then run NoiseWare Professional, adjust the levels to set a black point and shift the grey point, use the auto sharpen option in Elements, and add my copyright to the EXIF data. Save the image as a JPG and I’m done.
Subscribe to:
Posts (Atom)