A set of Nikon SW-11s arrived in the mail today and I after modding them to let more of the light from the MT-24EX's flash heads into the first internal reflector the Puffer set that I made is back on my flash heads. When I first tested the SW-11s (shooting one of my son's Hot Wheals cars) I was losing almost four more stops than the Puffer set, and after modding them I was only able to regain one more stop. So with the Puffers I lose one stop of light compared to the bare flash heads, and with the modded SW-11s I was losing three. The diffusion with the Puffer set was also better, but I'm not going to bother posting test shots since losing three stops of light is losing two stops too much. I can't recommend the SW-11s as a diffuser for the MT-24EX
The SW-11s use two reflectors to bounce the light from the flash into a diffusion panel. Oddly enough the first reflector looks like it's at the wrong angle and it seems to me that it's actually doing more to bounce the light from the flash right back toward it instead of bouncing it to the second reflector. One possible mod would be to change the angle of that first reflector, or replace it with something that would bounce the light in the right direction. But I didn't see enough room inside the diffuser to pull it off and I'm not sure it would make much of a difference. With every reflector I'm probably losing a stop, so at a minimum the best I'd be able to do with the SW-11s is to lose two stops. Not worth it...

Monday, November 30, 2009
Thursday, November 19, 2009
I Don't Know What You Need
I get a lot of questions about gear, and one of the most common is "What macro lens should a beginner get?". Since it's a common question I figured it would make a good post for the blog, and I was all set to tell you my preference too. But while I was thinking of what lens and why it hit me: What I would tell you to buy is based on my experience, the way that I like to shoot, and the subjects that I chase with the camera. It's all personal preference based on a lot of trial and error and a lot of money spent trying to figure it all out.
You're not me, I'm not psychic, so I don't know what you need.
Ask a dozen macro shooters what the best piece of gear is for macro and you're likely to get a dozen different answers. None of them are necessarily wrong, it's just that each person is telling you what they would get if they knew then what they know now. Unfortunately none of it, or some of it, might be right for you.
Good luck figuring out what to choose...
I can tell you some generic things that might help you make up your own mind though, things that I've learned through trial and error and a lot of gear that's just collecting dust.
There's no such thing as a "bug lens".
From the insect's perspective there is no difference between the 3.5" working distance of Canon's EF-S 60mm macro lens and the 180mm L's 8.9" working distance. As far as the critter's concerned you're too stinkin' close. How much you know about the subject's habits and quirks, and the willingness of the subject to stay put, is going to determine if you can get close enough to take a shot and not the working distance of the lens. If you cast a shadow over the subject then odds are it's not going to stick around, and a long focal length lens can help you to keep from spooking the critter. But as long as you know that shadows are bad a short focal length lens will work just fine for shooting anything. Last a long focal length lens will give you better background blur (called "bokeh") and if you plan on shooting a lot of closeup images a shorter lens might not give you the overall image quality that you want.
It's easier to go above life size with a shorter focal length lens.
It's simple math: The magnifying effect of adding extension tubes is greater with a shorter lens than a longer one. On the surface it takes 60mm of extension to take a 60mm macro lens to 2x and 180mm of extension for a 180mm lens. But the formula breaks down in a really cool way -most macro lenses lose focal length at life size. Canon's EF-S 60mm is actually a 37mm lens when the focus ring is set to 1:1 (life size). So all it takes is 37mm of extension tubes to get to 2x -sweet! I'm not sure how much the 180 L loses at 1x, but I'm sure it's not less than 100mm and that's a lot of extension on a lens that's already long and heavy.
The best lens is the one you take with you.
I've got a lot of heavy, expensive L glass sitting in my closet. I've got an 18-55mm IS kit lens in my camera bag...
You can use any flash for macro.
With few exceptions the light source doesn't matter -but the quality of that light does. The important thing to remember is to use a good diffuser, one that actually diffuses the light and doesn't just block it, and get the flash close to what you're shooting. A lot of the macro that I do is really nothing more than a form of flash based stop motion photography. It's not as obvious as freezing the motion of an exploding balloon, but none the less I'm still using the short duration of the flash to freeze motion so that I can get sharp images. Using a good diffuser, and getting the flash close to what I'm shooting, allows me to keep the flash duration as short as possible. Although it sounds like I'm talking about flash photography from my perspective, since I hand hold the camera, I'm really not. A tripod won't stop the subject from moving. One final note on macro flashes: A ring flash, even one that allows for ratio control, is going to produce flat light when compared to a macro twin flash or a standard camera flash on a bracket. Ring flashes are great -for dental and portrait photography...
You don't need a tripod, or any tripod accessories, to shoot macro.
See the flash section above about getting sharp images by freezing motion with the flash. I typically look for ways to brace the camera, or I'll use the Left Hand Brace Technique. You can use a tripod, but the more hardware you add the more limited you'll be. There are a lot of subjects that just won't sit still and wait for you to setup a tripod, adjust a ball head, and focus the scene with a focusing rail. So if all you want to do is take static photos of dew covered critters, or other forms of still life, then get a tripod. I prefer not to be held back by a lot of gear and to go after active subjects, when they let me, so I took the training wheels off of my camera a long time ago :D
I know it's frustrating, and I really do wish there was a "go hear and do this" kind of answer for all of the people out there who want to get into the greatest photographic discipline of them all, macro. But unfortunately you're going to have to figure out a few things on your own, I can't teach you experience, and I'm not you. Sorry...
Wednesday, November 18, 2009
Possible Diffuser Replacement
I got an idea for a new diffuser for the MT-24EX from this thread at PoTN. So I've ordered a set of Nikon SW-11 diffusers and I should be able to test them out and post about it by the 30th of November (provided I get them in the mail before Thanksgiving). I don't know how well they are going to work, or if I'll be able to use then for my style of shooting. But just in case any of you were thinking about building a set using the Puffer diffuser I wanted to let you know that I'll be testing the SW-11s. I'm hoping that they do work, since a set of SW-11s is cheaper than buying all of the material for my Puffer based diffuser, and it's easier to just attach a pre-built diffuser to the MT-24EX than to build a set from scratch. More to come...
Wednesday, November 11, 2009
Magic Angles
From time to time you'll hear people talk about "magic angles" in macro photography. I'm not sure who originally coined the phrase, probably one of those things that's as old as photography itself. But I thought it would be a good idea to define it (since I get asked about it a lot) and to explain how I take high magnification shots with a lot of depth using a simple technique.
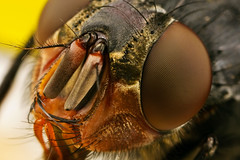
The area of acceptable focus is thin and flat, and unfortunately most of the critters I photograph are curved. The "trick" is to look for a way to lay a thin flat surface over a curve so that as much of it is covered as possible. The fly in the photo I've included with this post has a head that's almost triangle shaped and it should be pretty obvious that you can't shoot it head on. Placing a flat surface against the point of a triangle won't cover much, so there are some angles that just won't work for a single frame no matter how much depth you can get. Even though there are a lot of curves there are still some relatively flat areas that will allow you to make the most of what little depth you have at high magnification. It takes a little experience, but eventually you'll learn to recognize a good angle from a bad one.
The really cool aspect to magic angles is that I have yet to find one that does not work from a composition standpoint. If I can find a magic angle I'll end up with a well composed photo that has a lot of apparent depth. Since I'm more concerned about composition than getting maximum detail I haven't gotten into focus stacking -just haven't needed to do it yet.
Now for the technique part: For this shot I moved the lens in until the left front edge of the fly was in focus. Then, with the lower left hand corner of the frame locked in place, I moved the upper right corner in until the ridge between the fly's eye and "face" came into focus. I also turned that lower left corner on its axis, kind of spinning the frame so that the upper left corner went deeper into the scene. It's a very minor tilt / twist with my wrist that makes a huge difference in the amount of the subject that I can cover with the area of acceptable focus.
The result is an image that has a lot of depth simply because I'm not wasting any of it...
Sunday, November 8, 2009
Nice Capture
This post has been in my head for a long time, well over a year. It was going to be one of those pieces that would piss a few people off, so I sat on it while I tried to figure out how to word it. I was afraid it would come out too harsh and I'm kinda glad that I waited. You see I was gonna say that I thought it was wrong to tell someone "Nice capture" when they posted an image for critique that was, how can I put it gently...
Crap.
I was gonna say that if you have some skill and experience then you owe it to the community to give someone constructive criticism. By telling someone what they are doing right, and how they can improve, then you're not only doing the person you're responding to a favor but you're also helping everyone who reads your response. So in the end everyone wins and the macro discipline improves.
Telling someone "Nice capture" is like saying "Wow you found the shutter release!?".
But the more I post on the internet the more I've come to realize that there are a lot of people who really don't want constructive criticism. They'll post images that have some serious problems, problems that they'd have to be legally blind not to see, and what they want is for someone to tell them that they're doing great. So if anyone says anything other than "Nice capture" or "Well done" then they're opening themselves up to a wide assortment of egos, and some of them bruise like grapes. If you give honest feedback then you'll be viewed as arrogant instead of helpful -fuel for the trolls...
It's getting so bad that I've all but given up on giving constructive criticism, and not only do I now understand why some people will say "Nice capture" when a photo isn't up to par but I can also see why some have stopped teaching. The "students" don't want to be "schooled" -all they seem to want is the "diploma"...
On a semi-regular basis I hold classes on computers and networking. Every time I teach I end up learning something from the students. Either they bring fresh ideas to the discussion, or they ask questions that get me to think about a subject from a different angle. Photography is no different and healthy discussion, where people are willing to listen at least as much as they talk, is always a good thing. But unfortunately I'm just not finding much of that healthy discussion out there lately -too many egos and attitudes.
Too many trolls who only want to hear "Nice capture"...
Saturday, November 7, 2009
New Diffuser Example Image
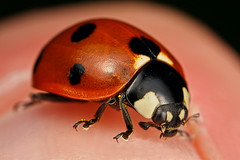
We had a break in the rain yesterday so I went hunting for critters with the camera and spotted this ladybug. Initially I tried to photograph it on a flower, but I couldn't keep the foreground from being distracting -too much out of focus junk between me and the bug. While I was holding onto the flower to keep it steady the ladybug crawled onto my hand and I took the shot to the right. Even though I took the frame at close to 3x the specular highlights (the bright spots on the shell) and the level of detail are a pretty good indicator that the light is very well diffused.
I had both flash heads mounted directly to the flash mount that Canon supplies with the MT-24EX, and both pointed directly at the ladybug. To get better shadows, and to eliminate the specular highlight on the left, I could have placed the "A" flash head (the one I use as a key light) on a Kaiser adjustable flash shoe. But I was really looking for a worse case situation with the lights just to show the level of diffusion with the new diffusers.
If you need more proof then click on this image to see a 1600 pixel wide version. Take a close look at all the texture detail that I picked up in the shell, and all of the fine hairs on the legs. In the past it would look like a ladybug had a layer of clear coat on it, and very little of the detail in the shell would come out in the resulting image. Much better diffusion, and the overall quality of the light is a lot better. I'm still experimenting with ways to improve it, but if this is the light quality that I'm taking into next year then I'll be happy with it...
Friday, November 6, 2009
Know Your Gear
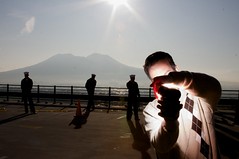
It's early in the morning on the roof of a parking garage and with Vesuvius in the background, as well as the sun, Scott Knauss and I were trying to get two 580EX II flash heads to fire from a single STE-II controller. Due to the low angle of the sun, and the sailors of the N8 department wearing their dress blues, we needed a lot of light. So I spent entirely too much time fumbling with my flash trying to figure out how to set it as the "B" flash in a two flash group. All of the other times that Scott tripped the shutter to test the light I was holding the flash away from me, but as my luck would have it the one time I'm looking right into it it works. So what does the image demonstrate, other than I'm sometimes a dumb ass?
Know your gear.
Don't wait until your out in the field trying to setup for a shot to figure out how something works. Take the time to read the manual and practice at home, when mistakes won't cost you a once in a lifetime photo.
Don't be a dumb ass...
Know your gear.
Don't wait until your out in the field trying to setup for a shot to figure out how something works. Take the time to read the manual and practice at home, when mistakes won't cost you a once in a lifetime photo.
Don't be a dumb ass...
Tuesday, November 3, 2009
MT-24EX Diffuser How To
This is my first video tutorial on building a diffuser for the MT-24EX, so be gentle :)
The parts list is pretty expensive, and with the exception of the Gary Fong Puffer diffusers the rest can be done with common items that you might have around the house. One word of caution: Cutting the mounting bracket that comes with the Puffer diffusers will void the warranty, and so will hot gluing the finished diffusers to your MT-24EX (you can use Gaffers tape instead of hot glue). I am not responsible for any mishaps or mistakes that you might make...
Garry Fong Puffer diffuser -you'll need two and the sticker shock is normally $39.90 USD + shipping. I ordered mine directly from Garry's E-store and the plastic that he's using now is a lot clearer than the Puffers that I ordered about a year ago. A little less diffusion, but the light isn't as warm either.
Metallic inserts for a Lumiquest Big Bounce -you'll need one set ($17.95 USD + shipping) if you want to use the same reflector material that I used to cover the top and bottom of the Puffer's.
Manfrotto Diffusion Pack -I've been using the diffusion material in this kit for a lot of projects. 12"x12" sheets of a dozen different types of diffusion plastic. $22.95 USD + shipping and handling.
Sto-Fen Diffusers -Just to use as a frame to make the finished diffuser easier to attach to the MT-24EX's flash heads. $22.95 USD + shipping.
I know, it's expensive. I tried to find a cheaper solution that worked as well but couldn't...
What I didn't mention in the videos: I made a template out of cardboard that I used to mark the Lumiquest reflector material before I cut it.
You'll notice in the second video that the reflector that goes over the MT-24EX's modeling lights has a high arch to it. I've since re-designed the diffuser by putting the top reflector onto the Puffer while the diffuser was attached to the MT-24EX's flash heads so I could get a tighter fit.
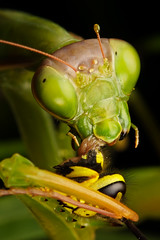
Fresh Meat Deconstruction
Sorry folks -not one of my "warm and fuzzy" insect macro shots. But it's rare that I even see a mantis around here, and even rarer still to find one feeding, so when I spotted this huge female eating a wasp I had to photograph the action.
The hardest part of shooting a predator / prey scene is getting both of the creature's eyes in the plane of acceptable focus. We are predators, and we gauge the intent of other beings by looking at their eyes -it's just instinct. The funny thing is that if the eyes are in focus the rest of the shot can be completely out of focus and the viewer won't really care. But if the entire image is in focus, but the eyes are out, then the entire image will seem out of focus. With two "subjects", the mantis and its dinner, the eyes have to be in focus on both of them.
For this shot I wanted a tight composition -the mantis is in some weeds and there is a lot of junk behind her. The lower the magnification the greater the chance that the flash is going to illuminate something in the background and I hate spending any amount of time in post cloning out junk that I shouldn't have shot in the first place. I also wanted you, the viewer, with your attention right on the action. So I kept the magnification at around 2x but framed the shot as a vertical image -shot with the camera held horizontally because it's easier for me than holding the rig vertically. All I had to do was turn the image 90 degrees in post.
Since I was almost laying on my side, and I didn't move the flash heads, the lighting was very direct and moody. I frequently shoot with my flash heads at the 11 O'clock and 2 O'clock position (relative to me) and leave them there no matter what angle I have on the subject. The end result is lighting that doesn't look the same in every shot, and if an image comes out really well it's easy enough to just look at the specular highlights to tell where my flash heads were positioned. Recreating the same effect later, for another scene, is simple. One of the things that's really improved my lighting is learning how to reverse engineer the light in any image so I can see what works, what doesn't, and how to create the light that I want. The light in this shot is no accident -I knew what it was going to look like before I pressed the shutter. Like everything else it's easy to do with a little practice...
Subscribe to:
Posts (Atom)