Sunday, June 24, 2007
Macro flashes and eating crow
*sigh*
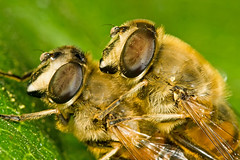
Since I’ve got an MPE-65 coming in the mail I decided to give the MT-24EX another try. Like always I set the ratio control to 4:1 and set the flash heads almost 180 degrees apart –and I got that ugly glare. Mark Plonsky looked at my photos and wondered why I was shooting at a 4:1 ratio since he rarely uses ratio control at all and when he does it’s never more than 2:1. What he does to get shadows is move the flash heads closer together (not 180 degrees apart) or he changes the angle of the flash heads.
I really felt stupid…
I should have thought about it myself, but instead I was stuck on setting the flash heads at opposite ends of the lens and using a ratio that guaranteed a bad reflection.
*sigh squared*
So I turned off the ratio control and set the flash heads at a 90 degree angle to each other. The results can be seen in the photo attached to this post. Nice shadows and the only minor reflection that I got were off of the fly’s wing –not bad.
Thanks again Mark for getting me to think outside the box!...
Friday, June 15, 2007
Focusing Tips
I often get asked how I get so much depth of field in my photos. There isn’t any magic to it really, it’s just technique. Here are some tips to help you get as much depth as possible.
Don’t be afraid to stop the lens down. Diffraction can be a problem, but I frequently shoot at F16 when I’ve got all my tubes and a diopter attached to my lens (about 2.75 times life size). Rarely does diffraction become a big issue with Canon’s 100mm macro lens unless you go above F16, and I’d probably shoot at F22 for life size shots if I needed the extra depth of field. If you don't like the diffraction softening then bring the Fstop down to F11 at 2x or F8 at 3x.
Remember that the plane of sharp focus is perpendicular to your lens and although it’s flat it has some “thickness” to it. If you move in toward a critter until its eyes are in focus, and then press the shutter release, then the plane of sharp focus starts at the eyes and ends somewhere between the critter and your lens –possibly out in the middle of nowhere in an area that you don’t need it! Often I move in toward an insect until the eyes are in focus and I keep moving in until they go out of focus again, and then I move away from it until the eyes are sharp and then take the shot. That way the area of sharp focus starts at the critter’s eyes and extends into its body where I need the extra detail…
Look for “magic angles”. Since the plane of sharp focus is perpendicular to the lens you can lay it over your subject so that it covers the critter like a blanket. You can make a scene look like there is more depth of field than what is really there. If you are shooting an insect from the side it’s a good idea to make sure the lens is perpendicular to the plane of its body so that the entire length of critter is in sharp focus –but it’s not necessary to do it all the time. You can use a shallow depth of field to draw the viewers attention to a particular area in a scene, so going for maximum depth of field all the time might be a mistake...
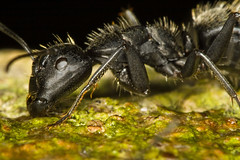
For the shot I’ve attached to this post I wanted the front leg to be in focus since an out of focus leg close to the ant’s face might be distracting. So I moved in until the eyes were in focus and then looked for “texture” –in this case the hair on the ant's legs. Once you’ve been shooting a particular critter for a while you can start to pick up on their unique textures. Body hair, scales, the lenses in the compound eyes, etc are all good examples. Use those textures as a visual clue to tell you when the area of sharp focus is where you want it to be.
I always take more than one shot of a particular composition, and I refocus the lens for every shot. I frequently shift the area of sharp focus from frame to frame just a little because sometimes a scene that looks good through the viewfinder doesn't look good when I get the image on my computer. Also shifting the focus can change the way a photo looks and feels -something that might not be easy to see in the view finder but very noticable on screen or in a print…
These are just tips and not rules etched in stone. How you use depth of field is a part of developing your own photographic style, so experiment and practice –lots of practice…
Happy shooting!
Footnote: After reading the first comment and looking over this post it dawned on me that I didn't mention the mechanics of focusing the scene. You can use the focus ring on the lens, or you can set the focus ring to any magnification you desire (most macro lenses have magnification marks on them) and move your body to adjust the focus. Either way is fine, and is really up to you. Last year I used the focus ring almost all the time and I locked my body in place. This year I use the "rock back and forth" method almost exclusively. And sometimes I use the focus ring like a course focus to get the composition that I want and then move my body to fine tune the scene. The best advice I can give you is to simply experiment and see what works for you...
Sunday, June 3, 2007
The Bazooka
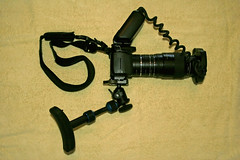
All Canon gear: Xti + 62mm of extension tubes + 100mm macro lens + 500D diopter. Magnification: 2.75x life size.
MR-14EX ring flash (notice that I have it turned so that one ring is on top of the lens and the other is on the bottom).
Novoflex Chest Pod with the neck strap and camera mount removed. Really Right Stuff 25mm ball head mounted to the chest pod. Normally I use it like a gun stock, but I can swing the whole thing down and use it like a miniature monopod if I need to.
Using a Canon 500D diopter
Mark, as usual, was right -the bokeh is excellent!
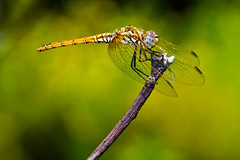
The 500D does take a little getting use to. I don't think that it gives me less depth of field, but it seems to compress the area of focus in the sense that a scene goes from being in sharp focus to being completely out of focus over a shorter distance. The area of sharp focus is the same as not using it, but the area between sharp and blurry is reduced -if that makes sense. Take a look at the background in the image with this post. I shot that female Violet Darter in a peach orchard, but all you see is s diffused sea of green due the way the 500D smoothes out the background.
There is no loss in image quality -period.
The 500D is designed to correct for chromatic aberration and it helps to keep the image circle sharp and, unlike an extension tube, there is no loss of light. The magnification that I get with the diopter is almost the same as a 25mm extension tube (1.375x for the 500D verses 1.39x for the 25mm tube). Given the choice between using the 500D and a teleconverter I'll take the diopter. But there is one problem...
Don't use a teleconverter with the 500D.
Stacking tubes between the camera and the lens with the 500D is no problem (all of my recent shots above 2x were taken with the diopter and tubes), but I wouldn't recommend using a teleconverter with the diopter -way too much glass and there is no increase in working distance.
I've had the 500D on the end of my 100mm macro lens since I've bought and only took it off once to shoot some bees in flight...
Friday, June 1, 2007
The Working Distance Myth
Those that will let you get close and those that won’t…
It really doesn’t matter what macro lens you have attached to your camera. If an insect stays put, then it will let you get close and you’ll take a picture of it -period. The lens, and the gear in general, does not decide how close you can get –the insect does. Now you might find it easier to work with a 100mm lens over a 60mm simply because you’ve got more room to maneuver with the longer lens. But shooting with a long focal length macro lens will not guarantee close shots of anything.
You’re skill at getting close is what counts.
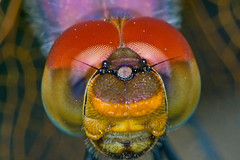
Take the head shot that’s included with this post. I saw several dragonflies that day, but few would let me get next to them. But I know from experience what to look for and when I spotted one feeding from a perch I tried my luck. I got the full body shot that I wanted, so I backed up and added 62mm of extension tubes to my Canon 100mm macro and the 500D diopter (it was already on the lens) for about three times life size magnification. This dragonfly really liked that perch –he was hunting bees from it and if you look closely at the whiskers you’ll see pollen stuck in them (click on the photo for a larger image). So I knew I could get close and the working distance of my 3x rig, 9cm (about 3.5 inches), made no difference. I know several shooters who are taking insect shots at life size and higher magnification with Canon’s EF-S 60mm lens and it has a working distance of less than 4 inches (about 10cm).
It’s not the gear that makes the difference –it’s you…

