I really like the way that natural light macro looks, with the subject and the background equally well lit. But there is never enough low contrast natural light for the kind of hand held images I like to take, and using a tripod is out of the question. By the time I got setup the critter would be long gone, and even if it didn’t take off the slightest little movement would ruin the shot anyway…
So what I need is the background illumination that’s possible with natural light, but the motion stopping power of a low duration burst of flash light. With the MT-24EX and a flash bracket it’s possible to get both.
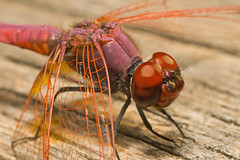
I have a Really Right Stuff flash bracket and some extenders for it. So I set one flash low to the lens and pointed it directly at the dragonfly in the photo included with this post. I set the other flash head on an extender and positioned it above the critter and pointing down to use it as fill flash for the area I’m shooting. I got a little bit of reflection from the direct flash –and I think I can work that out in time. But look at the overall illumination in the frame. Not too bad…
You don’t have to use a Really Right Stuff bracket and extender –you could put one flash head on the standard Canon flash mount for the MT-24EX and then place the other flash head on a bracket. The advantage to using the RRS bracket and extender is that I can position both flash heads toward the top of the lens where it’s easier for me to keep from bumping into things with them. I also have more angles available to me with the RRS mount than I can get out of the standard flash mount that comes with the MT-24EX.
Using one flash head for fill also works well when you’re shooting an insect from the side and you want to illuminate the area directly behind it. Just angle the “fill flash” so that it is pointing toward the area you want to light up.
So far I’ve tested using one flash head for fill all the way to 4x and the flash cycle time is fast –meaning that the flash duration is short and I’m able to freeze motion. Not only am I stopping the motion of the subject, but I’m stopping my own motion as well with just one flash head without having to go above ISO 100. Sweet…

Saturday, September 15, 2007
Sunday, September 2, 2007
Shooting Bees
If you’ve read my other posts on shooting insects (Shooting Butterflies and Shooting Dragonflies) then you can photograph the majority of the critters out there. But there are a few more useful tips that I can give you for shooting bees that are different than photographing other creatures so I’m listing them here.
Bees feed in a predictable pattern, both in the area that they are in and on the flowers that they get nectar from. If you see a bee feeding on a flower and it takes off odds are it will be back later (or one just like it). Honey bees communicate the location of the food sources that they discover, so if there is a flower that they like they’ll tell the hive where to find it. Bees feed on different flowers in different ways; Some flowers are shallow and it’s easy for the bee to feed from it –maybe they’ll only stay a second or two. Other flowers require the bee to go deep to get the nectar out, so they’ll stay in the flower longer –and you’ll have a better chance of getting the image you want…
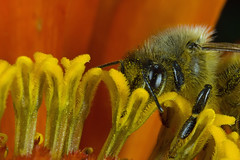
Another thing to watch for is that bees move around a flower in a predictable way. I often frame the image and simply wait for the critter to get into the picture. The photo I’ve included with this post is a prime example –all I had to do is wait for the bee to move into the area I wanted it in and then press the shutter release. It was hot that day, the bees were very active, and yet I got a clear shot at twice life size. Easy, once you know what to look for…
A lot of insects, bees included, will occasionally stop to clean themselves. So if you see a bee that's actively feeding, but moving too fast to photograph, watch it for a while and see if it stops to clean the nectar from it's legs or antenna.
All insects get a little lethargic when the temperature rapidly drops, and bees seem to have a habit of getting caught out in the open when spring or fall storms roll in. Before, or after, it rains look for bees that have been slowed down by the changing weather so you can photograph them when they are barely moving.
If you are getting frustrated by fast moving bees put a little corn syrup in an area where they are feeding and photograph them while they eat. One word of warning: Use a little bit of corn syrup –putting a lot of it down won’t attract bees any faster than using a little, but you might empty an entire bee hive if you use a lot of it at once…
If the bees are actively feeding on a particular type of flower then simply use a syringe to inject some corn syrup into it. Once the ladies find it and start feeding they'll usually let you get close for a few photos.
On hot days put out a little water in a shallow dark colored saucer and photograph bees that stop for a drink.
Some bees are very aggressive and if they start acting threatening then leave them alone. I’ve had some honeybees bees go from casually feeding to being in my face faster than you can snap your fingers, and I’ve been chased out of an area on more than one occasion. They key to not getting stung is to not push them –if the bee wants you to leave then leave…
Last, but not least, never swat a bee that lands on you. Most of the time it's just stopping to take a breather and the bee has no intention of stinging you. I’ve had them land in my hair and all I had to do was shake my head to get it to leave. If you take a swing at one and miss odds are it will come back at you, and this time you will get stung. Honey bees not only communicate the location of food sources, but they can also tell the hive where to find that irritating photographer…
Bees feed in a predictable pattern, both in the area that they are in and on the flowers that they get nectar from. If you see a bee feeding on a flower and it takes off odds are it will be back later (or one just like it). Honey bees communicate the location of the food sources that they discover, so if there is a flower that they like they’ll tell the hive where to find it. Bees feed on different flowers in different ways; Some flowers are shallow and it’s easy for the bee to feed from it –maybe they’ll only stay a second or two. Other flowers require the bee to go deep to get the nectar out, so they’ll stay in the flower longer –and you’ll have a better chance of getting the image you want…
Another thing to watch for is that bees move around a flower in a predictable way. I often frame the image and simply wait for the critter to get into the picture. The photo I’ve included with this post is a prime example –all I had to do is wait for the bee to move into the area I wanted it in and then press the shutter release. It was hot that day, the bees were very active, and yet I got a clear shot at twice life size. Easy, once you know what to look for…
A lot of insects, bees included, will occasionally stop to clean themselves. So if you see a bee that's actively feeding, but moving too fast to photograph, watch it for a while and see if it stops to clean the nectar from it's legs or antenna.
All insects get a little lethargic when the temperature rapidly drops, and bees seem to have a habit of getting caught out in the open when spring or fall storms roll in. Before, or after, it rains look for bees that have been slowed down by the changing weather so you can photograph them when they are barely moving.
If you are getting frustrated by fast moving bees put a little corn syrup in an area where they are feeding and photograph them while they eat. One word of warning: Use a little bit of corn syrup –putting a lot of it down won’t attract bees any faster than using a little, but you might empty an entire bee hive if you use a lot of it at once…
If the bees are actively feeding on a particular type of flower then simply use a syringe to inject some corn syrup into it. Once the ladies find it and start feeding they'll usually let you get close for a few photos.
On hot days put out a little water in a shallow dark colored saucer and photograph bees that stop for a drink.
Some bees are very aggressive and if they start acting threatening then leave them alone. I’ve had some honeybees bees go from casually feeding to being in my face faster than you can snap your fingers, and I’ve been chased out of an area on more than one occasion. They key to not getting stung is to not push them –if the bee wants you to leave then leave…
Last, but not least, never swat a bee that lands on you. Most of the time it's just stopping to take a breather and the bee has no intention of stinging you. I’ve had them land in my hair and all I had to do was shake my head to get it to leave. If you take a swing at one and miss odds are it will come back at you, and this time you will get stung. Honey bees not only communicate the location of food sources, but they can also tell the hive where to find that irritating photographer…
Subscribe to:
Posts (Atom)