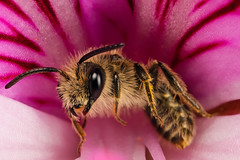
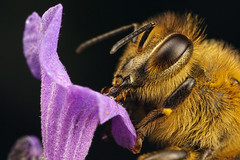
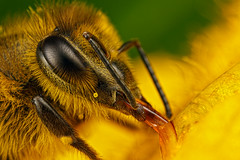
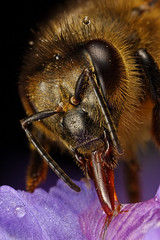
National Geographic is running a Macro Photography Tips article on their web site that includes two of my images -the one pictured in this post was used as the lead image.
Another one of my images is being published in National Geographic Young Explorer magazine this January / February.
Wednesday, December 29, 2010
Tuesday, September 28, 2010
Corn Syrup
One of the people who reads my blog, Elise, submitted this comment on my last post and I think it's important to share with everyone else:
"...I wondered if you're using high-fructose corn syrup as bee bait? I'm guessing not, but I just wanted to check, as I was a little concerned given studies that show a potentially harmful substance may form in high-fructose corn syrup that may contribute to honey bee deaths and colony collapse disorder (I use local, raw, unprocessed honey myself when baiting bees). For more info on HFCS and HMF see this article"
So there you have it -corn syrup as an attractant is a no no. Since the majority of the commercial beekeepers I talk to say that the quantities that I use as bait are too small to cause problems I'm going to go back to using honey.
Monday, August 30, 2010
Taming E-TTL
It’s been a while since I talked about lighting in general, and one of the things I’ve struggled with the most is E-TTL flash metering. Before I dive into an explanation of E-TTL I’ll answer the one question that’s sure to come up in the comments: “Why not just use manual flash mode”. The answer is simple: I can only adjust the MT-24EX in full stop increments and it’s just not enough control. I typically end up with a shot that’s too under exposed (and under exposing leads to more image noise and less detail). Also minor changes in angle can make significant changes in the amount of reflected flash light that comes back into the lens, and I just don’t have time to make a lot of adjustments when shooting active subjects. So I’d rather use E-TTL but to make the most of it I had to figure out how it works…
When I press the shutter release on my camera the flash sends out a short burst of light that the camera’s metering system uses to determine how long the main flash pulse is going to fire. If the subject fills the frame, or there is something close behind the subject for the light to bounce off of, then odds are the light meter in the camera will be able to correctly determine how long to turn on the flash to give me a properly exposed image. But if the subject doesn’t fill the frame, and there isn’t anything close in the background for the flash to bounce off of, then the light meter is going to turn on the flash so long that I’ll probably get an over exposed image. That’s how Evaluative–Through The Lens (E-TTL) flash metering works. To get the most consistent results with E-TTL I need to get as much of the metering flash burst back into the lens as possible, and that’s what I’ve done with this field studio:
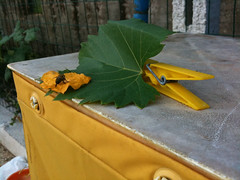
The trick is to initially bate the flowers that the bees are feeding on. Once the girls get into the habit of looking for the corn syrup (believe it or not it will take them a while) simply cut a piece of the flower petal, place it in a convenient spot close to where the bees are feeding, and set up a back drop (in this case a leaf). You’ll get better E-TTL metering since there’s a backdrop to reflect the metering pulse back into the lens, and you’ll have more time to concentrate on framing and composition because the camera is taking care of the exposure.
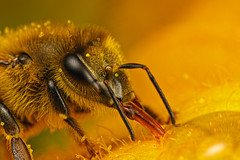
You can do a similar trick with dormant subjects –just cut the perch that they are using and hold it up in front of a leaf (or anything that will reflect light back into the camera and give you a pleasing background):

Footnote: The light meter in most cameras samples the frame at the same areas as the auto focus system. So a camera with more auto focus points will typically have a more accurate light meter.
Until next time, happy shooting :)
John
When I press the shutter release on my camera the flash sends out a short burst of light that the camera’s metering system uses to determine how long the main flash pulse is going to fire. If the subject fills the frame, or there is something close behind the subject for the light to bounce off of, then odds are the light meter in the camera will be able to correctly determine how long to turn on the flash to give me a properly exposed image. But if the subject doesn’t fill the frame, and there isn’t anything close in the background for the flash to bounce off of, then the light meter is going to turn on the flash so long that I’ll probably get an over exposed image. That’s how Evaluative–Through The Lens (E-TTL) flash metering works. To get the most consistent results with E-TTL I need to get as much of the metering flash burst back into the lens as possible, and that’s what I’ve done with this field studio:

The trick is to initially bate the flowers that the bees are feeding on. Once the girls get into the habit of looking for the corn syrup (believe it or not it will take them a while) simply cut a piece of the flower petal, place it in a convenient spot close to where the bees are feeding, and set up a back drop (in this case a leaf). You’ll get better E-TTL metering since there’s a backdrop to reflect the metering pulse back into the lens, and you’ll have more time to concentrate on framing and composition because the camera is taking care of the exposure.

You can do a similar trick with dormant subjects –just cut the perch that they are using and hold it up in front of a leaf (or anything that will reflect light back into the camera and give you a pleasing background):

Footnote: The light meter in most cameras samples the frame at the same areas as the auto focus system. So a camera with more auto focus points will typically have a more accurate light meter.
Until next time, happy shooting :)
John
Tuesday, July 6, 2010
All Work and No Play...
...is making Johnny a very dull boy. Sorry for my lack of posts -way too much Real Life getting in the way lately. Being a network engineer is fun -but replacing nearly every piece of gear in two nets that haven't been upgraded in over six years isn't ;)
After a brutal two months at the day job I took a long weekend and stayed out at my mother in law's farm. Early one morning I was out looking at the flowers I'd planted when I spotted a very lethargic solitary bee on some mint (odd for this time of year). So still in my pajamas I ran back to the house and broke out my camera. Fortunately the muscle memory that I've built up from shooting macro hand held seems to be permanent and placing the area of acceptable focus where I want it is still easy and automatic. So if you're still struggling with nailing the focus don't worry about it -you'll get the technique down soon enough. Just keep practicing!
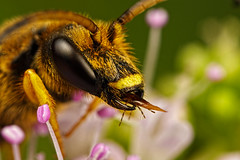
One of the things that I do, especially for shots like the one I've included with this post, is tilt one corner of the frame a littler further in while locking one corner in place. By locking the lower left corner, and tilting the upper left into the scene a little, I can get one of those "magic angles" that makes the most of what little depth I have. Although it looks like I've got a lot of depth, or I focus stacked, because that stamen and the bee are both in focus it's just an illusion -the image is a single frame shot at 4x and F10.
The last trick was placing a sunflower leaf behind the bee so that the flash would have something to reflect off of and I could keep the background from being black. Not that I have anything against black backgrounds in macro photos -sometimes it's best to let the background go dark. But for this shot the contrast between the subject and green works, and that's the real reason why I took the time to position the critter in front of a leaf.
Until next time take care :)
John
Saturday, May 1, 2010
Bee Part of It!
The BBC in the UK is about to launch a project called Bee Part Of It, to help raise awareness of the plight of the UK bees and encourage people to help through education and the planting of 40,000 new bee-friendly spaces.
They're working with the National Trust, The Wildlife Trusts, various bee organizations and the project is supported by the award winning BBC2 television wildlife series Springwatch.
One of the things they're doing to help people engage is to run a Bee Part Of It group on Flickr to help aggregate bee collections from across Flickr and encourage people to submit new work to showcase these amazing insects where they live.
I've already agreed to help with the project in any way that I can, and I encourage you all to do the same!
Saturday, March 20, 2010
Building Mason Bee Homes
You might recognize a few of the images in this video produced by Greg Peterson :)
Tuesday, January 19, 2010
Set a Baseline
Once you reach a point where you can make an honest analysis of your work then set a baseline for yourself. Take your best image (you can use more than one), and set it as the wallpaper on your computer (phone, PDA, etc.) and when you see it take the time to pick it apart. Look for ways that you could make it better, and then try to apply those changes to all of your future images (if possible). The goal isn't to re-shoot the exact same scene, but to find and fix mistakes that you might be repeating.
Once you take a better photo then set it as your wallpaper and start the process over again. The image included with this post is my current baseline. It's sure to change, but I may not come back and update this post.
Remember that you need to take the feedback that you're getting from other photographers with a grain of salt -both good and bad. If you start believing all of the positive things that people tell you then you might stop improving, and if you can evaluate your own work then no one should be pointing out mistakes that you're not seeing...
Friday, January 15, 2010
Extreme Macro -the Art of Patience
I recently finished my first book, Extreme Macro -the Art of Patience, and it's a coffee table book with some of my best images from 2009 as well as tips on how to shoot insects at high magnification.
Writing a book is something that I've wanted to do for a while, and I plan on getting into a regular schedule of photography through the year with a new book in the winter. I have a few ideas for the next one, but haven't settled on a single theme yet. If there is anything you'd like to see in the 2010 / 2011 edition then please let me know in the comments.
Writing a book is something that I've wanted to do for a while, and I plan on getting into a regular schedule of photography through the year with a new book in the winter. I have a few ideas for the next one, but haven't settled on a single theme yet. If there is anything you'd like to see in the 2010 / 2011 edition then please let me know in the comments.
Thursday, January 14, 2010
Macro Photographer of the Year
Considering the level of the photographers that entered the competition, and that have galleries on the Digital Photographer web site, I'm honored to have won!
Subscribe to:
Comments (Atom)

