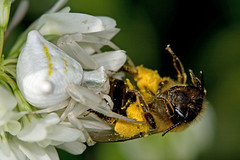
Depth of Field (DoF) is one of the most valuable commodities in macro photography –there never seems to be enough. You can try shooting with very small apertures, above F11 for example, but optical distortion effects like diffraction will rob you of any detail that you gain. Your images will be in focus but still appear “soft”. If anything macro photography will teach you about making compromises, and sometimes you have to sacrifice a little depth DoF to get sharper images, and that means opening the lens up and shooting at Fstops below F11. So what do you do?
Use a small Fstop to blur the background.
A low Fstop can be used to isolate the subject. You’ll lose some detail in the critter that you’re shooting, but more importantly you’ll lose detail in the background. Objects in the background that would have been distracting at F11 will just blend together and smooth out at F5.6 and make the subject stand out in the photo –so don’t be afraid to shoot with a small depth of field.
Learn to make the most of the depth of field.
The plane of sharp focus is perpendicular to the lens, so if you shoot an insect “head on” very little of it is going to fall into the plane. But if you shoot that same insect at an angle that places the plane of sharp focus along the length of its body then you’ll create the illusion that there is a lot of depth of field. Often called a “magic angle” the photo in this post is an example of one application of it. I needed to get both the bee and the spider’s eyes in focus –if I didn’t then the image wouldn’t work. So I shifted the angle I was shooting at until I could place the plane of sharp focus over the bee’s eye and the side of the spider’s head. Even though I was using tubes with a teleconverter for that shot, and shooting at F8, it looks like there is a lot of depth in the image. Magic… ;)


No comments:
Post a Comment