

The key to getting good at flash photography is to understand how the flash works. I’m sure I’ve said this before but I’ll say it again: The intensity of the light that your flash produces does not change –ever. No matter what the exposure is the intensity of the light that the flash produces from frame to frame is always a constant. The only thing that does change is the duration of the light –darker scenes require the flash to turn on longer than lighter ones.
You’d think that getting more distance between the flash and the subject would be a good thing, but the duration of the flash has to increase to give you a correct exposure. Reflections become more of a problem because the light has more time to bounce off of shiny surfaces. Plus it gets more difficult to freeze motion since the light is on longer –there is more time for you, or the subject, to move.
I can’t tell you how much time I spent trying to get the flash away from the subject thinking that it would make the light less harsh and improve the quality of my images… *sigh*
So how do you get a short flash duration and at the same time reduce reflections? Get the flash heads close to the subject, and then experiment with the angle of the flash heads. The flash duration will be low, so freezing motion and getting sharp images won’t be an issue. As for reflections; sometimes all it takes is a minor change in the angle of a flash head to cut most, if not all, of the reflections out of a scene. The image above is an example of getting the flash heads of the MT-24EX close to the subject and using one flash head as a fill light (positioned over the top of the dragonfly).
I tried experimenting with using the flash head that’s over the subject for the main light source and the other as a fill flash for the shadows by setting the ratio control on the MT-24EX to make the overhead flash twice as bright as the fill light. Here’s the result:
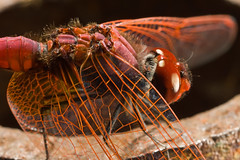
If you look at both of the images with this post you’ll see that the bottom photo doesn’t have as much detail in the eyes because the shadows are too strong. Also since the camera is metering for the entire scene the flash head that’s over the subject has to be on a lot longer to get the scene properly exposed (due to the distance and the angle of the overhead light source). I knew the flash duration was high because it was taking too long for the flash to recycle after each frame. So I went back to using the flash heads at equal power and the struggle continues… :)
8 comments:
I really enjoy your blog. I am just starting out with photography (Canon Rebel XTi) and find your posts VERY informative and insightful. I would really love to get into macro photography and have created a wish list on amazon for family and friends based on many of the posts in YOUR blog (hurry up Christmas!). Do you recommend a diffuser, or other solution, for on-camera flash like whats on my XTi until I can get a better flash? Also, have you experimented any with Sigma's macro lenses or Tokina's? I have my eye on the Canon 100mm macro but wanted your input on some of the other lenses out there.
VERY carefully cut a slit in a ping pong ball big enough so that you can slide the ball over the built in flash -instant diffuser for less than a dollar and it works really well.
Please be careful cutting that slit...
Unfortunately I have no experience with other lenses, but I am of the opinion that all of true macro lenses out there are excellent. What counts is how you use them...
My only advice is to stay clear of macro lenses that extend when you focus them -seems to me that you could spook a lot of critters that way ;)
Thanks for the props -I'm glad you like the blog!
I'm going to the local sporting goods store TONIGHT to pick up a set of ping pong balls! Great idea!
Cool :)
I carry one in my camera bag just in case I need it for a portrait, or if I want to take a quick macro shot but I don't want to set up the MT-24EX.
I used a butane powered soldering iron to burn a hole in the ping pong ball that I have -came close to scorching my fingers! :)
Update: I purchased my ping pong ($1.28 at Wal-mart for 6) balls this weekend and used a utility knife to cut out a nice half moon cut. This made for a nice snug fit on the Canon XTi built-in flash. I REALLY like the subtle diffusion it creates. The shadows were slightly softer and the highlights were not as blown-out. The ONLY complaint I have is that its giving a slightly yellow cast. I corrected this effect with a custom white balance but found it irritating to switch white balances when switching between using the ping pong ball and not. I think in the future I will correct the yellow cast in post. Thank you once again for an amazingly simple yet effective tip. :)
I'm glad I could help!
Here's one more: leave the white balance set to "auto" on the camera. In post do one of these two things; either change the white balance until you get the color cast you want (assuming that you shoot RAW) or simply do an auto levels adjustment in Photoshop.
I've found the easiest way to remove the color cast is to do the following in Photoshop: 1 - Duplicate layer; 2- Filter > Blur > Average; 3 - Add curves adjustment layer; 4 - Use the middle eye dropper to pick neutral values and select anywhere on the image (will be a solid color) ; 5 - remove blurred layer. The resulting levels adjustment will be too harsh so reduce the opacity till you get the desired result. Perfect nearly every time!
Cool! I little too time consuming for me -I hate post processing :)
Post a Comment