
I’ve spent the last six months or so experimenting with the MT-24EX and looking for a way to get the light I want from a flash that, out of the box, is really harsh. I started by learning how a flash works by reading the HiViz web site and reading the tutorials at Strobist. There is a huge difference between getting good results with a flash and understanding how you’re getting the light that you’re seeing in your images. If you’re not willing to invest a little time to read those two sites then, IMHO, you should stop reading this post now. Odds are I’m going to confuse you in the long run because you’re not going to understand what you’re doing –and you’re not going to understand why the things that I do work…
The last disclaimer before we get into the nuts and blots of things: I am not now, now will I ever be, the last word on any photographic discipline. There are a lot of ways to get from point A to point B and I’m only giving you one of them –my way. Take what you read here and elsewhere and experiment. Make your photography look like it’s coming from you and not me –otherwise you will always be walking in my shadow…
Let’s get started by going over what I’ve learned about ratio control on the MT-24EX.
The light that the MT-24EX produces is harsh. Enabling ratio control just makes one flash head a lot harsher that the other –but the light is still harsh.
You do not need ratio control to get good shadows, so turn it off. The only time you should have ratio control enabled is if the flash heads are 180 degrees apart on the flash mount and even then if you have the heads angled differently you still don’t need ratio control. If you do feel the need to use ratio control then don’t set it higher than two to one –and keep in mind that I do not use it…
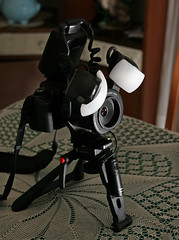
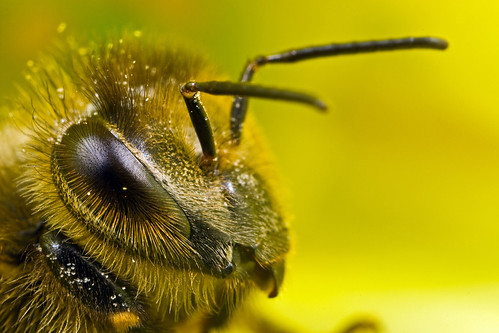
You can get really good shadows and images that look three dimensional just by placing the flash heads as close together as possible at the top of the flash mount. The image included with this post is how I have my flash heads positioned on the ring for 90% of the images that I take. The other 10% varies with the scene that I’m shooting, like if I’m trying to keep the flash heads from being blocked by leaves or other obstacles. It helps if you can visualize in your head how the light is going to hit the subject and then adjust the position of the flash heads on the ring. This next image is a prime example –there were flower petals close to the bee’s face and I had to play with the positioning of the heads to get the light from both of them into the scene. If you look at the reflection in the eye you can see where the flash heads were pointing.
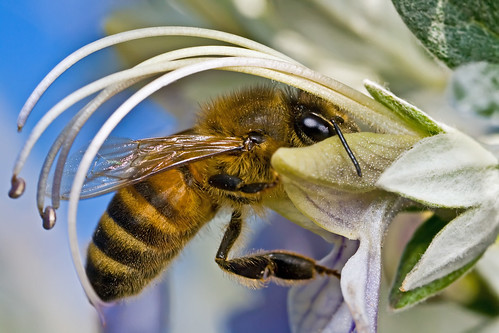
I usually have one flash head at the very top center of the lens and the other flash head is off to the side. Which flash head is at the top or on the side depends on the subject. If the critter is facing to my left I turn the flash mount so that one flash head is to my left and the other is on top, and if facing to the right I turn the mount so that one flash head is on my right and the other is on top. It doesn’t always work though. This shot of a bee is good example since the bee has its face buried in a flower. Placing one of the flash heads to the right would cause the bee’s face to fall into a shadow from the flower. Again look at the eyes to see where I have the flash heads positioned –they are both toward the top of the lens.
The angle of the individual flash heads can also make a big difference. I usually keep them both pointed directly at the subject and at the same angle. If I’m getting some glare that I don’t like and I have time to correct it then I’ll angle the flash head that’s causing problems either toward the lens or toward the subject –it depends on the scene. Also the magnification that I have the MPE-65 set to determines how I have the flash heads angled, and it’s kinda tough to show it in a photo so I’m going to do my best to explain it.
If you own the MT-24EX then you know that the flash heads make a clicking sound when you move them up and down. So as a starting point push the flash heads all the way down so that they are pointing toward the lens. For life size bring both flash heads up two clicks. For twice life size and higher magnification bring both flash heads up one click. My method of angling the flash heads at the various magnifications keeps them pointed directly at the subject, and it keeps the flash duration short. In some situations you might what to change the angle to eliminate bad reflections, but the angle that I set the flash heads to works most of the time.
You can also turn the flash heads from side to side, and you might want to depending on the subject and if you’re getting a bad reflection. But I rarely turn the flash heads.
Because the light from the MT-24EX is so harsh the key to getting the quality of light that I want from it has been to get the flash heads pointed right at the subject, get them as close to the subject as possible, and to diffuse them. The end result is that people are starting to think that my images are taken in natural light and that tells me that I’m on the right track. My goal when I started experimenting six months ago was to get flash photos that didn’t look like flash photos. But keep in mind that I’m still learning, still experimenting, and that you should do the same…
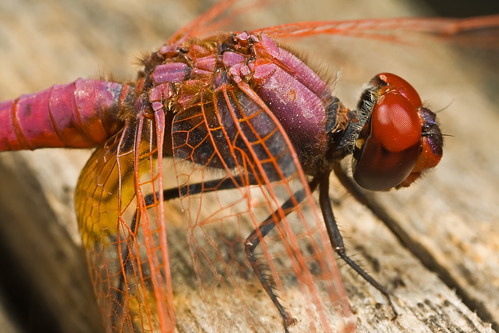
I’ll end this post with a shot that I took toward the end of last summer when I was working on reducing reflections –something that got me to think more about how the light was hitting the subject.
18 comments:
Another excellent article. I have gained tremendously from experimenting with your suggestions and have already achieved that magical comment "How did you take this image using natural light!". Many Thanks for the stimulus and sharing of your ideas and experiments.
Thanks kwest! :)
macro junkie - hey buddie..thanks for that..Its really helped alot..1 thing i still need is the defusers your using il be getting them soon as i can afford them.your shots are amazing.
iv been shooting with the flash heads pushed right in at 1:1 and 2:1..instead iv been using +1 fec..think this is why some of my shots are looking off colour?if a mantid was stood on a yellow magazine and i was shooting at 1:1 with the flash heads pushed right in towards the lens and to compensate for the loss of light i would use +1 fec could this be reason why the mantid shots come out with a yellow tinge on its body>?
any way im going to try your way today..thanks for putting up all the info u have found over past 6months..
Good to know I'm on the right track with my flash. Thanks for the info! Brad
@ MJ: Yes, that could definitely cause the mantid to look yellow -you're using the magazine like a bounce card...
@ Brad: Thanks!
Great article! Just so you know, you sold me on the MT-24EX...I will buy one for my Canon EF 100mm f/2.8 and I may even do that Gary Fong Puffer modification.
I've added your site to my "Links" page here: http://www.motleypixel.com/links/
Thanks,
Roy
Thanks Roy :)
The MT-24EX can be a PITA but once you learn to diffuse it the light quality is excellent!
Hi, I am new to macro photography and I have been reading your posts with great interest. As of this date (May 2011) are you still using the MT-24EX and the tripod shown in the photo? And the same diffusers? Thank you very much, Bob
Hey Bob,
I used that tripod for some abstract projects. All of my insect macro is hand held (I don't even onw a ball head or focusing rail).
For the diffuser please see this post: http://nocroppingzone.blogspot.com/2011/04/mt-24ex-diffuser-design.html
Regards,
John
Hi. Great article. I have recenty bought a MT-24EX. I use with a 100mm macro lens and have attached Gary Fong Puffer diffusers. The exposure of the bug is great but the background (if not very close) is an unacceptable black - not atall like yours. Tried experimenting but can't get around it. I understand the cause but how do you get arojhnd it! Thanks.
Hey Nick,
You need to put something in the background, close to the subject, that will reflect light back into the lens. Or use another flash, slaved off of the MT-24EX, to get more light into the background.
Hey John,
Just wondering if you can tell me if you still use the Kaiser Adjustable Flash Shoe on your MT-24EX? I've been shooting with a 100mm L macro lens but just purchased the MP-E65..just getting to grips with it. Also ordered the lens hood for it, do you still use that too? Thanks.
I still use both the Kaiser and the lens hood for the MPE-65mm, the lens hood for the 100mm is pretty useless and will just get in the way.
thanks for that John.
just ordered 1 Kaiser to use on the 'key' 11 o'clock flash head.
the thing that amazed me with my first session with the mp-e65 is how often i knocked my diy diffusers (followed your design) on the plants that the insect was on. such a small working distance! Thanks again!
just one more question John. I'm just about to make another set of diffusers based on yours. Now one of the things that has bugged me is that your puffers are more 'cloudy' than the ones now available. In other words my new ones are more see-through. So I was wondering would it be worth me not bothering this time to cut out the fronts of the stofens? to make the diffusion more like what you have. Or do you still think it will cut out too much light? Wish I could get the less see-through puffers that you have.
Don't cut the front out of the Sto-Fens. I made a new set not long ago, noticed the same thing you did, and left the Sto-Fens intact. Here is an example of the light I'm getting with it: Lady Bug at 4x
Just in time with your reply! Was about to start making them. Ok so I'll leave the stofens intact. I've currently got a white diffusion over the flash heads themselves too. Wonder if that'll still be needed with. experiment with and without I guess. Thanks John.
Post a Comment