But how I post process is a frequent question, and it’s too long of a post to include with a simple FAQ (another post that I need to do ;) so I’m going to explain how I post process and hopefully you can walk away with something that you can use.
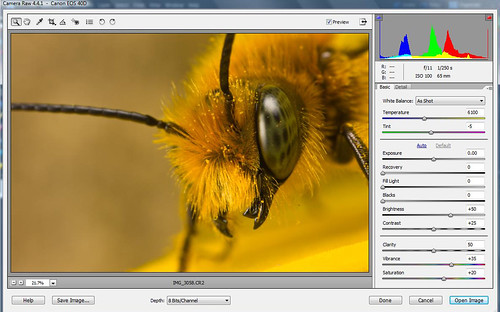
I started off in the Elements 6 RAW editor with the following defaults (click on the image to get to larger versions):

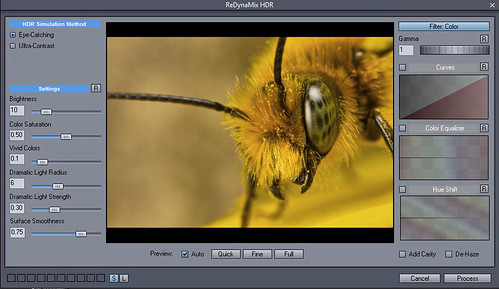
Then I opened the image making no changes in RAW. Instead I want to process the photo using an HDR plug-in so I’ll do most of my editing there (plus I like the way this shot looks right out of the camera). The first thing I did in the Elements 6 main editor is run NoiseWare Professional to strip out the sensor noise. The I ran DCE Tools ReDynaMix with the following settings:

When you first open an image in ReDynaMix it’s going to look “over processed” and the first thing I do is decrease the dynamic light strength. Also for this image I dropped the color saturation down a little as well. Don’t forget to adjust the Image Smoothing –it will take out a lot of noise induced by the HDR processing. I don't aways use ReDynaMix but I like the effect it had on this shot. If I didn't use it I'd do more editing in RAW and adjust midtone contrast in the main Elements editor window (Enhance/ Adjust Lighting / Shadows/Highlights).
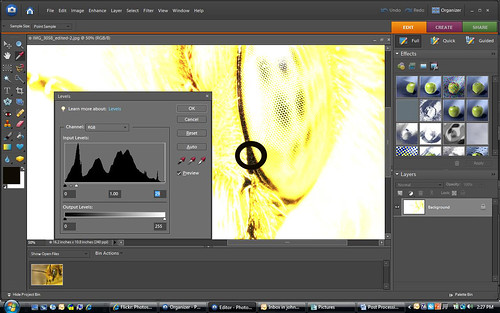
Next I adjust levels (Enhance / Adjust Lighting / Levels), and one of the first things in the levels editor that I do is set a black point. Follow the link and take a good look at that tutorial. Sometimes all you have to do in levels to make an image really look good is just set a black point. In Elements it's really simple. Click on the highlights slider (the triangle at the far right of the histogram display) and slide it to the left until you are left with just the darkest pixels. Make a mental note of where they are (it helps to magnify the image so you can see the dark pixels better). Then click on the reset button to get the histogram back to where it was before you moved the slider. Now click on the left most eye dropper (it's for setting the black pixels) and click on the darkest pixels in the image. I've circled the area that I chose for this shot:

Before you close out the levels editor adjust the middle point of the histogram above and below 1.0 and watch how your image changes. Sliding the midpoint to the left will make the image lighter and sliding it to the right will make it darker. I changed the mid point to 1.05 just to lighten it up a little.
I then went to Enhance/ Adjust Lighting / Shadows/Highlights and lightened shadows by 3%. You want to be careful here, since small changes will have a big effect and if you push the settings here you can add a lot of noise and banding to an image. Also under the Enhance menu I selected Auto Sharpen. I never use Unsharp Mask because although everyone says you need to sharpen digital images no one can agree on how much. The auto sharpen option will sharpen an image without over sharpening –and it’s fast.
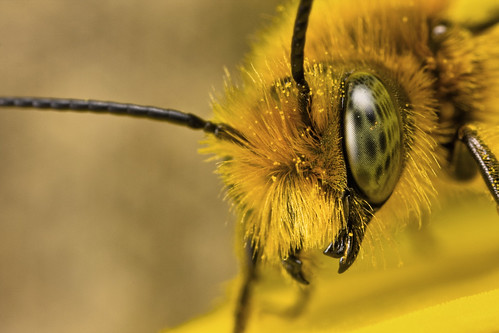
The last thing I do is rub out dust spots with the Spot Healing brush, add my copy right to the Meta data that’s saved with the image file (use the File / File Info option) and then save the image as a high quality JPG. Less than two minutes per image and I get results like this:

I'm sure there is a better way to do it, but post processing this way works for someone like me who is "Photoshop challenged" ;)

5 comments:
Great job, nice article - great detail... looks like you figured ReDynaMix out quickly heh... those are my basic initial steps as well - turn down brightness, cut color saturation, reduce dramatic light radius, jack up the surface smoothness...
Nice work!
Hey John...do you shoot most of your macro's in raw? I have been shooting Jpeg but was thinking about starting to shoot raw.
I am like you where I really want to get as much right out of the camera as possible! Would RAW help me with some quicker post processing?
Great post
Thanks Jason :)
@ mdc: Shooting RAW won't make your post processing easier -in fact it will add a few steps since the camera isn't doing any of the work anymore. This is why I shoot RAW.
Is there such a thing as a plugin like ReDynaMix for mac do you know?
@ rasmus: No idea. Did you check their web site of search Google?
Post a Comment