
The Basics
I went looking for solitary bees up in the mountains around Itri, Italy on a really cool, miserable day. The skies where party cloudy, and temps around 14C (57F) so I knew that if I found one then odds are it would be semi-active since they need the heat of the sun to help drive their metabolism in the early spring. Later on in the year I’ll still try to photograph them but it won’t be easy. I took the photo in the afternoon, later in the year I won’t get close unless I can find the critter very early in the morning or late in the evening when they bed down for the night. Don’t worry about getting stung, since only female solitary bees have stingers and most of them are too short to puncture your skin.
Working out the Light
The flower that it was on was very low to the ground with nothing behind it to reflect the flash back into the camera. So if I shot it in place I’d run into trouble with Evaluative –Through the Lens (E-TTL) metering and the background would be black: With E-TTL metering the flash fires a short pulse of light that the camera’s light meter uses to determine how long to turn the flash on for the actual exposure. With only the subject and a few flower petals most of the metering flash would not return to the lens, and the light meter would compensate by turning on the flash longer than it needs to and the image would be over exposed. You can compensate by setting the Flash Exposure Compensation (FEC) to a negative value, but depending on the camera you’re using you’ll get mixed results. Even if you don’t end up over exposing the subject the background will be black since there won’t be enough natural light to correctly expose anything in the background, even on a sunny day, and people will complain that the image doesn’t look natural. It doesn’t matter that it’s not normal to see an insect’s compound eyes and individual hairs, that the detail in the photo is already making it “unnatural”. A black background is a compositional buzz kill, even though the critter is technically sleeping.
So to get a break on the exposure, and to keep the background from being black, I picked the flower and carried it over to a stone wall that my brother in law had built close to his house. I liked the color of the stone, and it has a really rough texture that I knew would do a really good job of scattering the light from the flash. A smooth surface would be too reflective –all too easy to get a hot spot in the background from the flash. Rough surfaces will also give you a smoother looking background –no detail to distract the viewer from the subject.
If the flower had been higher I could simply hold or position anything behind it that would give me a complementary color for the subject. I carry a modified carpenter’s clamp in my camera bag just in case I need a third hand to hold a back drop or a critter’s perch (see Field Studio Gear).
As a starting point I usually try to position the subject so that the background is at the same distance from the subject as the lens. So if my working distance (lens to subject) is two inches then I position the subject two inches from the background. Due to flash fall off the light coming back to the lens from the background will be two stops lower than the light that’s coming back from the subject, and in this case it was too dark so I held the flower closer to the wall to brighten up the background.
Right about now some of you are probably thinking “why not use manual flash exposure?”. As I’m shooting I’ll change the magnification, which causes the distance between the subject and the flash, and the amount of light I need for a proper exposure, to change so I’d have to constantly check the histogram and adjust the light output of the flash. To add insult to injury I can only adjust the MT-24EX macro twin flash in full stop increments –not exactly the kind of fine tuning that I’d need to get a good exposure. In E-TTL mode the camera can make small adjustments to the light output of the flash, firing it at lower levels than I can select manually. In the end it’s actually easier to let the camera control flash metering, and with the 1D MK III I get consistent exposures from frame to frame.
Final Words on Technique
I shoot hand held by placing the lens on my left hand (the same hand that’s holding the critter’s perch) and slide the lens to focus the scene and adjust the framing. That stone wall also helped me to keep things steady because I was bracing my left hand on it. With the camera and the subject on the same mount, my left hand held against the wall, it’s easy to control the amount of motion in the scene and get a sharp image. Even though it’s not as obvious as freezing a balloon in mid pop or a bullet as it punches though an apple macro is a form of flash based stop motion photography. That short burst of light coming from the flash is not only exposing the image but it’s also helping me to freeze motion. Even the slightest movement, as little as the space of a pixel, is going to affect the sharpness of a macro photo once the softening effects of diffraction are factored in. So using a diffuser that actually diffuses the light from the flash (and not just blocking it) and getting the flash as close to the subject as possible will help to give me a very fast pulse of light from the flash. That short flash pulse, along with bracing the camera and the subject’s perch, allows me to get a razor sharp image even at high Fstops and is the primary reason why I do not focus stack.
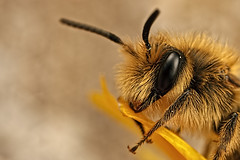
For this photo I wanted a portrait, and shooting critters is no different than taking an image of a person. I positioned the bee to the right of the frame looking into the dead space to the left, careful not to clip one of its antennas. Even though they’re out of focus they needed to be in the frame or I’d have to shoot at a high enough magnification to make the bee’s head fill the vertical space –either get the antenna all the way in the shot or all the way out. Clipping a portion of the bee’s feelers is distracting. From a low angle I moved the camera so that the bee’s pincers and eye were in focus, then I tilted the upper right corner of the camera a little deeper in the frame so the depth of field would fall flat against the slope of its head and get the back of the eye in focus. A cheap trick with the angle between the camera and the subject that makes the most of what little depth of field there is at 3x and F13. Often you’ll hear macro shooters talk about “magic angles” and it’s just an angle that makes the most out of the depth in a scene. With practice you can make your own magic angles just by tilting and twisting the camera a little. The trick is to take the area of acceptable focus, a flat thin plane, and lay it against the curve of the subject.
The end result is an image of a lounging bee that’s been described as “cute” and “cuddly”.
TL;DR: Practice, practice, practice… :)
2 comments:
Nice post, thanks for sharing that. Any advice on the best places to go to find sleeping insects like this? Local parks I guess would be a good start
Also the Field Studio link needs fixing
Thanks
David
Hey David,
A local park is good, but just about any area that has flowers and isn't close to a road will do. I don't think that insects can hear, but they can sense vibration. There is a huge patch of flowers in the town where I live that's deserted cause it's too close to the street.
Thanks for letting me know about the link -fixed!
Post a Comment