
Note: If you firmly believe that you have to use a tripod, or focus stack, or both to get a lot of detail at high magnification and Fstops then stop reading this post right now –I’ve got nothing for you.
When I first got into macro back in 2006 there were two prevailing themes: You had to use a tripod to get sharp images, and diffraction is the primary reason why you can't stop a lens down and get those sharp images. But something really odd was happening over at the Fred Miranda Macro Forum: Occasionally someone would post a really sharp image taken at high magnification and high Fstop that wasn’t focus stacked. I remember there being more than one person doing it and they wouldn’t explain how; either they wanted to keep the technique to themselves, or they were afraid of going up against overzealous focus stackers who believed that the only good macro images were those that are razor sharp at 100% pixels (unfortunately even today some still equate sharpness with quality). I was curious to know how they were pulling off such highly detailed images at high Fstops, and I finally figured out part of the puzzle sometime around 2008, but the last piece didn’t come together until several years later.
I wanted to let the subject dictate how I shot it, and to go after moving targets, so I came up with the Left Hand Brace Technique for taking control of the motion in a scene so I could get the compositions that I was looking for without using a tripod (and without cropping in post). I started to realize that the more control I had over the motion in the scene the sharper my images were (the first piece of the puzzle) not because some of them were suffering from noticeable motion blur but because slight motion, as little as the width of half a pixel, can amplify diffraction. I started to think of the phenomenon as “macro motion blur”. To explain how motion blur can mimic diffraction you first have to really understand what diffraction is.
The classic definition of diffraction is light bending as it passes through a small opening, and that's true. But there's a little more to it than that: The rays of light actually expand, like a cone, so that light rays that should hit a single pixel are now bleeding over into adjacent pixels. When that bleeding over reaches half way into those adjacent pixels you'll see a loss in image quality -diffraction has taken your lunch money.
But if you can wrap your head around expanding light rays causing a loss of detail then couldn't slight motion, as little as half a pixel of movement during the exposure, amplify diffraction? My experience has taught me that it can.
Right about now some of you are thinking "But wait a minute Mr. Macro Motion Blur, why do my images get sharper when I decrease my Fstop?!" To answer that question we have to first determine what your actual shutter speed is.
At macro magnification, high Fstops, and low ISOs, the light that your flash is producing is the only significant light source in a scene. To prove it just set your camera to manual mode, F11, 1/200 of a second (or whatever your maximum flash sync speed is for your camera), ISO 100, and go out and take a photo on a bright sunny day with your macro lens set to its minimum focusing distance (life size magnification). You'll have to shoot something really bright or reflective to get anything to show up in the resulting image. Then turn on your flash and take the same shot -there will be a major difference in what you can see in the photo. At higher magnifications, if the flash doesn't fire, you'll just get a completely black image. So your flash duration is really your shutter speed, since it's the major, or only, light source -the actual speed of the shutter doesn't matter...
So you set your camera to manual mode, F11, 1/200, and ISO 100. You've got a rig that will let you shoot at 3x, you take a shot hand held, and the resulting photo isn't very sharp. You then set your camera to F8, take the same shot, and this time the image is a lot sharper. See, no more diffraction! Well there's only one little problem -when you went from F11 to F8 you opened up the aperture in your lens to let about twice as much light into the camera. Through The Lens (TTL) metering compensated for the increase in aperture (decreasing Fstop) by turning the flash on for about half as long -so your shutter speed (the flash) nearly doubled. Did you defeat diffraction or macro motion blur?...
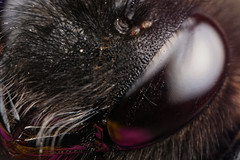
For me the answer is simple, since I can get sharp images at up to three times life size at F13, and four to five times life size at F11 with Canon's MPE-65mm macro lens. The key is to get the flash as close to the subject as possible (to keep the flash duration as short as possible), use a diffuser that really diffuses the light (not one that just blocks the light), and look for ways to take control of the motion in the scene.
Diffraction does exist, but it's not the monster that most macro photographers make it out to be.
The second piece of the puzzle is to use a well diffused light source. If your flash produces really strong specular highlights you’ll end up with high “micro contrast” (a term coined by SteB). Those little bright areas will make an image look sharper than it really is, and you might think at first that high micro contrast is a good thing. But those same bright areas will limit how much sharpening you can apply during post processing. So what you really want are “soft” specular highlights where you can actually see texture and possibly even a little color behind them. The softer the light the more sharpening you can apply during post without making your images look over sharpened. Getting your flash as close as possible to the subject won't just help you to keep your flash duration short, it will also make your light look more diffused.
Since you're getting the flash close to the subject you don't need a long focal length lens -you don't need more working distance if the flash is close to the subject anyway, and short focal length lenses will give you more magnification when you start shooting with extension tubes. There's no such thing as a "bug lens" -all you have to do is learn a little about the habits and quirks of the subjects you want to photograph.
With this post I’ve pretty much given you the keys to the candy store…
Footnote: When I first published the Left Hand Brace Technique I got several hate emails and angry private messages on a few forums. It seems that quite a few macro photographers had been using the technique, but were keeping it quiet, and were really pissed off at me for writing about it.
Last but not least: I do lose some texture detail to diffraction –I can’t cheat physics. But there is so much depth and detail in my photos that people frequently ask me if I focus stack. I do not focus stack, and although there is nothing wrong with the technique (it’s just one tool of many) I’ve pretty much proven that it’s not necessary...
1 comment:
Hey Dan,
I posted a video on how I made a set of diffusers for the MT-24EX http://nocroppingzone.blogspot.it/2011/04/mt-24ex-diffuser-design.html
If you're using the flash mount that comes with the MT-24EX (and you should) then you have to find a way to diffuse the flash in a very short distance due to the working distance dropping as you increase the magnification of the MPE-65mm. The MT-24EX is brutally harsh, and I'm using no less than three layers of diffusion plastic to get it to produce a soft, diffused light.
I typically have one flash head at the top of the lens on a riser (http://www.bhphotovideo.com/c/product/109450-REG/kaiser_201200_adjustable_flash_shoe.html) and the other is at the 3 O'clock position on the flash mount. The goal is to get light that partially wraps around the subject that's not hitting at the same angle. The result is a light source that makes the subject look more three dimensional.
Hope this helps. If you need more info please post your question(s) to this post: http://nocroppingzone.blogspot.it/2011/04/mt-24ex-diffuser-design.html
Post a Comment