
Often I find myself shooting in less than ideal conditions and if I waited for perfect weather or light I’d rarely get a chance to shoot, so one of the things that I wanted to teach myself was how to photograph insects using a mix of natural light and flash. Since portrait photographers often under expose the ambient light in a scene and then use a flash to expose the subject I thought that would be a good place to start. After reading several examples at Strobist (a site that you should all be reading as well) I set out to play. This is what I’ve learned so far…
The trick is to keep the sun at an angle that's either to the side or behind you. The sun is going to be your light source for the background, and the sun + the flash will be your light source for the subject. You want to under expose the background to force the colors to saturate (I'm not shooting in good light) and to use just enough flash to keep the subject from being too dark to see any detail. I shoot in manual mode, and I set the aperture to F8 because it’s usually enough depth for the magnification that I’m shooting at (usually 1/3 life size). I set the ISO high enough to allow me to use a shutter speed of 1/640 of a second or higher –tripods and I just don’t get along. On a few rare occasions I find myself at ISO 800, but for the most part I’m shooting at ISO 400. Don’t worry about noise, since you’re going use noise removal in post (I use NoiseWare Professional because it’s great at removing noise and preserving detail). Since the ambient light in the scene is going to be under exposed you’ll actually have a lot of latitude in how you set up the camera.
I’m currently using an MR-14EX ring flash as my fill light just because I like the quality of the light that I get from it and the balance of that flash –all the weight is back by me. Any diffused light source will work just fine though. Set your flash to manual mode and the power level will depend on the flash you use and the scene that you’re shooting. I have the MR-14EX (on a Canon 180L macro lens) set to 1/32 power most of the time. If you use E-TTL then set the flash to at least -2 FEC.
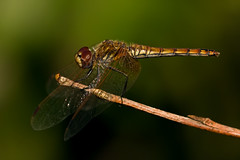
Once you find a willing subject take a shot and look at the histogram -you don't want to see any blown color channels and the overall exposure should be to the left (dark). Do not use the preview image on the LCD to gage exposure or sharpness -for the most part. For the grape vine that the dragon is perched on in the sample that I’ve included in this tutorial I wanted it to look brown on the preview. If the shade of that vine was too pail then I'd either under expose the ambient more if the background looked too bright (increase the shutter speed), or decrease the power from the flash if the background looked good to me. The image you see on your camera's LCD should look very under exposed. Later when you get the photo on the computer you simply raise the exposure during RAW processing. While watching the histogram increase the exposure, stopping right before one or more color channels blow out. Increasing the contrast will also give you a little more room to increase the exposure.
I then run NoiseWare Professional, adjust the levels to set a black point and shift the grey point, use the auto sharpen option in Elements, and add my copyright to the EXIF data. Save the image as a JPG and I’m done.
2 comments:
Thanks for all the info John! Your blog is always a pleasure to read.
This sounds pretty much like the way I, too, shoot dragonflies in conditions where natural light is not enough, using the flash for fill.
I haven't used noise removing software, though, and sometimes I have trouble with the noise at ISO 800, but I'll look into NoiseWare ASAP :-)
Stavros
Thanks Stavros :)
Post a Comment