I don't do reviews because there are plenty of sites out there that do and I have no intention of competing with them. I also do not want vendors sending me kit for a favorable review (happens more often than you know). But I do want to pass along the things that I've used that have worked really well and for sensor cleaning I haven't found anything better than the Eyelead Camera Sensor Cleaning Kit. No links that line my pocket with your money -if you want to know more then off to the Google with you. I will leave you with a video that was done my The Fstoppers:

Monday, May 16, 2016
Thursday, May 12, 2016
500px
To all of my new followers "Welcome!" and I hope you enjoy my work :)
Monday, May 9, 2016
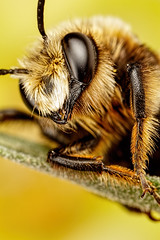
Nesting Miner Bee Deconstruction

The Butcher's Bill
I spent about 36 minutes shooting the Miner Bee and took 85 frames. I have a few images that I might post later, but none as good as the one with this post. Sometime when I'm shooting it feels like fun, but this time she made me work for the shot I wanted :)
Sunday, May 1, 2016
Using Canon's 80D for Macro Photography
I keep getting asked about the Canon 80D and how I like using it for macro photography. My canned answer is that the dynamic range is better, the ISO noise is lower, and that the shutter is quieter -and all of that is true. But I don't know if most people understand what that increase in dynamic range can do for you, and how well it applies to some of the subjects that a macro photographer typically shoots. For a really good demonstration of the Canon 80D's dynamic range check out this review, the entire video is good but the first eight minutes or so is dedicated to discussing the dynamic range.
So how does this apply to macro and the types of critters that we shoot? Some surfaces, like a solitary bee's compound eye, are incredibly difficult to expose because it's like firing a flash directly into a curved piece of glossy black plexiglass. If you expose the scene "to the right" (exposing for the highlights) then the specular area in the bee's eye is going to be completely blown out unless the size of your diffuser relative to the subject is huge. Well now it's possible to get a break in the specular highlights on those surfaces by under exposing a scene and then boosting the exposure and shadows in post to recover detail that would have been lost in the shadows (without getting a lot of sensor noise and a serious loss in detail). You can easily see it in the video above. For those of you who photograph the small world this shot might be of interest to you:

My son found that Violet Carpenter bee comatose on the outside stairs that lead to a store room and an outdoor shower that we use in the summer time to wash sand off before going in the house. Since it's several meters below ground there is a temperature drop at the bottom and the critter fell victim to it. It's still alive, but covered in beach sand and hasn't had a chance to wake up and clean itself off. Not a shot that I'll post to my gallery, but I thought it would be a good test of the 80D's dynamic range so I shot it at about -2.5 EV (as measured in the camera's histogram looking at the red channel). I then brought it up +2/3 of a stop in post, boosted the shadows, and dropped the highlights down a little. I use Photoshop Elements 14, and I think that those of you who use Lightroom could do an even better job of adjusting the exposure curve. I then processed the shot the way that I do all of my photos. If it wasn't for the dirt on the critter's face that would be a perfectly usable image, and the compound eyes are clearly visible even in the "harshest" specular area. Now under exposing a scene isn't going to help you as much on the specular highlights if your light source isn't properly diffused to begin with but for those tricky subjects, with a properly diffused flash, under exposing is now an option if you're shooting with the Canon 80D. Highlight tone priority is also very practical now, and I think that I'll use it more often. In the past I always tried to expose to the right of the histogram but would lean toward under exposing a little, because I didn't want to risk losing detail in the highlights, and then I'd wrestle with sensor noise in post. Now I can be even more cautious where the highlights are concerned and still get a shot with very little noise and a lot of detail.
All of that is old news to anyone who doesn't shoot with a Canon camera, but then again you don't have the MP-E 65mm macro lens ;)
So how does this apply to macro and the types of critters that we shoot? Some surfaces, like a solitary bee's compound eye, are incredibly difficult to expose because it's like firing a flash directly into a curved piece of glossy black plexiglass. If you expose the scene "to the right" (exposing for the highlights) then the specular area in the bee's eye is going to be completely blown out unless the size of your diffuser relative to the subject is huge. Well now it's possible to get a break in the specular highlights on those surfaces by under exposing a scene and then boosting the exposure and shadows in post to recover detail that would have been lost in the shadows (without getting a lot of sensor noise and a serious loss in detail). You can easily see it in the video above. For those of you who photograph the small world this shot might be of interest to you:
My son found that Violet Carpenter bee comatose on the outside stairs that lead to a store room and an outdoor shower that we use in the summer time to wash sand off before going in the house. Since it's several meters below ground there is a temperature drop at the bottom and the critter fell victim to it. It's still alive, but covered in beach sand and hasn't had a chance to wake up and clean itself off. Not a shot that I'll post to my gallery, but I thought it would be a good test of the 80D's dynamic range so I shot it at about -2.5 EV (as measured in the camera's histogram looking at the red channel). I then brought it up +2/3 of a stop in post, boosted the shadows, and dropped the highlights down a little. I use Photoshop Elements 14, and I think that those of you who use Lightroom could do an even better job of adjusting the exposure curve. I then processed the shot the way that I do all of my photos. If it wasn't for the dirt on the critter's face that would be a perfectly usable image, and the compound eyes are clearly visible even in the "harshest" specular area. Now under exposing a scene isn't going to help you as much on the specular highlights if your light source isn't properly diffused to begin with but for those tricky subjects, with a properly diffused flash, under exposing is now an option if you're shooting with the Canon 80D. Highlight tone priority is also very practical now, and I think that I'll use it more often. In the past I always tried to expose to the right of the histogram but would lean toward under exposing a little, because I didn't want to risk losing detail in the highlights, and then I'd wrestle with sensor noise in post. Now I can be even more cautious where the highlights are concerned and still get a shot with very little noise and a lot of detail.
All of that is old news to anyone who doesn't shoot with a Canon camera, but then again you don't have the MP-E 65mm macro lens ;)
Subscribe to:
Posts (Atom)