
Thursday, November 24, 2016
Daily Deviation #10
I've been awarded my 10th Daily Deviation at Deviant Art for Mason Bee Series 3-2
Wednesday, November 2, 2016
The Brainy Life of Bees
Sunday, October 30, 2016
Hitting Limits


But after a while my gallery seems to just be repetitive, and I don't like taking the same shot over and over any more than you enjoy seeing them. So part of the problem is just an issue of inspiration. What can I do next that's going to keep my gallery fresh? I haven't found the answer to that one yet.
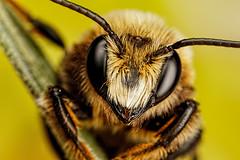
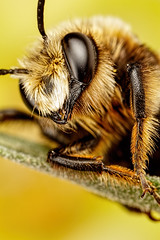
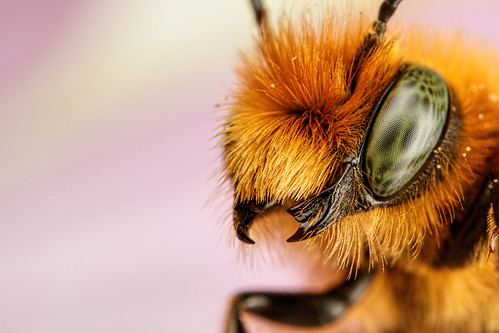
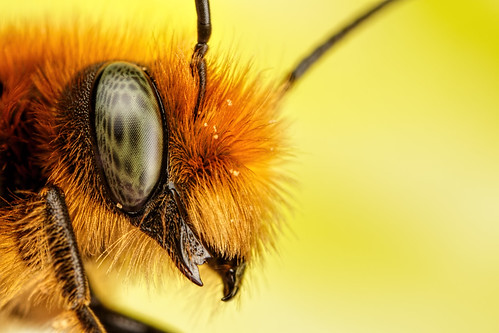
I thought about getting into focus stacking, but then I'd lose the ability to take "action shots" like the images above. Plus I just don't see the challenge in photographing something that doesn't move. Granted I'd get more detail, but I really don't think that detail is a problem even with my "diffraction limited" macro photography:
Over the years I've come to realize that the quality of the light I'm using has a really big impact on the level of detail in my images. A lot of texture data can get lost due to light that creates too much micro contrast. In addition the better the light quality the more I can push my images in post, and for me everything from what I do with the camera to what I do in post is connected. It's unfortunate that the main stream media has projected the impression that post processing is just for correcting mistakes, instead of post just being a normal part of the the photographic process. You have to develop your "film" and it doesn't matter if the negative is a piece of celluloid or a RAW file.
Light is the one area where I've really hit a hard wall. Due to my style of shooting I have to use Canon's MT-24EX because it's the only flash that gives me the balance I need for hand holding the camera while chasing semi-active to hyperactive subjects. I also benefit from the close working distances at life size and higher magnification since the diffusion of the light gets better the closer the diffuser is to the subject, and getting the flash close also helps to keep the duration of the light as short as possible so that I can freeze a lot of motion. But the short distance between flash and subject limits what I can do to diffuse the flash, and I've pretty much taken the MT-24EX as far as it can go.
Sadly the MT-24EX is the only Canon flash that has not been updated, and I'm hoping that they do in fact come out with a better version of it.
My macro journey isn't over and if I can come up with something unique I'll post some abstract work this winter. Just wanted to let you know that I'm still here, but just finding inspiration a little difficult at the moment.
Monday, June 13, 2016
Published in the July issue of Digital SLR Photography Magazine
Special thanks to Mr. Jordan Butters, contributing editor for Digital SLR Photography Magazine, for such a great opportunity!
Update 10 July 2016: I've passed the 25 thousand followers mark at 500px :)
Monday, May 16, 2016
Products that work: Eyelead Camera Sensor Cleaning Kit
I don't do reviews because there are plenty of sites out there that do and I have no intention of competing with them. I also do not want vendors sending me kit for a favorable review (happens more often than you know). But I do want to pass along the things that I've used that have worked really well and for sensor cleaning I haven't found anything better than the Eyelead Camera Sensor Cleaning Kit. No links that line my pocket with your money -if you want to know more then off to the Google with you. I will leave you with a video that was done my The Fstoppers:
Thursday, May 12, 2016
500px
To all of my new followers "Welcome!" and I hope you enjoy my work :)
Monday, May 9, 2016
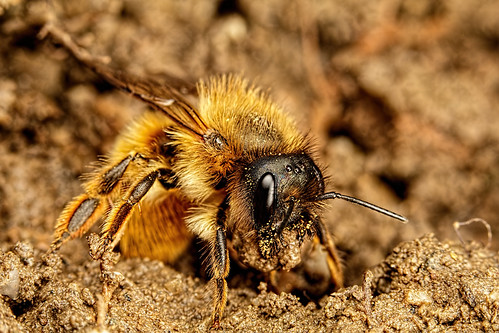
Nesting Miner Bee Deconstruction

The Butcher's Bill
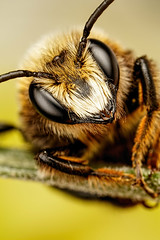
I spent about 36 minutes shooting the Miner Bee and took 85 frames. I have a few images that I might post later, but none as good as the one with this post. Sometime when I'm shooting it feels like fun, but this time she made me work for the shot I wanted :)
Sunday, May 1, 2016
Using Canon's 80D for Macro Photography
I keep getting asked about the Canon 80D and how I like using it for macro photography. My canned answer is that the dynamic range is better, the ISO noise is lower, and that the shutter is quieter -and all of that is true. But I don't know if most people understand what that increase in dynamic range can do for you, and how well it applies to some of the subjects that a macro photographer typically shoots. For a really good demonstration of the Canon 80D's dynamic range check out this review, the entire video is good but the first eight minutes or so is dedicated to discussing the dynamic range.
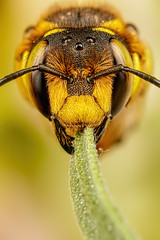
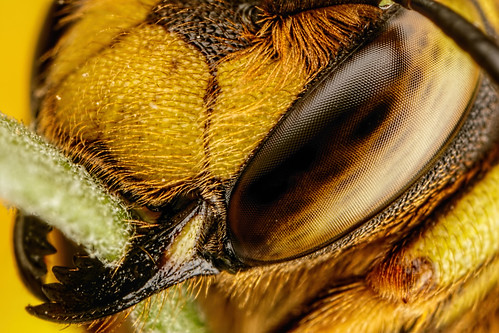
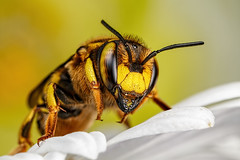
So how does this apply to macro and the types of critters that we shoot? Some surfaces, like a solitary bee's compound eye, are incredibly difficult to expose because it's like firing a flash directly into a curved piece of glossy black plexiglass. If you expose the scene "to the right" (exposing for the highlights) then the specular area in the bee's eye is going to be completely blown out unless the size of your diffuser relative to the subject is huge. Well now it's possible to get a break in the specular highlights on those surfaces by under exposing a scene and then boosting the exposure and shadows in post to recover detail that would have been lost in the shadows (without getting a lot of sensor noise and a serious loss in detail). You can easily see it in the video above. For those of you who photograph the small world this shot might be of interest to you:

My son found that Violet Carpenter bee comatose on the outside stairs that lead to a store room and an outdoor shower that we use in the summer time to wash sand off before going in the house. Since it's several meters below ground there is a temperature drop at the bottom and the critter fell victim to it. It's still alive, but covered in beach sand and hasn't had a chance to wake up and clean itself off. Not a shot that I'll post to my gallery, but I thought it would be a good test of the 80D's dynamic range so I shot it at about -2.5 EV (as measured in the camera's histogram looking at the red channel). I then brought it up +2/3 of a stop in post, boosted the shadows, and dropped the highlights down a little. I use Photoshop Elements 14, and I think that those of you who use Lightroom could do an even better job of adjusting the exposure curve. I then processed the shot the way that I do all of my photos. If it wasn't for the dirt on the critter's face that would be a perfectly usable image, and the compound eyes are clearly visible even in the "harshest" specular area. Now under exposing a scene isn't going to help you as much on the specular highlights if your light source isn't properly diffused to begin with but for those tricky subjects, with a properly diffused flash, under exposing is now an option if you're shooting with the Canon 80D. Highlight tone priority is also very practical now, and I think that I'll use it more often. In the past I always tried to expose to the right of the histogram but would lean toward under exposing a little, because I didn't want to risk losing detail in the highlights, and then I'd wrestle with sensor noise in post. Now I can be even more cautious where the highlights are concerned and still get a shot with very little noise and a lot of detail.
All of that is old news to anyone who doesn't shoot with a Canon camera, but then again you don't have the MP-E 65mm macro lens ;)
So how does this apply to macro and the types of critters that we shoot? Some surfaces, like a solitary bee's compound eye, are incredibly difficult to expose because it's like firing a flash directly into a curved piece of glossy black plexiglass. If you expose the scene "to the right" (exposing for the highlights) then the specular area in the bee's eye is going to be completely blown out unless the size of your diffuser relative to the subject is huge. Well now it's possible to get a break in the specular highlights on those surfaces by under exposing a scene and then boosting the exposure and shadows in post to recover detail that would have been lost in the shadows (without getting a lot of sensor noise and a serious loss in detail). You can easily see it in the video above. For those of you who photograph the small world this shot might be of interest to you:
My son found that Violet Carpenter bee comatose on the outside stairs that lead to a store room and an outdoor shower that we use in the summer time to wash sand off before going in the house. Since it's several meters below ground there is a temperature drop at the bottom and the critter fell victim to it. It's still alive, but covered in beach sand and hasn't had a chance to wake up and clean itself off. Not a shot that I'll post to my gallery, but I thought it would be a good test of the 80D's dynamic range so I shot it at about -2.5 EV (as measured in the camera's histogram looking at the red channel). I then brought it up +2/3 of a stop in post, boosted the shadows, and dropped the highlights down a little. I use Photoshop Elements 14, and I think that those of you who use Lightroom could do an even better job of adjusting the exposure curve. I then processed the shot the way that I do all of my photos. If it wasn't for the dirt on the critter's face that would be a perfectly usable image, and the compound eyes are clearly visible even in the "harshest" specular area. Now under exposing a scene isn't going to help you as much on the specular highlights if your light source isn't properly diffused to begin with but for those tricky subjects, with a properly diffused flash, under exposing is now an option if you're shooting with the Canon 80D. Highlight tone priority is also very practical now, and I think that I'll use it more often. In the past I always tried to expose to the right of the histogram but would lean toward under exposing a little, because I didn't want to risk losing detail in the highlights, and then I'd wrestle with sensor noise in post. Now I can be even more cautious where the highlights are concerned and still get a shot with very little noise and a lot of detail.
All of that is old news to anyone who doesn't shoot with a Canon camera, but then again you don't have the MP-E 65mm macro lens ;)
Tuesday, April 19, 2016
Mason Bee Life Cycle
I'd like to be able to say that I planned it, that from the beginning of this year my goal was to photograph the life cycle and behavior of Mason Bees. But I didn't, it just kinda happened. I did plan to photograph them, just didn't think I'd do as well as I did since their life spans are so short and the weather so unpredictable in the early spring. But I did manage to document them being born...
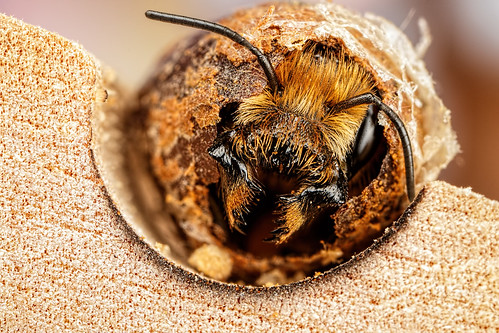
...to starting a family...
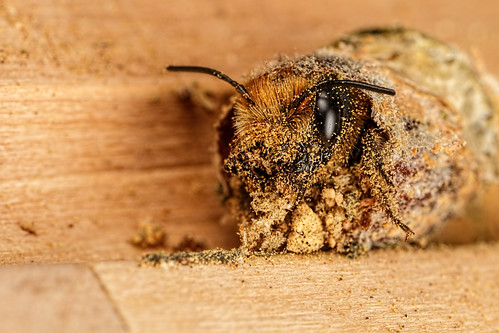
...to nesting and nest building...

...and I watched about twelve capped reeds of Mason Bees turn into over sixty in just two months. Next year I'm going to have a lot of bees! I even got lucky enough to photograph some Male Blue Mason bees on their birth day, a species that I hadn't seen in my yard before.
If you want to know more about Mason Bees, and possible start raising them yourself, then head on over to Crown Bees. I'll leave you with this video I shot of Mason bees collecting mud for their nest building. I was right on top of them and not once did any of the ladies bother me -they really are quite docile and excellent pollinators!
...to starting a family...
...to nesting and nest building...
...and I watched about twelve capped reeds of Mason Bees turn into over sixty in just two months. Next year I'm going to have a lot of bees! I even got lucky enough to photograph some Male Blue Mason bees on their birth day, a species that I hadn't seen in my yard before.
If you want to know more about Mason Bees, and possible start raising them yourself, then head on over to Crown Bees. I'll leave you with this video I shot of Mason bees collecting mud for their nest building. I was right on top of them and not once did any of the ladies bother me -they really are quite docile and excellent pollinators!
Tuesday, March 29, 2016
Crown Bees

Note that I'm not including affiliate links in this post -I'm not trying to make money from you. What I do want is for more people to get interested in these beautiful creatures, and to see their population in the wild get stronger. We need them folks...
Thursday, March 24, 2016
Natural Pollinators

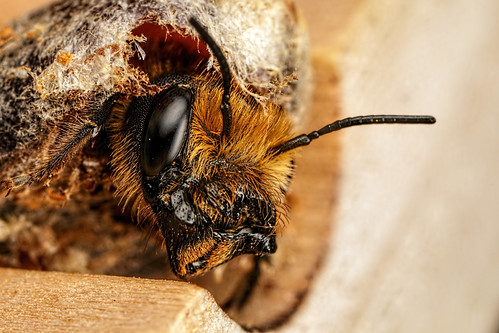
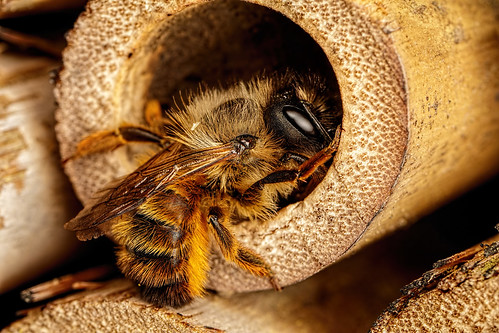
Last weekend I noticed that some spiders had set up shop in my bee house. Normally I'd let nature take its course, but that was my house and my bees. Since it was warm (17C/62F) I thought some of the bees might hatch while I was cleaning the house so I got my camera ready. Here's a shot of one of the original bee's daughters hatching out of a cocoon:
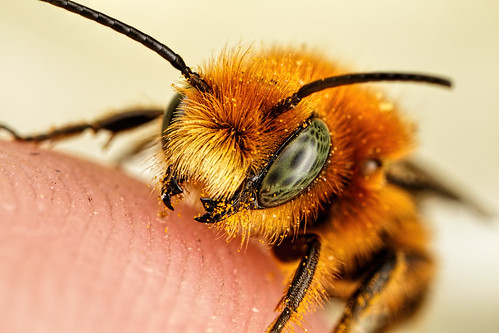
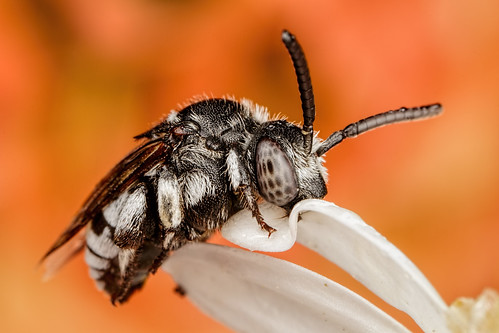
I may have more than one species of Mason Bee in my yard, because there are some clear differences in the males that I shot last year...

...and the males that hatched out of my bee house last weekend...
...but they had to be the sons of one or more of the females that were building egg chambers in the bee house. Irregardless of who the parents are I can't be happier about seeing a larger population of native pollinators in my yard! We have a pretty small garden and yet we end up giving away a lot of vegetables due to all of the solitary bees. Best of all they are really docile and only the females have a stinger -and you'd have to really manhandle one of them to get stung. As for those sometimes scary looking mandibles I've never once been bitten.
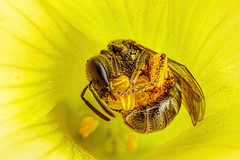
Why am I telling you this? Because natural pollinators are very important! I'm sure you've read in the news about colony collapse disorder (CCD). What you might not have heard about is the decline of natural pollinators. Most solitary bees are really good at pollinating crops because they are actually pretty bad at collecting pollen. Honeybees and bumblebees have pollen baskets on their hind legs and they pack pollen into it and use nectar to make it sticky:
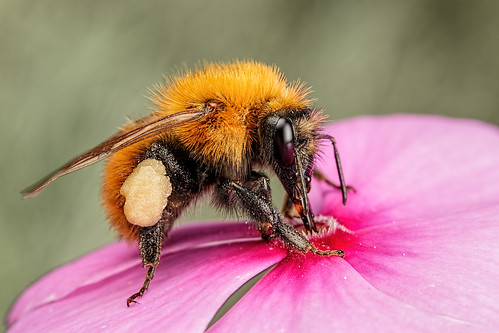
Once that pollen is glued down it's not coming off until the bee takes it off. Mason bees don't have a pollen basket and rely on the static electricity that builds up in their hairs to attract and hold pollen. So when they land on a flower to collect pollen they roll in the flower like a pig playing in the mud, and in the process spread some of the pollen that they had already collected from another flower. Also since not every flower is exactly the same some are pollinated better by different species of bee, so the more species you have foraging for nectar in your garden the better.
If you want to encourage natural pollinators in your yard or garden then check out Crown Bees -that's not an affiliate link. I'm sending you to Crown Bees not to make money off of you but because they sell quality products, have great resources on their web site (plus videos on You Tube), and excellent customer support. They can help you start your own colony of natural pollinators :)
Thursday, March 17, 2016
Sunday, January 10, 2016
What Macro Lens Should You Buy?
There are some hard limitations when shooting macro photography though -and by macro I mean from 1x to 10x magnification (10x and higher is considered micro photography). Shooting closeups below 1x is considerably easier than shooting at 1x and higher mag simply because there is more surface area to reflect light back into the lens. So when shooting macro the light source that you want to use is going to have a big impact on your lens choices and how you set up your camera. The first option is to use natural light and you need to shoot in the golden hour, that hour right after sunrise or right before sunset, or when there are some thin high altitude clouds acting as a diffuser for the big yellow ball. Shooting in the middle of the day when the light is harsh is going to give you scenes that have too much contrast as well as specular highlights that are going to look ugly. The only negative to shooting when the light is good is that there won't be enough of it to give you shutter speeds fast enough to freeze motion. You'll be reduced to shooting lethargic subjects, and odds are your camera will be attached to a focusing rail and a tripod. Nothing wrong with doing any of that, but your choices of subjects will be limited. It's easy for me to spot natural light macro shooters -I just count the number of dew covered insects in their gallery. I should also mention that if you're going to use natural light as the primary light source for the subject then you're better off using a long focal length lens -the longer the better. The extra working distance will come in handy since you don't want to be so close to the subject that you're casting a shadow over it.
The second option is to use a flash as the primary light source for the subject, and this is where things can kinda get counter intuitive. The funny thing about a flash is that the light it produces will look more diffused, and will give you softer specular highlights, the closer you get it to the subject due to the Apparent Light Size Principle (that article is required reading). So it doesn't make any sense to buy a long focal length macro lens only to put the flash on a bracket way out past the end of the lens. You're actually better off with a short focal length lens in the 60mm range.
Another advantage to using a flash is that if it doesn't fire then odds are the subject is going to be completely black. Why is that good? It means that the short duration pulse of light that the flash is producing is actually acting as your "shutter", and it will allow you to freeze a lot of motion and still get sharp images. Using a flash allowed me to follow an active Mantis and shoot it with the camera in my hand while it was cleaning itself and still get a sharp photo.
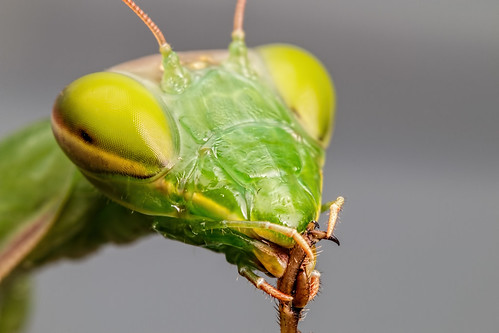
I took that shot with a Canon EF-S 60mm macro lens with 37mm of extension tubes from about three inches away (2x, since the lens loses a lot of focal length at it's minimum focusing distance). An image like that one isn't possible using natural light because that scene is just too small, only 11.1 mm long by 7.4 mm high. Just not enough natural light being reflected off of such a small area to give me a shutter speed fast enough to freeze motion even if I had maxed out the ISO and opened the lens up to F2.8 -and if I did that and managed to get a decent shutter speed the resulting photo would look like garbage. Instead I set the camera to F11, ISO 200, and 1/125 of a second to expose for the natural light in the background and let the camera meter for and expose the subject with the flash. Any movement recorded by the camera in the background would have been irrelevant since it's out of focus anyway.
The light source you choose is also going to have a huge impact on your photographic style. Do you want to put your camera on a focusing rail and a tripod and then go look for subjects that will give you enough time to set all of that up (natural light)? Or do you want to keep your gear to a minimum, hold the camera in your hand, and let the subject dictate how you're going to photograph it (flash)? I really like the way that good natural light looks, but sadly if the natural light looks good then it is well diffused and there just isn't going to be enough of it for fast shutter speeds. That's not an opinion; physics simply says "No!" ;)
Saturday, January 9, 2016
Mixing Natural Light and Flash
The problem though, at least for me, is that I don't like black backgrounds in my images and from the feedback I've received a lot of you don't either. I really don't care about making my images look "natural" because that word is just too subjective. Ask half a dozen people what natural means and you're likely to get six different answers. Add to that the fact that you can't "naturally" see the level of detail that I can show you, so by my definition macro photography isn't "natural" anyway. But I do want you to suspend disbelief and just enjoy the subject and how I'm presenting it to you. I don't want you to get hung up and distracted because the background is black. It's easy to have something in the background if I have control over a lethargic subject, or I can use the flower that it's on to reflect the light from the flash back into the camera. But the real trick is shooting a hyperactive subject in conditions where I have very little control, and when there isn't anything close to the critter that I can use for a background.
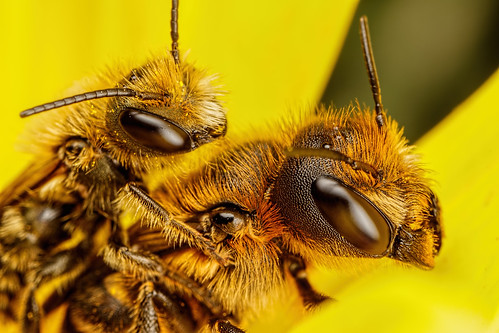
I get most of my inspiration from portrait photography, and one of the techniques that portrait photographers use it to set the camera at the ISO and Fstop that they want to use for the subject and then "drag the shutter" to expose for the background. Dragging the shutter simply means decreasing the shutter speed until you get the exposure that you want. So you basically use the shutter to control the amount of natural light that's coming into the lens to expose for the background, and then use the flash to expose the subject. But a portrait photographer is shooting scenes that are reflecting a lot more natural light back into the camera than what I can get in a macro photo. Since I was concerned about getting too close to the natural light exposure for the subject I set my flash to second curtain sync, so that the flash would be the last significant light source recorded by the sensor and if there was enough natural light to record movement I'd freeze the action at the end of it and still get some detail. If you look closely at this next image you can see how that movement looks in the trailing antenna of this bumblebee -look at the "shadow" above it.
There was a lot of hard sunlight reflected off of a white wall in my garden and at 1/30 of a second the shutter speed was too slow to stop the motion in the scene. The background is actually a sidewalk about two meters from the subject and I was trying to keep it from looking too dark.
For this next shot I set up a field studio, injected a Wall Flower with artificial nectar, and waited for a visitor. The flower is actually in the shade, and I'm shading the subject as well with the camera, and yet at 1/60 of a second there is still a little movement at the back part of the wing.
At first I thought that I might have caught the far wing, out of focus. But the more I look at the image the more I think it's actually just a motion artifact.
After a lot of trial and error, and in a wide range of lighting conditions, I've pretty much settled on 1/125 as being my minimum shutter speed when shooting critters that have antenna. With the camera set to F11, 1/125, and ISO 200 I'm getting scenes like this one with no recorded movement.

Under ideal conditions you want to be able to cast a hard shadow over the subject, and in an area where there isn't a lot of reflective light hitting it from the sides, so that if the flash didn't fire the subject and the area around it would be a silhouette. In the absence of natural light the short duration of the flash will allow you to freeze any subject motion. The "shadows" that I recorded are not the result of a decrease in the background exposure but are due to natural light striking the area that moved and bouncing back into the camera.
Also keep in mind that it's OK to under expose the background a little, as long as it's not completely black it won't be distracting. The 70D that I shoot with displays the exposure in the viewfinder (+/- 3 stops) and if I know I'll be shooting in a certain direction I'll take a look at the exposure in the view finder and adjust the shutter, ISO, and Fstop until I get to within -2 stops (under exposing the background actually causes the color in it to saturate). But I try to set the ISO no higher than 200 to avoid image noise, and the Fstop no lower than F11 so I can still get a decent amount of depth. Both of those decisions are based on my personal preferences and the ISO noise performance of my camera.
You'll have to do some experimenting since you might be shooting different subjects, and under different conditions than I am. But hopefully you can use this article as a guide to get you started. Until next time happy shooting! :)
Friday, January 1, 2016
2015 in Review

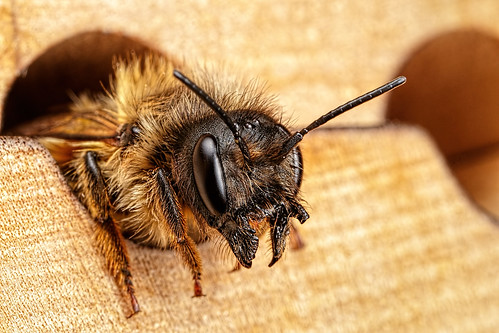
I even set up a solitary bee house and managed a few shots of a female Mason bee as she was about to start her day.
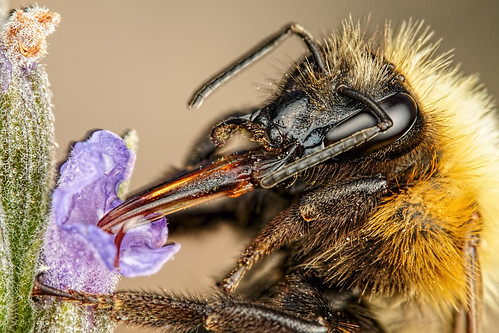
The weather was mild through April and May and I found a Wool Carder bee sleeping in my lavender.
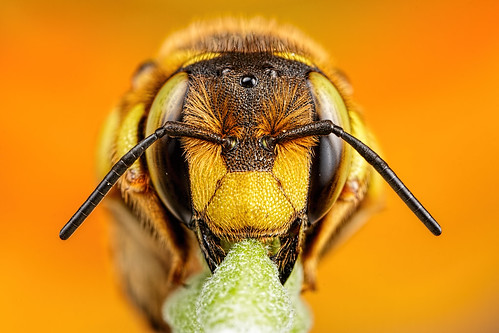
I was determined to push the limits of what I could do with the subjects that I photograph, so as it woke up I held the lavender close to another flower that I had fastened in a clamp and to my surprise the bee climbed right onto it.
It would even occasionally go back to sleep.
From June through August the weather was hot and humid, and just about everything was hyperactive before the sun came up. I had to find a way to take photographs in the heat of the day, and one way to get the critters to let me get close is to bait them. I used a mix of sugar and water, but ended up adding a little artificial nectar mix to the syrup because they seemed to like it better. They won't always let me get close, and sometimes it takes a lot of effort to get an image out of my mind and into the camera. But patience pays off...
I have a triangle in my head and at each point there is composition and technique, lighting, and post processing. If I feel like one of those three is getting weak in comparison to the other two then I spin that point to the top and work on it. Sometimes improving on one aspect forces me to make changes to another (like when I change my lighting I have to change my post processing to take advantage of it). For 2016 I'm going to keep spinning that triangle, and keep pushing the limits of what I can to with the gear and the subjects. But most of all I'm going to continue to have fun :)
Subscribe to:
Posts (Atom)