I've seen some really cool macro videos and hope to bring more of them to you via this blog but this Venus Flytrap Timelapse, by the Another Perspective Youtube channel, is one of the best I've ever seen!

Sunday, June 30, 2019
Wednesday, June 19, 2019
Pollinator Week 2019


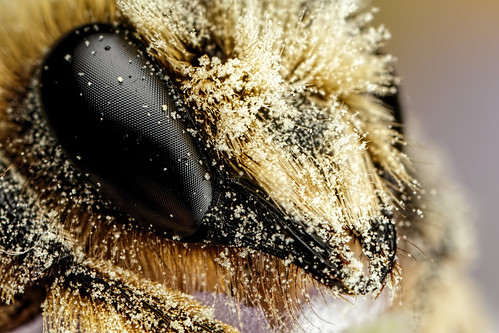
Now that's one messy eater! In the process of getting nectar he also picked up, and distributed, a lot of pollen.

Social bees like honeybees and bumblebees have a grove on their hind leg called a pollen basket. They pack pollen into it and wet it down with nectar, and that pollen isn't going anywhere except back to the colony. Check out the saddle bags on this Common Carder bee (a type of social bee).

Now granted that Common Carder will spread pollen, but not as well as a solitary bee because solitaries don't have a pollen basket. Female solitary bees collect pollen in hairs on their abdomen, and they wallow in a flower to get the pollen to stick to that hair. So in the process of collecting pollen they also spread a lot of it around. They'll also visit more flowers in a day than a honeybee will. We have a small garden in our back yard that produces so many vegetables that we have to give some of them away, and it's all due to the number of solitary bees in our yard. I also raise Mason Bees and they are a lot of fun to watch and photograph. Here's a female Red Mason about to start her day.
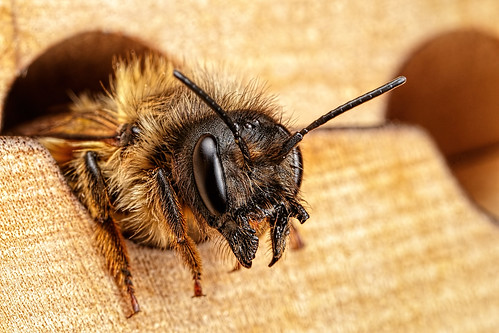
Mason Bees are so docile they can be handled without getting stung. I found this female a little waterlogged from a spring rain and I put her back in my bee house after take a few shots -or is it really her bee house ;)
If you want to help the native bees in your area then plant native flowers in your yard. If you want to raise your own mason bees Crown Bees has everything you need, including how to videos to get you started (and their customer service is excellent!). I'm not affiliated with them in any way, and this is not a paid post. Gotta put that disclaimer in because a lot of what you read on the web is just an advertisement in disguise...
Until next time folks, happy shooting!
Saturday, June 15, 2019
Macro Twin Flash Diffuser Review

Although shipped from the UK I was presently surprised at how quickly they showed up at the post office, especially since I have a military postal address (civilian working at a US Navy base) so the package had to go from the UK to the States and then to Italy and it only took about a week. The diffusers are very well made and even though the ABS plastic is thin they feel sturdy. They slip on and off of the flash heads with a little twisting, and will not come off by accident under normal use. There is some assembly required, but it's pretty easy. The goal is to cover the entire inner surface of the diffuser with some reflective stickers (supplied with the diffuser). Ian explains the process really well in this video (update -the new design has a white matte surface on the inside that diffuses the light a lot better and there are no stickers to apply):
Although the video was made for the MT-24EX the instructions apply to all of the macro twin flashes. There's quite a bit of overlap with the stickers, but that just makes it easy to get all of the inner black plastic shiny. The push pins that hold the front diffuser to the diffuser shell work well, but if you take them on and off a lot eventually they will wear out. I wouldn't expect any problems with the push pins under normal use, and there are two extra ones just in case you need them.
For me the real test of a diffuser is how well it can diffuse light at 1x since the working distance is going to be the greatest. Due to the Apparent Light Principle the larger a diffuser is relative to the subject the better the diffusion, and as the magnification goes up the twin flash heads get closer to the subject. So if a diffuser can perform well at 1x it will just get better at higher magnifications. Here are the tech specs for the gear:
Canon 80D (F11, 1/250, ISO 100) + a Canon MP-E 65mm macro lens + a diffused MT-26EX-RT using Ian's diffusers (both flash heads attached directly to the Canon lens mount), E-TTL metering, -1/3 FEC, second curtain sync). They are all single, uncropped, frames taken hand held. I'm holding on to the plant stem with my left hand, and resting the lens on that same hand to keep the scene steady.
First up is a very small beetle with a very reflective shell -pretty much a torture test for any diffuser.

The specular highlights are very well controlled in that shot. I did notice a slight hot spot in the Elements RAW editor, but nothing to really worry about. The light loss with the diffuser is only 1 1/3 stops compared to shooting with the bare flash heads, so a few additional layers of diffusion could be added inside the diffuser to force the light to spread out more and you could still keep the light loss below 2 stops. For comparison my home made diffuser loses 2 stops, but I'm forcing the light through four layers of diffusion. B&H Photo sells a Pro Gel Pack for about 25 USD counting shipping that will allow you to experiment with several different types and grades of diffusion so you can tweak the light until you get the quality that you want. For MT-24EX users that gel pack is highly recommended since those flash heads have a Fresnel differ that almost looks like a clear piece of plastic. For the record the MT-26EX-RT has a much better built in diffuser.
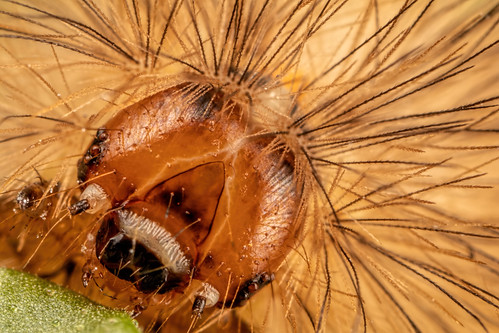
In addition to the beetles eating my Lavender I also found a caterpillar munching on my Mint. Again shooting at 1x so I can record the specular highlights at their worst.

Pretty much the same results as the beetle shot, the specular highlights are very well controlled. I also picked up a lot of texture detail in the Mint leaf, another indicator that the diffusion is looking good. I also wanted to see how well I could light this critter at 4x to test the diffuser performance at a steep angle between the subject and the flash.
Again no issues, plenty of light on the caterpillars face. You can see where the flash heads were just by looking at the specular highlights. The only problem I ran into was with the size of the diffusers. It's great that they are so wide because that helps with the diffusion at 1x. But I like to shoot with the flash heads at the 12 O'clock (key) and 3 O'clock (fill) position and that's not possible with Ian's diffuser due to the width. I did have the flash heads as close as I could get them but the light still looks pretty even. But don't let my personal preferences bias you against this diffuser, the "out of the box" light quality is pretty darn good.
I got nothing but good things to say about Ian McConnachie's diffuser set. Really good light quality, really well made, and I think that they'd hold up to the abuse that most field macro shooters will put them through. Is the light quality up to par with my home made set? Nope, and I didn't expect it to be because I'm using more diffusion layers. But there aren't many, if any, alternatives out there and if you don't like the diffusion as is you can always pick up that gel pack and experiment until you get the light quality that you want. I'm gonna call Ian's macro twin flash diffusers "highly recommended"!
Footnote: I paid full price for the diffusers, and Ian McConnachie didn't know that I was going to write a review. In addition the links are not affiliate links, so I make no money if you click though to B&H Photo or Macrodiffuser.com. So this post is not sponsored in any way.
Friday, June 14, 2019
I probably screwed up...
...cause in this day and age we're just suppose to like each other, but I snapped. In a post on a macro photography forum after the following statement was made...
"I bet if you did a survey among non-photographers, showing a picture of -whatever- centered and one obeying the rule of thirds, they would prefer the centered shots."
I know I should get out of macro forums cause they seem to be filled with people who really aren't interested in personal growth as photographers, and I'm close to calling it quits and sticking to just shooting. But I had to respond...
Nope. Centered shots are pretty boring. Even when the subject fills the frame I avoid centering. In the bird photo you linked there's nothing above or below it (it was a centered image of a bird in flight -nope, not even remotely macro), so it only works cause there's nothing in the frame to give it some perspective. But although it works I'd delete it cause there's nothing in the fame to give it a sense of perspective, and overall it looks pretty dull -in short it's boring.
It's at this point that any kind of filter I might have just shuts down...

Even though it's filling the frame I didn't center this preying mantis -it's in the left side of the frame looking toward the right . Why? Because it's a classic portrait composition technique that just works.
For everyone: I swear I'd give real money if the macro community just shot with the rule of thirds in mind. As it stands right now most of you are producing some of the most amazing razor sharp snapshots. Yup, snapshots cause the primary concern is with getting every little pixel as sharp as possible. Lighting, composition, story telling, all of the things that separate a photograph from a snapshot?! Why bother. Can't see the photo cause the pixels are in the way...
Joe public is looking for images that look good edge to edge, something that he can save to his PC (or phone) as wallpaper. Poorly composed, poorly exposed, razor sharp images are are at the end of the day poorly composed and exposed and they are the reason why very few people outside of the macro community take macro seriously. No matter how much time you spend in post stacking an image if the composition is off and the lighting sucks then congratulations you've just spent a lot of time and energy creating an image that no one outside of the focus stacking community will look at twice.
I know that all sounds harsh, and I know that being honest hasn't made me popular with the macro community. But it's the truth as I see it. The vast majority of macro photos absolutely stink. Take a look at any other photographic discipline and you'll see some amazing photos, and being in the top ten means that you're work is most likely being published. Get outside of these forums that seem to be controlled by people obsessed with getting every pixel razor sharp and you'll see some awesome macro photography.
I absolutely hate social media, and yet there are better macro photos on Facebook and Instagram than I've ever seen on any forum. Images that actually inspire me to be better. Either you all learn that there really is no "box", no hard fast rules that you have to follow, and you make a name for yourselves as photographers that happen to shoot macro or you continue to participate in the circle jerk that is the macro forum community where you continue to take the most uninspiring images on the planet and pat each other on the back for doing so. Yes, I know that last sentence isn't gonna go over well. If you really care about your work as a photographer, or how the general public views the small world, then you won't be pissed off. You'll see what I've written as a challenge...
If you only want to cater to the general consensus on most macro forums , or if you only want to go for a nature walk and record what you see, then I get it. But just don't expect anyone outside of that tight little niche to take you seriously...
At 54 sometimes I can't tell my inner voice from my outer voice. No regrets...
"I bet if you did a survey among non-photographers, showing a picture of -whatever- centered and one obeying the rule of thirds, they would prefer the centered shots."
I know I should get out of macro forums cause they seem to be filled with people who really aren't interested in personal growth as photographers, and I'm close to calling it quits and sticking to just shooting. But I had to respond...
Nope. Centered shots are pretty boring. Even when the subject fills the frame I avoid centering. In the bird photo you linked there's nothing above or below it (it was a centered image of a bird in flight -nope, not even remotely macro), so it only works cause there's nothing in the frame to give it some perspective. But although it works I'd delete it cause there's nothing in the fame to give it a sense of perspective, and overall it looks pretty dull -in short it's boring.
It's at this point that any kind of filter I might have just shuts down...
Even though it's filling the frame I didn't center this preying mantis -it's in the left side of the frame looking toward the right . Why? Because it's a classic portrait composition technique that just works.
For everyone: I swear I'd give real money if the macro community just shot with the rule of thirds in mind. As it stands right now most of you are producing some of the most amazing razor sharp snapshots. Yup, snapshots cause the primary concern is with getting every little pixel as sharp as possible. Lighting, composition, story telling, all of the things that separate a photograph from a snapshot?! Why bother. Can't see the photo cause the pixels are in the way...
Joe public is looking for images that look good edge to edge, something that he can save to his PC (or phone) as wallpaper. Poorly composed, poorly exposed, razor sharp images are are at the end of the day poorly composed and exposed and they are the reason why very few people outside of the macro community take macro seriously. No matter how much time you spend in post stacking an image if the composition is off and the lighting sucks then congratulations you've just spent a lot of time and energy creating an image that no one outside of the focus stacking community will look at twice.
I know that all sounds harsh, and I know that being honest hasn't made me popular with the macro community. But it's the truth as I see it. The vast majority of macro photos absolutely stink. Take a look at any other photographic discipline and you'll see some amazing photos, and being in the top ten means that you're work is most likely being published. Get outside of these forums that seem to be controlled by people obsessed with getting every pixel razor sharp and you'll see some awesome macro photography.
I absolutely hate social media, and yet there are better macro photos on Facebook and Instagram than I've ever seen on any forum. Images that actually inspire me to be better. Either you all learn that there really is no "box", no hard fast rules that you have to follow, and you make a name for yourselves as photographers that happen to shoot macro or you continue to participate in the circle jerk that is the macro forum community where you continue to take the most uninspiring images on the planet and pat each other on the back for doing so. Yes, I know that last sentence isn't gonna go over well. If you really care about your work as a photographer, or how the general public views the small world, then you won't be pissed off. You'll see what I've written as a challenge...
If you only want to cater to the general consensus on most macro forums , or if you only want to go for a nature walk and record what you see, then I get it. But just don't expect anyone outside of that tight little niche to take you seriously...
At 54 sometimes I can't tell my inner voice from my outer voice. No regrets...
Tuesday, June 11, 2019
Macro Myths, 2019 Edition

#1 The "bug lens" myth. Some people say that long focal length lenses are best for shooting insects (a "bug lens"). That one really took me back, cause I know a lot of macro photographers that shoot active subjects with short focal length lenses (I'm one of them). In fact if you want to use a flash as the primary light source then a short focal length, in the 60mm range, is optimal. You need to get the flash as close to the subject as possible to keep the duration of the flash to a minimum, and getting the flash close also gives you better diffusion (both explained in more detail later). So you really need to learn the habits and quirks of the subjects that you want to shoot because it's your knowledge of them, and their willingness to let you get close, that will determine if you get the shot. To a skittish critter the working distance of a lens doesn't matter, so there is no such thing as a "bug lens".
#2 The focus stacking myth. Still a lot of people claiming that you have to focus stack to get enough depth for macro. But most of them are really saying that in order to get razor sharp images that have some depth you have to focus stack (and that's actually true). The kind of detail that a focus stacked image will give you is almost lost on the web and in print, and the average person doesn't care about absolute image sharpness because they're looking for something to save to their computer desktop (or their phone's screen) as wallpaper. People who don't pixel peep want images that look good edge to edge, and you don't need to focus stack to create images that have a lot of depth and detail. You do need to look for, or learn to create, magic angles (angles that make the most out of the depth in a single frame). But the myth persists because some people can't see the picture because the pixels are in the way...
#3 The diopter myth. Plenty of people saying that adding any additional glass to a lens will degrade image quality. I'd preface that statement that if you add cheap glass to a lens then you're going to see a loss of detail, and maybe a lot of other artifacts as well. But most high quality diopters (close up lenses), or even teleconverters won't have a huge impact on image quality. You have to pixel peep to notice any difference. If you need to use additional glass to get a shot then use it -it's better than no photo at all...
#4 The 100mm macro lens myth. Macro lenses in the 100mm range are not good beginner lenses. I'm guilty of this one, cause I use to recommend them for people just getting into the discipline. But the best lens for a beginner is also the best lens for someone who has some experience, and the lens you need depends on the light source. A macro lens in the 60mm range is best when a flash will be the primary light source since you need to get the flash close to the subject to keep the flash duration to a minimum (easier to freeze motion) and the closer the flash the better the diffusion. If you want to use natural light as the primary light source then get a long focal length macro lens, the longer the better. You'll need the extra working distance to keep from shading the subject, or disturbing it. Macro lenses in the 100mm range are a jack of all trades, but a master of none. Too much working distance for flash, and for natural light you'll want more room between the lens and the subject. A lot of the issues I struggled with when I first got into macro were due to using Canon's 100mm USM macro lens.
#5 The flash duration myth. The general perception that the flash will always fire fast enough to freeze motion, and as proof people will list duration times that are close to what a flash will produce when set close to minimum power. The problem with shooting macro is that there is very little surface area to reflect light back into the lens, so you'll rarely if ever be using a flash at close to its minimum setting. Compound that with motion as little as 1/4 the width of a pixel being enough to amplify diffraction, an effect I call macro motion blur. Macro motion blur won't look like traditional motion blur, but you will see a loss of detail and it's easy to blame it on diffraction alone. Although not as obvious as stopping a balloon in mid pop, or a bullet as it passes through an apple, flash based macro is a form of flash based stop motion photography. The "secret" to getting sharp images at high Fstops and magnification is to take as much control over the motion in the scene as possible (your motion and the subject), get the flash as close to the subject as possible (to keep the duration of the flash to a minimum), and use a diffuser that actually forces the light to spread out (and not just block the light). Diffraction, lens sharpness, and motion all have a very synergistic effect on each other with the end result being a loss in image detail. Unfortunately there are still a lot of people who claim that any loss of detail when shooting at high magnification and Fstops is just due to diffraction, and it's just not true.
That's my list for now. I'll add to it when and if I see more "armchair expert advice". What macro myths have you run into?
Wednesday, June 5, 2019
Macro Technique

Then there is the other group: A lot of people (myself included) shoot hand held with just a camera, flash, and a macro lens. Keeping the gear to a minimum allows the subject to dictate how it's going to be photographed. If you take the time to study the habits and quirks of the critters you want to photograph then you can get the images that you want, in just about any conditions. The only thing that stops me is the rain, but after a storm is the perfect time to go looking for a subject that's been slowed down by the rain and the drop in temperature that normally comes with it.
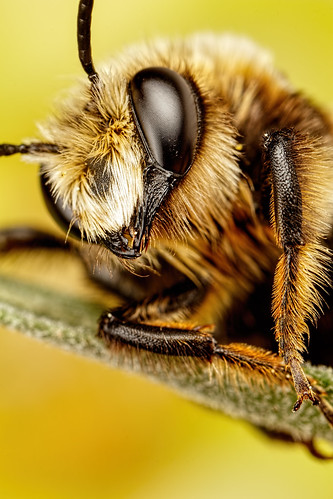
Another advantage to shooting hand held is that you can shoot hyperactive subjects when it's windy. Insects can't tell the difference in the vibration induced by the wind, and the vibration induced by me when I grab on to the stem of a flower. Once I have the stem in my left hand I rest the lens on that same hand to keep everything steady. If I managed to get set up without spooking the subject then all I have to do is follow it with the camera and wait for something interesting to happen. Like this female Sweat Bee using her mandibles to anchor herself to a stamen while she attempts to collect pollen.

Using your left hand to hold on to the critter's perch, and then resting the lens on that same hand to keep everything steady, is a technique that I call the Left Hand Brace. The biggest advantage to using it is that it allows me to photograph insects going about their routine. Like this Chafer Beetle that was shoveling pollen into its mouth.

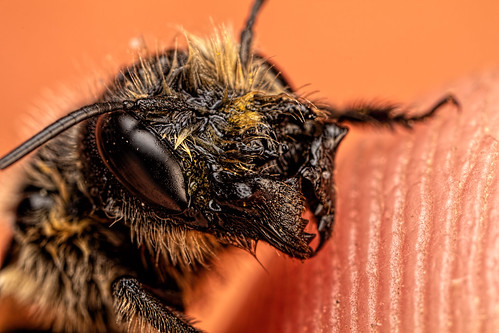
It's also possible, under the right conditions, to photograph the same subject twice and end up with a completely different set of images. I found this semi-active Mason Bee in my Lavender and moved it to my patio table so I could sit down and photograph it with an artificial flower in the background (to keep the background from being black). It would move around and when it stopped I'd look for a way to compose it.

After a while I got tired and decided to crash for a while, so I set the bee on a flower close to my patio. The weather was partly cloudy and cool, with intermittent light rain so the critter stayed on the flower. When I went to check on it this is how I found it.

Same day, same subject, completely different images. The point is to keep your mind open and look for opportunities even when conditions don't seem to be ideal. I've had the chance to shoot some really cool subjects on days when most people would probably leave their camera in their camera bag.
Another way to get close to a critter that doesn't want you anywhere near it is to use a syringe to inject sugar syrup into a flower. If the subject is more hungry then afraid the syrup gives it a reason to let you get close.

There's also a potential third group that combines parts of the first two, using whatever gear and techniques fit the situation. The main thing is to use whatever it takes to get a scene that's in your head and get it into the camera. But I draw the line at putting critters in a refrigerator to slow them down (they might die), or killing them. It's my opinion that macro photographers have a responsibility to change hearts and minds about the small world, and it's kinda tough for the general public to take insects seriously if macro photographers are killing them just to take a photo. They have to be seen as more than "just bugs"...
That's all for this article folks. Until next time happy shooting!
Subscribe to:
Posts (Atom)