Sunday, July 12, 2020

Diffusing a Macro Twin Flash

I've probably spent the better part of a decade trying to wrap my head around flash photography and how to diffuse a harsh point source like a twin flash in as short of a space as possible. For field macro you just don't have a lot of room to work, so any diffusion scheme has to be compact. I also like to use a twin flash as two separate light sources, in a key (one head at the top of the lens) and fill (one head off to the side) configuration because it gives me a lot of control over the highlights and shadows. It also allow me to partially wrap light around the subject so that it doesn't look flat. If you place the flash heads on opposite sides of the subject, or fire them through a single diffuser that's connected to the end of the lens, the light will be too even across the subject and will potentially make the subject look flat. I don't focus stack, but for those of you who do flat light is a composition buzz kill. Get everything in focus and evenly lit and your images will look 2D. So here's what I've learned while loosing my mind trying to diffuse a twin flash:
  • The diffusers that Sto-Fen sells, and the set that Cannon supplies with the MT26EX RT, are better at blocking the light than they are at forcing it to spread out. You'll lose about a stop of light with either of them for a very small gain in diffusion and I think the same can be said for just about every hard diffusion plastic. I'm not going to do a "how to" on this one cause I don't want you to blame me if you ruin the diffuser set that comes with your MT26EX RT. I bought a second set from Canon to test out my theory that they weren't really diffusing the light very well, and as soon as I got them I used a Dremel tool to remove the front diffusion plastic so I could use it as a base for my own design (I just needed the frame and the clips that hold it to the flash heads). Due to some shipping issues I ended up paying over 60 USD for the set, but it was worth it cause I was right. If you follow me down this rabbit hole with the only set of diffusers that you have for your MT26EX RT you do so at your own risk...
  • 1/4 stop white China silk is the only material I've found that can force the hot spot in the MT24EX (and to a greater extent the MT26EX RT because it has a better built in diffuser) to spread out. It's best to use two layers separated by an air gap, preferably with at least a centimeter between them. Putting one layer of silk directly over another will cause the light to drop by at least a stop, so separate them. You can get it at B&H Photo but it's a little pricey and they have to special order it. I've been looking for a better, cheaper source. Note: The MT24EX knock off flash units perform about the same as the MT24EX, so 1/4 stop silk should also work for them but I have no experience with those flashes. At some point I'm going to experiment with other materials because I'd like to find a cheaper material than silk and not all diffusion surfaces are the same. Each of them diffuses the light in a different way.
  • Gary Fong's Puffer Plus makes an excellent last diffusion stage, if your trying to keep the size of your diffusers as small as possible, because the light transmittal is good and the surface is dimpled (it acts like a much larger diffusion surface). I've been looking for a similar photographic grade material that's not curved, but so far no joy. I've experimented with a lot of different diffusion plastics for that last diffusion stage and none of them performed better than the Puffer Plus. Even just using another layer of 1/4 stop white China silk didn't work as well.
Here's where things get "tricky": There's a difference between soft light and diffused light, and they are not the same. Using a diffuser that is large relative to the subject will give you soft light, and you can see it in the quality of the shadows. But diffusing the light means forcing the light to spread out, and a large diffusion surface relative to the subject won't necessarily do that. Diffused light means forcing the light to spread out so that the intensity of the light across the diffusion surface is the same. You can have soft light (soft shadows) and a hard well defined specular area.

Understanding the difference between soft and diffused light was a eureka moment for me, because I initially thought that I had hit a hard limit in my diffusion because using a larger diffuser wasn't practical. But my light was soft enough with my current diffusers, or another way of saying it is that my diffusers were large enough relative to the subject, because I was getting soft shadows. Take a look at the shadow under the Sourgrass petal just below the Sweat Bee's antenna:

Sweat Bee in a Sourgrass Flower VI

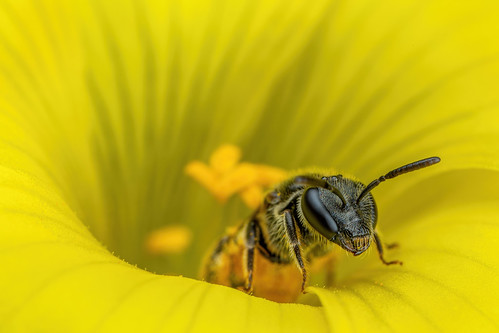
The shadow is soft, so my diffusers are large enough. But the light that they were creating could best be described as "soft specular" and not "soft diffused" because the specular area is still well defined and almost harsh. My light wasn't really diffused. But after modifying the internal structure of my original diffuser (the details of which I'm not going into) I'm now getting soft diffused light with almost no hot specular highlights (the intensity of the light across my diffusers is almost the same) while only losing about 1 and 1/4 stops when compared to the bare flash heads. Light that's so well diffused I'm having a tough time determining if I've nailed critical focus on some subjects, when viewing images on my camera's LCD screen, because there is no noticeable specular reflection in their eyes.

Foraging Cricket II

The Death of the Kaiser

After some experimenting with a cooperative, and very metallic, Chafer Beetle I've determined that using a Kaiser Adjustable Flash Shoe to elevate the key is working against me in some situations. Depending on the angle that I'm shooting from it can cause the fill light to be too harsh and/or pump a lot of light into the flower that a critter is perched on creating a third specular highlight. So I'm going to be experimenting with the angle of the flash heads more.

The quality of your light and the angle between the light, subject, and sensor will determine how much detail you can capture. You can easily lose more detail to poor light quality than to diffraction, and if you focus stack you really should be putting some serious effort into your light. Doesn't make sense to spend all that time to create a stack only to erase detail with poor specular highlights.

Note: All of my diffuser design has been geared toward creating a relatively small, compact, diffuser that would give me the light quality that I wanted but still be practical for field macro. However light is light, and I'm sure that the information I've provided in this post can be applied to any diffusion setup that you might build for yourself.

Sunday, June 14, 2020

Monday, June 8, 2020

Ladybug 3D Microscope

Mr. Ahron Wayne contacted me via my Extreme Macro Facebook page to tell me about a Kickstarter project that he and a team of engineering students have been working on. It's a motorized scanning macro camera:


I wasn't all that excited, because I shoot single frames of active subjects, until I saw it track a moving critter in the video! Pretty cool :)

This isn't a paid add, or an endorsement of the Kickstarter campaign, I just thought it was a really interesting project and I know a lot of you are going to be interested in it as well :)

Friday, June 5, 2020

Sweat Bees in Sourgrass Flowers Deconstruction

Sweat Bee Foraging in a Sourgrass Flower III
I want to give you a full breakdown of how I'm shooting active Sweat Bees, and most of what I'm going to cover will apply to just about any active subject. The image to the right was what I was trying to capture, although it's not the frame that's still stuck in my head. I can't control where the critter is going to be, or where the antennas are pointing, so I just have to work with what she gives me. But it's close and I'm happy with it, and here's how I took it.

Sourgrass starts growing in my yard in the fall and by early May it's already dormant and waiting for cooler temps and less sunlight. It typically blooms in the early spring, so the peak time for the flowers to be in full bloom is from about mid February to mid April. Most of the ground dwelling bees don't get active until late March. So there is a roughly four week window to photograph female Sweat Bees foraging in Sourgrass flowers for pollen. After the Sourgrass is gone they move on to other pollen sources (like Dandelions). The flowers completely close in the afternoon and don't open until the sun has been up for a few hours and it's already warm. So there's no chance to catch a sleeping bee in one of them unless it rains after the bees get active and there is a temperature drop. So shooting the critters when they are hyperactive and foraging for pollen is the only choice, and it's what I'm looking to capture with the camera anyway.

A lot of people will tell you that you cannot shoot macro on windy days, but it's actually not true. Most insects are very sensitive to vibration, and it's easier to photograph them in flowers when I can grab onto the flower's stem with my left hand and then rest the lens on that same hand to keep the scene steady. But when it not windy it's easy for the critter to tell when I've grabbed on, and when they do they'll stop foraging and come to the top of the flower to investigate. More often that not they will be facing away from the camera, but it's not a total loss since I'm holding onto the stem and can gently rotate the flower so that the bee is facing the camera. This is the type of shot that I can get when she figures out that I'm close.

Sweat Bee in a Sourgrass Flower

Not a bad shot, just not what I'm looking for. To get the depth that you see in that image I'm focusing on the leading edge of bee's mandibles, using my peripheral vision to frame and compose the scene (so I don't have to look away from the focus point), and twisting my wrist (sometimes both of them) to lay the area of acceptable focus over the curve of the critter's head. In that scene I'm tilting the frame toward the top and right without moving the focus that I have on the bee's mandibles, and it's something that I don't have to think about after 14 years of shooting macro (13 of that with just the MP-E 65mm macro lens). I then refocus, reframe, and take another shot if the subject doesn't take off and I can take each shot with less than a second between them because all I have to think about and concentrate on is where I'm placing the initial focus. I'm not shotgunning the shutter release and hoping that I get something to post, and since the bees are in motion if a "spray and pray" technique gave me a usable image it would just be pure luck and that's not how I want to shoot anything. Being able to rapidly reframe, refocus, and take a shot is important because they are in motion and I want to catch them stripping pollen out of Sourgrass anthers with their mandibles like this:

Sweat Bee Foraging in a Sourgrass Flower

Still not the frame that's stuck in my head, but I'll get another opportunity to photograph them again but it won't be until next year.

Note: There are still a lot of you out there who think that all you need is the equipment that I have and images are just gonna magically jump into the camera. Someone recently replied to one of my posts on Reddit indicating that he wished he had my gear, to which I replied that what he really wanted was my 14 years of experience shooting macro. This is what he said:

"You don't know me or my want to..... so you may be right but.... I could give you a run for your money with an 8th of the experience!! just give me a camera equally powerful promise il deliver lol"

I asked for a link to his gallery and didn't get it, and rightfully so. If he could give me a run for my money with my gear and 1/8 of my experience then he should be shooting at my level already because the equipment I use just makes my style of shooting convenient for me (might not work for you). Notice that in the deconstruction above not once did I mention the hardware I used, and I didn't mention it cause it wasn't relevant to getting the photos. Everything depended on my knowledge of the subject, my ability to get close to an active wild animal, and how to make the most out of the limited depth of field.

That next lens, next camera body, next whatever isn't going to make you a better photographer. Learn to use what you have now...

Tuesday, May 26, 2020

The Dreaded Error 01

I'm back to shooting with the Canon EF-S 60mm + extension tubes because my MP-E 65mm macro has broken again (3rd time). The aperture makes the most God awful crunching sound when I take a shot, and the display reads Error 01 and tells me that there's something wrong with the lens contacts. It's a generic error that pops up when the camera cannot communicate with the lens, and from experience I know it's because the cable that runs between the electrical contacts and the aperture assembly has worn out. I told myself the last time it broke that I was just gonna use the EF-S 60mm and tubes or buy a new MP-E. So I think I'll use the EF-S lens for a while until I decide what to do. Knowing my luck I'll buy a new one and Canon will announce a version for an RF mount...

Which brings me to the last topic I want to mention: I'm feeling the need to shoot full frame but I'm not sure about getting a mirror-less camera. I photograph a lot of semi-active to hyperactive subjects and I'm concerned that the display lag between the sensor and an electronic view finder (EVF) will be an issue. For those of you shooting with a Canon mirror-less rig how's the EVF lag?

Friday, May 22, 2020

Bumblebes Foraging in Grape Hyacinth

One of the followers of my Extreme Macro Facebook Page posted a link to a video that he shot that I just had to share. Methias Solstrand did an excellent job of filming Bumblebees in motion foraging on Grape Hyacinth flowers. I always associated pollination with the hairs on bees, but these Bumblebees are clearly pollinating the flowers with their proboscis.

Saturday, April 11, 2020

Let's Talk Technique

Sweat Bee in a Sourgrass Flower
Due to some of the questions and feedback I've received lately I thought I'd explain what I'm doing with the camera and how I deal with different situations. One of the common comments that comes up is someone will see my photos, and all the depth that I can get at F11, and assume that Canon's MP-E 65mm macro lens can defy physics. But depth of field is strictly a function of magnification and the Fstop. So the depth that I get at 2x and F11 in a single frame with Canon's MP-E 65mm is the same depth of that I'd get with Canon's EF-S 60mm and 37mm of extension tubes (the EF-S 60mm is roughly a 37mm lens at minimum focus). So how do I get so much depth in my images? I pick an area where I want the focus to start and then I twist my wrist to lay the area of acceptable focus over the curve of the subject's face, creating a "magic angle" that makes the most out of the thin depth of field. The image to the upper right is an example, taken at roughly 2.5x and F11. The image below was taken at 3x and F11, and I shot the critter head on.
Sweat Bee in a Sourgrass Flower IV


Another question I get is about the magnification that I list with my images. If I say that I took a shot at "over 2x", for example, it's because I had the MP-E65mm set to somewhere between the 2x and 3x mark on the lens barrel. I use magnification as a composition tool, and I don't always set the lens to even magnification points. I never take the crop factor of my sensor into account, because cropping an image is not the same as increasing the magnification. Using a smaller than full frame sensor, and cropping a full frame image down to a 1.6x crop, is functionally the same and just creates an enlargement of the subject. Cropping will never reveal more detail in an image that wasn't already there, but increasing the magnification can.

One of the many reasons why I don't focus stack is because most of the time the subjects that I photograph are active. Now some of you have been quick to point out that there are macro photographers that shoot active critters, and you're right -kinda. They are focus stacking active subjects when they pause long enough to take a "spray and pray" sequence of images. When I say that I'm shooting active subjects I mean that I'm tracking them with the camera as they are moving. Like this Sawfly that I shot at 4x and F11:
Feeding Sawfly


So my definition of "active" might be different from your definition of "active" ;)

The Left Hand Brace Technique that I use allows me to eliminate a lot of motion (excluding subject motion) and get precise control over the framing and where I want the area of acceptable focus to be. But like any technique it has limitations. I've got the critter's perch in one hand and the camera in the other so there's no way for me to change the magnification of the lens. I have to look at a scene, make an educated guess as to what magnification will give me the framing that I want, set the MP-E 65mm to that magnification and then hope I can find a good composition. There are scenes, like this one, that I'd like another chance to shoot:

Foraging Sweat Bee II


I love everything about that shot, except for the clipped wing at the top of the frame. She was moving so fast, forcing me to re-frame and re-focus every shot, that I'm lucky to walk away with anything. This is the photo that I took before that one, the one that caused me to increase the magnification (note not the same bee or flower):

Foraging Sweat Bee


It's just not the same image. Some days I'm the statue, and some days I'm the pigeon ;)

One of the benefits of using the Left Hand Brace Technique is that I can rotate the flower to position the subject so that it's looking into the lens. Some of the Sweat Bees included in this article felt me grab onto the Sourgrass flower they were in (it wasn't windy enough) and stopped foraging. When they come to the top of the flower it's very common for them to be facing away from me. But I can gently twist the flower's stem without spooking the subject, and it doesn't damage the flower. Shooting when it's windy is easier, since the critter can't tell the difference between the vibration induced by the breeze and the vibration that I create when I grab onto the flower's stem.

If you have any questions about how I'm shooting just drop me a comment, or join my Extreme Macro page on FaceBook and post them there. I have comment moderation enabled here at Blogger to cut down on spam. Rest assured that even if you leave a negative comment I'll post it provided it's not laced with profanity. Until next time happy shooting!

Monday, March 23, 2020

Emerging Mason Bees

Hatching Female Mason Bee II
Last year when I harvested my Mason Bee cocoons I realized, all too late, that I had a unique opportunity to document the critters emerging but I really wasn't prepared for it. I was just shooting on the fly, with no real thought about the compositions that I was looking for. As a result the image to the right is the best shot that I took last spring, and I'm not happy with it.

After reviewing the images I took, and kicking myself for not doing a better job, I was determined to put some real effort into documenting my Mason Bee's first day. So off and on over the summer and into the winter months I thought about the compositions I wanted to get, angles that would make their emergence easy to see and understand. But I gotta admit that luck also played a part in the photos I was able to create, cause I managed to be mentally "in zone" during some pretty unique situations. Like when this Mason Bee was chewing its way out of the cocoon:

Emerging Blue Mason Bee X

There was also the time I was unrolling a paper insert and the paper broke right at the point where a Mason Bee had taken the top off of his cocoon:

Emerging Blue Mason Bee III

Then the tricky shots, like trying to get as much of the bee's antenna in the plane of focus as it was actively emerging from a cocoon:

Emerging Blue Mason Bee IX

I captured a lot more images, ten in the first series that I posted to my Flickr gallery, and I'm saving some to post this fall when all the critters are gone. I get all of my Mason Bee supplies from Crown Bees, and this article is not sponsored by them. I'm giving them a plug because their customer service is excellent and they provide a lot of online information to make raising your own Mason Bees easy. We have a small garden that produces more vegetables than we can eat and it's due to all of the solitary bees that visit my yard.

In addition to photographing them emerge I also got a few shots of newly emerged Mason Bees.

Newly Emerged Blue Mason Bee III [6000x4000] [OC]

It was also a good opportunity to photograph them warming up on my finger before they took off and joined the rest of the bees in my yard.

Newborn Blue Mason Bee

I'm really happy with the emergence images that I created this year, and always happy when I can look back over my photos and see improvements in my image quality. As always those photos are single, uncropped, frames taken hand held. I usually pick an area to lock the focus, like a bee's mandible, and then twist the camera in my hand to lay the area of acceptable focus over the critter's face. The end result is a "magic angle" that makes the most out of what little depth exists above 2x and F11. So for those of you who look at my photos and think that Canon's MP-E 65mm can somehow defy the laws of physics and provide more depth of field than other macro lenses, well, it's not the lens ;) Until next time happy shooting!

Footnote: Lately I've noticed a disturbing trend to pose dead insects and photograph them in such a way that it looks like they're flying, or in one case a "fight" between a jumping spider and bug. Although I think it's pretty creative, and when it's done right the images are really impressive, it's misleading to try to trick the viewer by not being honest about how an image was taken. I'd hate for someone who's new to macro to see those kind of shots and think that it's actually possible to take a focus stack of a subject that's in motion, especially after spending thousands on gear to take images that are impossible unless the subject is dead. Granted I'll bait a subject so that it will let me get close, but when I do bait them you know I've done it because I tell you. IMHO it's important for a photographer to be honest about their work. One easy way to tell if a shot has been faked is to see if it is a focus stack, especially if the scene is a dynamic one. Maybe one day the hardware will get to a point where it will be possible to capture frames fast enough to focus stack a moving subject. But that tech isn't here yet. So when you see a photo of a flying insect and it's razor sharp with a lot of depth know that it's a fake.

Footnote part due: Thanks to everyone who has reached out during the pandemic to ask how I'm doing! Italy has been hit pretty hard, and unfortunately it's not over. But me and mine are well, and we're fortunate to live in a villa that has a yard. It's gotta be really tough for those who are quarantined with only a balcony! Stay safe everyone, limit your contact with others, and wash your hands religiously...