From an email I received a while back:
"Greetings,
I'm Eric and I'm an art director in an independent agency here in Dubai, U.A.E.
I have seen some of your works here in devianart and I think they're great!
You see, we are currently working on a calendar for 2010 and we're featuring MACRO PHOTOGRAPHS with interesting colors and unexpected details of ordinary everyday objects ( or animals and humans maybe ).
I'm just wondering if you would like to be featured in this 2010 calendar.
I'll be honest with you though, We are on a very strict budget, which is basically none.
If you decide to agree, All we can offer you is your work being seen throughout the whole year in a lot of desks all over the world.
I cannot tell you which company we are doing this for at the moment because it's confidential at this point.
But we will give you a copy of the finished calendar design in pdf format before we send it out so you could see it first.
If you can reply to this asap, like now....that would be great!!
I'll be waiting for your favorable reply
Thanks and have a great day!"
So the art director gets paid, and the folks who print and distribute the calendar get paid, but the guy who took the photos (the poor SOB who's the reason why people are buying the calendar in the first place) doesn't get paid?! I sent the email to Tom Stack and Associates (Tom handles my portfolio) and I never heard from Eric again. There are so many people out there who are willing to fall for this "I can't afford to pay you even though I'm making out like a bandit" scam that they'll keep trying until they find someone who is willing to trade their work for a photo credit, and it's the reason why there's no money in photography anymore...
Footnote: The reason why the scam works is that people get all excited when someone contacts them for images. They think that because someone is asking for their work then that must mean that their photos are really good, and getting them published is a form of validation. What the photographer doesn't realize is that the publisher is phishing for people who will agree to give away their images for nothing but a photo credit -Eric's email is a prime example. He didn't know what direction he was going to take the calendar because he didn't know who would agree to give away their work. He'd just keep trying until someone said yes and then he'd use their images to develop the theme of the calendar. Target enough people and eventually you'll find someone who's willing to say yes -it's the same reason why the Nigerian 401 scams work. If the technique wasn't successful then it wouldn't be used.
Trust me when I tell you that if someone wants to use your specific images then they will pay you for them...

Monday, December 28, 2009
Thursday, December 24, 2009
Tuesday, December 22, 2009
Another Daily Dozen
This image of a bated honeybee feeding on a Rosemary flower was selected by National Geographic as one of the Daily Dozen for December 21st 2009 :)

Monday, December 21, 2009
Odds and Ends
Normally I make a "Macro Resolutions" post at about this time, listing the things that I'm going to work on in the coming year. But this year I could sum up part of what I want to do with "take better photos". The rest is a little too specific to mention unless I want someone else to beat me to it so I'm gonna stay quiet :)
The photo that I'm including with this post is an example of the kind of macro that I really like to do because it tells a story. I've got nothing against shooting a critter that's too lethargic to move -there are plenty of those images in my gallery. But shooting active subjects is ultimately more interesting, and challenging, so you'll see me doing more of it in the coming year. With the way the local weather is expected to change I may be back to shooting critters in just a few weeks -way too warm for December.
Someone recently asked me about the Hama adjustable flash shoe and being the crash test dummy that I am I ordered a set. They are almost identical to the Kaiser adjustable flash shoe (minor differences). I think that the Hama has a better tension mechanism for the rocker arm, but I wouldn't hesitate recommending either one. Neither set will lock into the flash mount that comes with the MT-24EX, but that's easy to fix just by cutting a couple of notches into the base plate of the flash shoe with a Dremel tool :)
After comparing my 40D with the 7D using DXO's Image Quality Database I've lost all interest in getting a 7D -just too noisy at ISO 100 for shooting macro. IMHO the last good 1.6x crop factor camera that Canon produced was the Xti, and I keep hoping that they will roll their latest sensor improvements into a 10 MP "60D". Even a 1.3x crop factor sensor that can take EF-S lenses (using a smaller area of the sensor when an EF-S lens is connected) would be great! But I just don't see it happening until just about every Canon photographer switches to Nikon out of frustration. I'd sell all of my gear and make the switch if it wasn't for the MPE-65mm macro lens -it's the only reason why I'm still a Canon shooter...
Note to Canon: No one really needs more than 10 MP in a DSLR -they just need to be 10 million really good pixels...
I did win a photography contest, but I can't talk about it yet and it's driving me nuts! Like knowing what you're getting for Christmas but you have to wait to open the box. The 15th of January is the announcement date.
I hope you and yours have a happy and safe holiday! Take care :)
Thursday, December 17, 2009
Macro Spotlight - Grzehoofr
From time to time I like to bring attention to the incredible talent that exists in the amateur macro community. Unless your a member of at least a dozen different forums you'll never get a chance to see, or appreciate, their work. I ran into an extremely talented shooter from Poland over at the Juza Nature Forum, macro section named Grzehoofr that just blew me away. It's not the level of detail in his work, or his compositional skills, or his lighting -it's all of the above. In my opinion macro photographers like Grzehoofr (see his gallery over at Picasa) represent the benchmark in macro -they are the people that you'll be measured against in the not so distant future. Here's a sample that I pulled out of his gallery -it's one of many incredible photos...

Saturday, December 12, 2009
Topaz Labs
I put a lot of time and effort this year to improve my techniques, lighting, and composition -so much that post processing had become the weakest aspect of my shooting. I just don't have the time or patience to sit down and learn a lot about Photoshop Elements, and CS4 is just too stinkin' expensive. But something had to give because my weak post processing was really starting to impact the quality of my photography...
About a month ago one of my coworkers, and a talented pano shooter, Scott Knauss, mentioned Topaz Labs and asked me if I had tried any of their plug-ins. Being the crash test dummy that I am I downloaded a few of them and requested a temporary license key so I could test drive them (the test license is good for 30 days).
I've since registered Topaz Labs Detail, Adjust, and DeNoise. I use Detail and Denoise on my macro images now, and Adjust on my closeup and landscape images (for those few times that I actually take the MPE-65mm macro lens off of my camera). The image included with this post was processed as follows:
I first open the image in the Element's RAW editor and make any necessary changes to the exposure and white balance (usually setting the temperature of my light to 5800 K). I then open the image in the Elements main editor and use the healing brush to rub out any dust spots. I then run Topaz DeNoise and use the standard RAW preset. It takes a little while for DeNoise to analyze an image, but it's worth it -to me it does a better job of preserving detail than NoiseWare Pro.
Once I've removed the image noise I sharpen the photo with Topaz Detail using the Micro Contrast preset. With Detail I also adjust the highlights and shadows (if necessary) and add a little saturation. Once Detail is finished I create a Levels adjustment layer and set a black point.
I can not emphasize that last step enough -setting a black point will really make your photos "pop"!
All that's left is to save the image as a PSD (in case I want to go back and make any changes) and a JPG. At the risk of sounding like I've been paid to write a review: Topaz Labs has allowed me to bring my post processing to a level where it's no longer the weakest aspect of my photography. If any of you have been using Topaz Labs plug-ins and have any tips for me then please leave them in the comments!
Wednesday, December 2, 2009
Speed Bump Deconstruction
Of all the images that I've written deconstructions on you might not think that a shot of a snail deserves its own writeup -not like it's going anywhere anytime soon right? Well there's actually a lot more going on in this shot than you might notice at first, and there are a few tricks and tips that are worth mentioning.
This is a field studio image, completely manipulated, and there is only one element that was captured by chance...
I've been seeing a lot of these snails the last few months and they're tiny -most no more than a centimeter in diameter. The plant that it's on has some large leaves that are easy to grip without ripping, and in this shot I'm holding onto the leaf and using my fingers to create the "speed bump". Pretty much a standard Left Hand Brace shot as far as keeping the camera steady goes.
The tricky part when shooting snails, damselflies, or any creature that has eyes on a stalk is getting those peepers and the main body of the critter in focus. Although it looks like I'm shooting the snail almost side on I'm really getting it head first because it started to turn. I'm holding the camera so that the top of the frame is deeper into the scene than the bottom, and that's why so much of the leaf and the snail are in focus. I'm also using my hand to turn the leaf down to get it as parallel to the plane of acceptable focus as possible. The end effect is a "magic angle" between the camera and the scene that creates the illusion that there is a lot of depth when there really isn't. I've simply shortened the front to back distance between the top of the snail's shell to the bottom of the leaf, and then angled the camera to take advantage of it. Do it often enough and it just becomes second nature.
Last, but not least, I got lucky: The snail looked right at the bump I had created in the leaf :)
Monday, November 30, 2009
No New Diffuser -Again
A set of Nikon SW-11s arrived in the mail today and I after modding them to let more of the light from the MT-24EX's flash heads into the first internal reflector the Puffer set that I made is back on my flash heads. When I first tested the SW-11s (shooting one of my son's Hot Wheals cars) I was losing almost four more stops than the Puffer set, and after modding them I was only able to regain one more stop. So with the Puffers I lose one stop of light compared to the bare flash heads, and with the modded SW-11s I was losing three. The diffusion with the Puffer set was also better, but I'm not going to bother posting test shots since losing three stops of light is losing two stops too much. I can't recommend the SW-11s as a diffuser for the MT-24EX
The SW-11s use two reflectors to bounce the light from the flash into a diffusion panel. Oddly enough the first reflector looks like it's at the wrong angle and it seems to me that it's actually doing more to bounce the light from the flash right back toward it instead of bouncing it to the second reflector. One possible mod would be to change the angle of that first reflector, or replace it with something that would bounce the light in the right direction. But I didn't see enough room inside the diffuser to pull it off and I'm not sure it would make much of a difference. With every reflector I'm probably losing a stop, so at a minimum the best I'd be able to do with the SW-11s is to lose two stops. Not worth it...
The SW-11s use two reflectors to bounce the light from the flash into a diffusion panel. Oddly enough the first reflector looks like it's at the wrong angle and it seems to me that it's actually doing more to bounce the light from the flash right back toward it instead of bouncing it to the second reflector. One possible mod would be to change the angle of that first reflector, or replace it with something that would bounce the light in the right direction. But I didn't see enough room inside the diffuser to pull it off and I'm not sure it would make much of a difference. With every reflector I'm probably losing a stop, so at a minimum the best I'd be able to do with the SW-11s is to lose two stops. Not worth it...
Thursday, November 19, 2009
I Don't Know What You Need
I get a lot of questions about gear, and one of the most common is "What macro lens should a beginner get?". Since it's a common question I figured it would make a good post for the blog, and I was all set to tell you my preference too. But while I was thinking of what lens and why it hit me: What I would tell you to buy is based on my experience, the way that I like to shoot, and the subjects that I chase with the camera. It's all personal preference based on a lot of trial and error and a lot of money spent trying to figure it all out.
You're not me, I'm not psychic, so I don't know what you need.
Ask a dozen macro shooters what the best piece of gear is for macro and you're likely to get a dozen different answers. None of them are necessarily wrong, it's just that each person is telling you what they would get if they knew then what they know now. Unfortunately none of it, or some of it, might be right for you.
Good luck figuring out what to choose...
I can tell you some generic things that might help you make up your own mind though, things that I've learned through trial and error and a lot of gear that's just collecting dust.
There's no such thing as a "bug lens".
From the insect's perspective there is no difference between the 3.5" working distance of Canon's EF-S 60mm macro lens and the 180mm L's 8.9" working distance. As far as the critter's concerned you're too stinkin' close. How much you know about the subject's habits and quirks, and the willingness of the subject to stay put, is going to determine if you can get close enough to take a shot and not the working distance of the lens. If you cast a shadow over the subject then odds are it's not going to stick around, and a long focal length lens can help you to keep from spooking the critter. But as long as you know that shadows are bad a short focal length lens will work just fine for shooting anything. Last a long focal length lens will give you better background blur (called "bokeh") and if you plan on shooting a lot of closeup images a shorter lens might not give you the overall image quality that you want.
It's easier to go above life size with a shorter focal length lens.
It's simple math: The magnifying effect of adding extension tubes is greater with a shorter lens than a longer one. On the surface it takes 60mm of extension to take a 60mm macro lens to 2x and 180mm of extension for a 180mm lens. But the formula breaks down in a really cool way -most macro lenses lose focal length at life size. Canon's EF-S 60mm is actually a 37mm lens when the focus ring is set to 1:1 (life size). So all it takes is 37mm of extension tubes to get to 2x -sweet! I'm not sure how much the 180 L loses at 1x, but I'm sure it's not less than 100mm and that's a lot of extension on a lens that's already long and heavy.
The best lens is the one you take with you.
I've got a lot of heavy, expensive L glass sitting in my closet. I've got an 18-55mm IS kit lens in my camera bag...
You can use any flash for macro.
With few exceptions the light source doesn't matter -but the quality of that light does. The important thing to remember is to use a good diffuser, one that actually diffuses the light and doesn't just block it, and get the flash close to what you're shooting. A lot of the macro that I do is really nothing more than a form of flash based stop motion photography. It's not as obvious as freezing the motion of an exploding balloon, but none the less I'm still using the short duration of the flash to freeze motion so that I can get sharp images. Using a good diffuser, and getting the flash close to what I'm shooting, allows me to keep the flash duration as short as possible. Although it sounds like I'm talking about flash photography from my perspective, since I hand hold the camera, I'm really not. A tripod won't stop the subject from moving. One final note on macro flashes: A ring flash, even one that allows for ratio control, is going to produce flat light when compared to a macro twin flash or a standard camera flash on a bracket. Ring flashes are great -for dental and portrait photography...
You don't need a tripod, or any tripod accessories, to shoot macro.
See the flash section above about getting sharp images by freezing motion with the flash. I typically look for ways to brace the camera, or I'll use the Left Hand Brace Technique. You can use a tripod, but the more hardware you add the more limited you'll be. There are a lot of subjects that just won't sit still and wait for you to setup a tripod, adjust a ball head, and focus the scene with a focusing rail. So if all you want to do is take static photos of dew covered critters, or other forms of still life, then get a tripod. I prefer not to be held back by a lot of gear and to go after active subjects, when they let me, so I took the training wheels off of my camera a long time ago :D
I know it's frustrating, and I really do wish there was a "go hear and do this" kind of answer for all of the people out there who want to get into the greatest photographic discipline of them all, macro. But unfortunately you're going to have to figure out a few things on your own, I can't teach you experience, and I'm not you. Sorry...
Wednesday, November 18, 2009
Possible Diffuser Replacement
I got an idea for a new diffuser for the MT-24EX from this thread at PoTN. So I've ordered a set of Nikon SW-11 diffusers and I should be able to test them out and post about it by the 30th of November (provided I get them in the mail before Thanksgiving). I don't know how well they are going to work, or if I'll be able to use then for my style of shooting. But just in case any of you were thinking about building a set using the Puffer diffuser I wanted to let you know that I'll be testing the SW-11s. I'm hoping that they do work, since a set of SW-11s is cheaper than buying all of the material for my Puffer based diffuser, and it's easier to just attach a pre-built diffuser to the MT-24EX than to build a set from scratch. More to come...
Wednesday, November 11, 2009
Magic Angles
From time to time you'll hear people talk about "magic angles" in macro photography. I'm not sure who originally coined the phrase, probably one of those things that's as old as photography itself. But I thought it would be a good idea to define it (since I get asked about it a lot) and to explain how I take high magnification shots with a lot of depth using a simple technique.
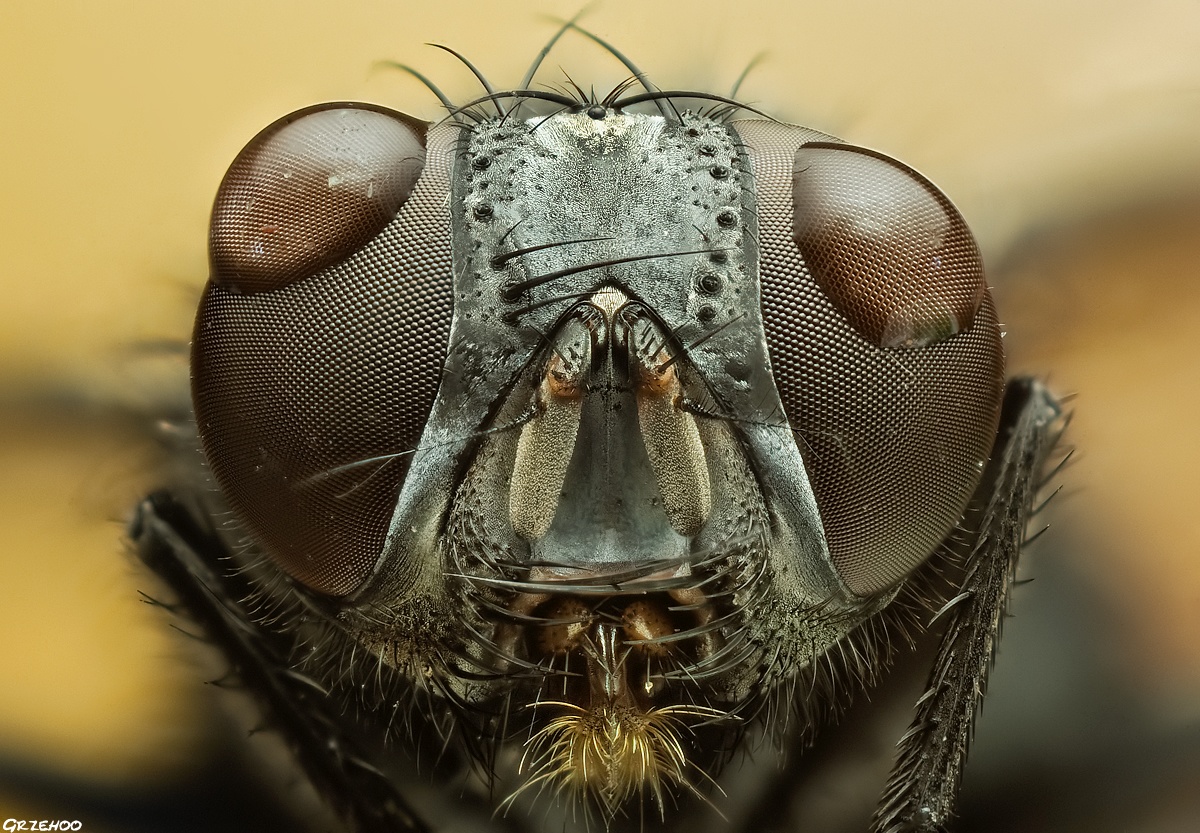
The area of acceptable focus is thin and flat, and unfortunately most of the critters I photograph are curved. The "trick" is to look for a way to lay a thin flat surface over a curve so that as much of it is covered as possible. The fly in the photo I've included with this post has a head that's almost triangle shaped and it should be pretty obvious that you can't shoot it head on. Placing a flat surface against the point of a triangle won't cover much, so there are some angles that just won't work for a single frame no matter how much depth you can get. Even though there are a lot of curves there are still some relatively flat areas that will allow you to make the most of what little depth you have at high magnification. It takes a little experience, but eventually you'll learn to recognize a good angle from a bad one.
The really cool aspect to magic angles is that I have yet to find one that does not work from a composition standpoint. If I can find a magic angle I'll end up with a well composed photo that has a lot of apparent depth. Since I'm more concerned about composition than getting maximum detail I haven't gotten into focus stacking -just haven't needed to do it yet.
Now for the technique part: For this shot I moved the lens in until the left front edge of the fly was in focus. Then, with the lower left hand corner of the frame locked in place, I moved the upper right corner in until the ridge between the fly's eye and "face" came into focus. I also turned that lower left corner on its axis, kind of spinning the frame so that the upper left corner went deeper into the scene. It's a very minor tilt / twist with my wrist that makes a huge difference in the amount of the subject that I can cover with the area of acceptable focus.
The result is an image that has a lot of depth simply because I'm not wasting any of it...
Sunday, November 8, 2009
Nice Capture
This post has been in my head for a long time, well over a year. It was going to be one of those pieces that would piss a few people off, so I sat on it while I tried to figure out how to word it. I was afraid it would come out too harsh and I'm kinda glad that I waited. You see I was gonna say that I thought it was wrong to tell someone "Nice capture" when they posted an image for critique that was, how can I put it gently...
Crap.
I was gonna say that if you have some skill and experience then you owe it to the community to give someone constructive criticism. By telling someone what they are doing right, and how they can improve, then you're not only doing the person you're responding to a favor but you're also helping everyone who reads your response. So in the end everyone wins and the macro discipline improves.
Telling someone "Nice capture" is like saying "Wow you found the shutter release!?".
But the more I post on the internet the more I've come to realize that there are a lot of people who really don't want constructive criticism. They'll post images that have some serious problems, problems that they'd have to be legally blind not to see, and what they want is for someone to tell them that they're doing great. So if anyone says anything other than "Nice capture" or "Well done" then they're opening themselves up to a wide assortment of egos, and some of them bruise like grapes. If you give honest feedback then you'll be viewed as arrogant instead of helpful -fuel for the trolls...
It's getting so bad that I've all but given up on giving constructive criticism, and not only do I now understand why some people will say "Nice capture" when a photo isn't up to par but I can also see why some have stopped teaching. The "students" don't want to be "schooled" -all they seem to want is the "diploma"...
On a semi-regular basis I hold classes on computers and networking. Every time I teach I end up learning something from the students. Either they bring fresh ideas to the discussion, or they ask questions that get me to think about a subject from a different angle. Photography is no different and healthy discussion, where people are willing to listen at least as much as they talk, is always a good thing. But unfortunately I'm just not finding much of that healthy discussion out there lately -too many egos and attitudes.
Too many trolls who only want to hear "Nice capture"...
Saturday, November 7, 2009
New Diffuser Example Image
We had a break in the rain yesterday so I went hunting for critters with the camera and spotted this ladybug. Initially I tried to photograph it on a flower, but I couldn't keep the foreground from being distracting -too much out of focus junk between me and the bug. While I was holding onto the flower to keep it steady the ladybug crawled onto my hand and I took the shot to the right. Even though I took the frame at close to 3x the specular highlights (the bright spots on the shell) and the level of detail are a pretty good indicator that the light is very well diffused.
I had both flash heads mounted directly to the flash mount that Canon supplies with the MT-24EX, and both pointed directly at the ladybug. To get better shadows, and to eliminate the specular highlight on the left, I could have placed the "A" flash head (the one I use as a key light) on a Kaiser adjustable flash shoe. But I was really looking for a worse case situation with the lights just to show the level of diffusion with the new diffusers.
If you need more proof then click on this image to see a 1600 pixel wide version. Take a close look at all the texture detail that I picked up in the shell, and all of the fine hairs on the legs. In the past it would look like a ladybug had a layer of clear coat on it, and very little of the detail in the shell would come out in the resulting image. Much better diffusion, and the overall quality of the light is a lot better. I'm still experimenting with ways to improve it, but if this is the light quality that I'm taking into next year then I'll be happy with it...
Friday, November 6, 2009
Know Your Gear
It's early in the morning on the roof of a parking garage and with Vesuvius in the background, as well as the sun, Scott Knauss and I were trying to get two 580EX II flash heads to fire from a single STE-II controller. Due to the low angle of the sun, and the sailors of the N8 department wearing their dress blues, we needed a lot of light. So I spent entirely too much time fumbling with my flash trying to figure out how to set it as the "B" flash in a two flash group. All of the other times that Scott tripped the shutter to test the light I was holding the flash away from me, but as my luck would have it the one time I'm looking right into it it works. So what does the image demonstrate, other than I'm sometimes a dumb ass?
Know your gear.
Don't wait until your out in the field trying to setup for a shot to figure out how something works. Take the time to read the manual and practice at home, when mistakes won't cost you a once in a lifetime photo.
Don't be a dumb ass...

Know your gear.
Don't wait until your out in the field trying to setup for a shot to figure out how something works. Take the time to read the manual and practice at home, when mistakes won't cost you a once in a lifetime photo.
Don't be a dumb ass...
Tuesday, November 3, 2009
MT-24EX Diffuser How To
This is my first video tutorial on building a diffuser for the MT-24EX, so be gentle :)
The parts list is pretty expensive, and with the exception of the Gary Fong Puffer diffusers the rest can be done with common items that you might have around the house. One word of caution: Cutting the mounting bracket that comes with the Puffer diffusers will void the warranty, and so will hot gluing the finished diffusers to your MT-24EX (you can use Gaffers tape instead of hot glue). I am not responsible for any mishaps or mistakes that you might make...
Garry Fong Puffer diffuser -you'll need two and the sticker shock is normally $39.90 USD + shipping. I ordered mine directly from Garry's E-store and the plastic that he's using now is a lot clearer than the Puffers that I ordered about a year ago. A little less diffusion, but the light isn't as warm either.
Metallic inserts for a Lumiquest Big Bounce -you'll need one set ($17.95 USD + shipping) if you want to use the same reflector material that I used to cover the top and bottom of the Puffer's.
Manfrotto Diffusion Pack -I've been using the diffusion material in this kit for a lot of projects. 12"x12" sheets of a dozen different types of diffusion plastic. $22.95 USD + shipping and handling.
Sto-Fen Diffusers -Just to use as a frame to make the finished diffuser easier to attach to the MT-24EX's flash heads. $22.95 USD + shipping.
I know, it's expensive. I tried to find a cheaper solution that worked as well but couldn't...
What I didn't mention in the videos: I made a template out of cardboard that I used to mark the Lumiquest reflector material before I cut it.
You'll notice in the second video that the reflector that goes over the MT-24EX's modeling lights has a high arch to it. I've since re-designed the diffuser by putting the top reflector onto the Puffer while the diffuser was attached to the MT-24EX's flash heads so I could get a tighter fit.
Fresh Meat Deconstruction
Sorry folks -not one of my "warm and fuzzy" insect macro shots. But it's rare that I even see a mantis around here, and even rarer still to find one feeding, so when I spotted this huge female eating a wasp I had to photograph the action.
The hardest part of shooting a predator / prey scene is getting both of the creature's eyes in the plane of acceptable focus. We are predators, and we gauge the intent of other beings by looking at their eyes -it's just instinct. The funny thing is that if the eyes are in focus the rest of the shot can be completely out of focus and the viewer won't really care. But if the entire image is in focus, but the eyes are out, then the entire image will seem out of focus. With two "subjects", the mantis and its dinner, the eyes have to be in focus on both of them.
For this shot I wanted a tight composition -the mantis is in some weeds and there is a lot of junk behind her. The lower the magnification the greater the chance that the flash is going to illuminate something in the background and I hate spending any amount of time in post cloning out junk that I shouldn't have shot in the first place. I also wanted you, the viewer, with your attention right on the action. So I kept the magnification at around 2x but framed the shot as a vertical image -shot with the camera held horizontally because it's easier for me than holding the rig vertically. All I had to do was turn the image 90 degrees in post.
Since I was almost laying on my side, and I didn't move the flash heads, the lighting was very direct and moody. I frequently shoot with my flash heads at the 11 O'clock and 2 O'clock position (relative to me) and leave them there no matter what angle I have on the subject. The end result is lighting that doesn't look the same in every shot, and if an image comes out really well it's easy enough to just look at the specular highlights to tell where my flash heads were positioned. Recreating the same effect later, for another scene, is simple. One of the things that's really improved my lighting is learning how to reverse engineer the light in any image so I can see what works, what doesn't, and how to create the light that I want. The light in this shot is no accident -I knew what it was going to look like before I pressed the shutter. Like everything else it's easy to do with a little practice...
Saturday, October 24, 2009
No New Diffuser
I thought I had a good plan: Order a few ABS plastic project cases from All Electronics, cut out holes on one side of the boxes for the flash heads of my MT-24EX and the other side where I'd mount a piece of diffusion plastic and presto! I'd have a brand new diffuser set. I could easily change the diffusion material just by taking the front of the case off and putting a different plastic on it (great for experimenting).
So over the course of three evenings I became one with the Universe and a Dremel Tool. There were so many plastic shavings scattered all over the kitchen it looked like I had tossed a manikin in a wood chipper. I'm a man who knows his limits so when I wanted to test two different box sizes I ordered three of each, even though the MT-24EX only has two flash heads. After completely ruining one box, and the bottom of another, I had two sets of diffusers built and I tested them against the set of Puffer diffusers that I built over a year ago. During testing I ran into one minor snag...
The new diffusers didn't work.
Well, they did "work", but I couldn't get light that was more diffused than the Gary Fong Puffers that I've been using (if you use that link to order two Puffers you'll only pay $30 USD + shipping). Looking back on it I think I'd have to build a diffuser that has at least twice the surface area of the Puffer plastic. Unfortunately the resulting diffusers would be too large to use with the flash heads connected to the flash mount that Canon supplies with the MT-24EX. I'd have to get the new diffusers further away from the lens, and it would just make hand holding the rig more difficult. So for my style of shooting the Puffer makes a better diffuser.
Here's a video showing what the Puffers look like and how I use them:
Wednesday, October 21, 2009
"The Bee Man"
The title of this post is one of the things that I've been called this year, along with "The Bee Whisperer" and considering the number of bee photos I've taken this year I'm stunned no one has said "Dances with Bees" :D
It was really unintentional -I shoot whatever I have time for, and whatever will let me get close. I typically only have about 30 minutes a day, on average, to take photos. This year I missed about six weeks of the "macro season" between my son going into the hospital for an asthma attack (he's OK now) and my MT-24EX dieing. Sadly the flash went south during the height of the solitary bee emergence here, and I got the replacement three days after one of my best shooting locations was mowed. So I actually took fewer bee images than I could have, but still managed to fill my gallery with them. Go figure...
The only planned bee shoot that I did was toward the end of August. For three consecutive weekends I baited pumpkin flowers so I could photograph honeybees while they were feeding (like the one in the image I've used for this post). I had a few compositions stuck in my head from when I was shooting honeybees out at the farm two years ago and I wanted to see if I could get those images into the camera. Unfortunately I waited too long to track down a beekeeper to photograph honeybees on comb, but I've got that session on the list for next year.
This coming spring I plan to photograph more hoverflies, particularly Banded Eye Drones. But I really can't say what I'll definitely be able to photograph at any given time. I can say that I'm not really fixating on any one insect though, because I don't want my gallery to get repetitive and boring. It also isn't any fun for me to shoot the same critters all the time -and it needs to be fun...
I'm working on a new set of diffusers for my MT-24EX, so my light will be different in the coming year. Also I might just get my MPE-65mm macro lens back from the Canon Service Center -after almost two years of constant use it broke as well. What a year...
Sunday, October 18, 2009
The Annual Charity Bazaar
As I write this it's Sunday morning, and I still haven't recovered from the two day charity bazaar at the NATO base here in Naples, Italy. Along with the photo at the right here's a short video clip of the area where Scott Knaust (my coworker and fellow photographer) were selling our work:
This year we paid a little extra money for an indoor spot, and with the weather turning cold and raining on Saturday it was money well spent! Setting up inside allowed us to leave everything so we didn't have to take the photos down at the end of the first day and set them back up the next morning. There were also a lot more people viewing our work this year than last, so I don't think we'll be renting an outdoor spot next year. My favorite critique came from a young girl, probably no older than my 8year old, who saw this image...

...and said "Oh now that's just gross!!". Critics one, Dalantech zero :)
One advantage to doing an event like an international bazaar is that you get to meet people from all over the world and to see the cultural differences between them. Almost to an individual the French love macro photography and think that it's an art form. If I were single I'd find a busy street corner in Paris and just sell photos for a living. I'd probably be eating peanut butter and crackers on a regular basis though :)
I took one poster sized print and one large canvas print with me just as "show pieces" -no real intention of selling them because the cost to produce them is too high. Simple economics governs every event like this one, and people just don't have the liquid capital that they use to. No matter how good your work is you still need to offer someone a quality product at an affordable, and attractive, price. But I like to take at least one large print to the bazaar just to show people how an image will look when printed poster size (lots of detail because I don't crop) and if someone wants a different photo printed large they can just send me an email and I'll give them a quote (it pays to have business cards).
I had three copies, in different sizes, of this image...

...and I thought I was taking a risk by having too many copies made. In addition to the poster sized print I had an 8"x12" and a 13"x19" and the 13"x19" was the very first image that I sold on Friday morning. The smaller copy sold that afternoon, and people were leaving the bazaar and talking about the larger image so much that the people they talked to were coming just to see it. Hind sight being what it is if I had about six more 8"x12" copies I could have sold them. I did end up bringing the poster sized version home, it was just too expensive to produce once I paid to have it framed so I couldn't sell it at an affordable price. But when I choose images to use as show pieces I pick photos that I like, so if they don't sell I can always hang them on my wall. Scott and I talked at length about the need to find a way to make poster size prints that are good quality (worth buying) and inexpensive (easy to sell)...
The pleasant surprise came from a German couple who bought the canvas print: A woman who I completely mistook for a native English speaker looked over this image several times...

...and thought her husband would enjoy it. He's a helicopter pilot and likes the way that dragonflies maneuver :)
I sold a mix of images this year, both natural light closeups and high magnification macro shots. Different images appeal to different people, and I try to bring a wide range of photos. Some get carried away by customers, and some I carry back to my car. There's no formula for figuring out what will and what won't work -I just take the images that are my strongest compositions.
Favorite moment: Several people took photos of my work -don't get me started on how low it is to take a photo of a photo. For 15 Euro the individual could have had the real thing without the plastic bag and the reflections that it will cause (one of the reasons why I bag my prints). But the real kicker was when a guy asked Scott to move out of the way so he could get a clear shot of one of Scott's images with his iPhone. It was like asking Scott to turn so it would be easier to take his wallet...
Now that it's over can I retire, sitting on a beach in the Bahamas with some tall fruity umbrella topped drink in my hand? No way! I did make enough to pay for all the new prints and to cover my half of renting the booth with a little pocket money left over. But that's not important since the real value in doing an event like the bazaar is in meeting new people, sharing what I know with new photographers (and picking up tips from them), and getting feedback on my work -both good and bad. Definitely one of those life experiences where the journey is more important than the destination...

This year we paid a little extra money for an indoor spot, and with the weather turning cold and raining on Saturday it was money well spent! Setting up inside allowed us to leave everything so we didn't have to take the photos down at the end of the first day and set them back up the next morning. There were also a lot more people viewing our work this year than last, so I don't think we'll be renting an outdoor spot next year. My favorite critique came from a young girl, probably no older than my 8year old, who saw this image...
...and said "Oh now that's just gross!!". Critics one, Dalantech zero :)
One advantage to doing an event like an international bazaar is that you get to meet people from all over the world and to see the cultural differences between them. Almost to an individual the French love macro photography and think that it's an art form. If I were single I'd find a busy street corner in Paris and just sell photos for a living. I'd probably be eating peanut butter and crackers on a regular basis though :)
I took one poster sized print and one large canvas print with me just as "show pieces" -no real intention of selling them because the cost to produce them is too high. Simple economics governs every event like this one, and people just don't have the liquid capital that they use to. No matter how good your work is you still need to offer someone a quality product at an affordable, and attractive, price. But I like to take at least one large print to the bazaar just to show people how an image will look when printed poster size (lots of detail because I don't crop) and if someone wants a different photo printed large they can just send me an email and I'll give them a quote (it pays to have business cards).
I had three copies, in different sizes, of this image...
...and I thought I was taking a risk by having too many copies made. In addition to the poster sized print I had an 8"x12" and a 13"x19" and the 13"x19" was the very first image that I sold on Friday morning. The smaller copy sold that afternoon, and people were leaving the bazaar and talking about the larger image so much that the people they talked to were coming just to see it. Hind sight being what it is if I had about six more 8"x12" copies I could have sold them. I did end up bringing the poster sized version home, it was just too expensive to produce once I paid to have it framed so I couldn't sell it at an affordable price. But when I choose images to use as show pieces I pick photos that I like, so if they don't sell I can always hang them on my wall. Scott and I talked at length about the need to find a way to make poster size prints that are good quality (worth buying) and inexpensive (easy to sell)...
The pleasant surprise came from a German couple who bought the canvas print: A woman who I completely mistook for a native English speaker looked over this image several times...
...and thought her husband would enjoy it. He's a helicopter pilot and likes the way that dragonflies maneuver :)
I sold a mix of images this year, both natural light closeups and high magnification macro shots. Different images appeal to different people, and I try to bring a wide range of photos. Some get carried away by customers, and some I carry back to my car. There's no formula for figuring out what will and what won't work -I just take the images that are my strongest compositions.
Favorite moment: Several people took photos of my work -don't get me started on how low it is to take a photo of a photo. For 15 Euro the individual could have had the real thing without the plastic bag and the reflections that it will cause (one of the reasons why I bag my prints). But the real kicker was when a guy asked Scott to move out of the way so he could get a clear shot of one of Scott's images with his iPhone. It was like asking Scott to turn so it would be easier to take his wallet...
Now that it's over can I retire, sitting on a beach in the Bahamas with some tall fruity umbrella topped drink in my hand? No way! I did make enough to pay for all the new prints and to cover my half of renting the booth with a little pocket money left over. But that's not important since the real value in doing an event like the bazaar is in meeting new people, sharing what I know with new photographers (and picking up tips from them), and getting feedback on my work -both good and bad. Definitely one of those life experiences where the journey is more important than the destination...
Thursday, October 15, 2009
You're about to get left behind...
There is, to use an abused phrase, a paradigm shift occurring in macro. More and more people want to see well lit, well composed images. Just like any other photographic discipline it's the composition that will make or break a photo.
Cataloging insects is boring...
You might still be in a clique now, might still have people telling you that they like your work. That's because they are shooting like you are, producing centered razor sharp images or photos that don't even remotely tell a story. Most of the compliments you're getting are on your technique, instead of what you're capable of producing with it. Or they're just telling you what they think you want to hear.
Your fan club is going down with you...
Those photographers who are concentrating on composition and story telling in their work, that are constantly sweating the lighting, will be the shooters in the upper ten percent of the discipline. They'll not only have the respect of the macro community, but photographers in other disciplines will admire their skill and art. They won't be "capturing" the creatures of the small world, they'll be photographing them.
Anyone can take a poorly composed razor sharp image; people on vacation take thousands of them every day. If your macro work looks no better than the average vacation point and shoot snapshot then your images will never stand out. John Q. Public neither knows nor cares how difficult it is to take a macro photo -all he cares about is what he can see in print or on a computer monitor. There has to be something about your work that's going to get the average viewer to stop and take notice and capturing a lot of detail isn't enough.
Time to stop making excuses and step up your game before you get left behind...
Makes Me Wonder...
...if they can actually think and make decisions...
Not my video -I just thought it was really interesting.
Not my video -I just thought it was really interesting.
Silence of the Bees
A very interesting PBS program on colony collapse disorder from 2007 Silence of the Bees.
Saturday, October 10, 2009
October Bee II Deconstruction
One of the problems with shooting a bee that's trying to get it's metabolism going is that it will occasionally move, and more often than not it will move away from the camera. That's exactly what was happening while trying to shoot this dew covered solitary bee, but it's a problem that actually has an easy solution.
For this shot, and nearly all of my high magnification macro, I'm holding onto the object that the critter is on -in this case it's that smelly yellow thing. I'm holding onto the flower's stem, and resting the lens on that same hand, to keep everything steady. But the other benefit to using what I call the Left Hand Brace Technique is that since I have the stem between my left index finger and thumb I can rotate the flower as the subject is moving to keep it looking into the camera. I can also tilt the flower to change the angle between the camera and the subject.

For this shot, and nearly all of my high magnification macro, I'm holding onto the object that the critter is on -in this case it's that smelly yellow thing. I'm holding onto the flower's stem, and resting the lens on that same hand, to keep everything steady. But the other benefit to using what I call the Left Hand Brace Technique is that since I have the stem between my left index finger and thumb I can rotate the flower as the subject is moving to keep it looking into the camera. I can also tilt the flower to change the angle between the camera and the subject.
Thursday, October 8, 2009
Macro Spotlight - John Hallmen
You might know John Hallmen as morfa over at Juza Nature Forum and if you don't know him at all then you're seriously missing out on one of the top macro photographers on the web today! John's work represents what macro should be -well composed images that show the viewer what it's like to see the world from the critter's perspective. He shoots with a mix of natural light and flash, and he never harms his subjects for a photo. The image I've linked with this post is just a test shot he took while trying out a new lens.
Head on over to John's photo stream at Flickr and get educated...

Head on over to John's photo stream at Flickr and get educated...
Saturday, October 3, 2009
Think Outside the Box
The image I've added to this blog post isn't mine, it belongs to Dave Merrigan and I'm using it with his permission. Dave spotted this dragonfly but was pressed for time so he simply lit it with an LED flashlight off to camera right. When I first saw this photo there was only one word that came to mind:
Brilliant!
What didn't enter my mind was any silly notion that the photo doesn't look natural just because the background is dark. I appreciated the image for what it is: Well lit, well composed, a shot I'd want to print large or save to my desktop as wallpaper. An image that's art and not just another "catalog shot"...
There's this thing called a box and if you don't step out of it and think about your work and where you're going you'll just end up producing the same old run of the mill images that everyone else can, and is, taking...
Friday, October 2, 2009
Published by Environmental Graffiti
There's an interesting article at Environmental Graffiti with a few of my images in it, plus additional photos by some really talented shooters. The lead photo in the article was taken by Dixie Native and if you're not familiar with his work you owe it to yourself to check out his gallery!

Wednesday, September 30, 2009
Spring in September Deconstruction
I was packing the car to head home from a trip when I spotted this honeybee on the sidewalk. For reasons unknown to me sometimes their metabolism tanks and they slow down -this day was partly cloudy and cool so even the sun going behind the clouds could have been a problem for her.
To take this shot I picked a dandelion (I think that's what the yellow smelly thing is ;) ) and let her crawl onto it. Then I simply held the flower in my left hand and rested the lens on that same hand to take the shot. Really easy to do with a little practice once you get over your fear of getting close to them. If you're allergic to them, or you've never been stung, then I don't recommend doing this type of shooting...

To take this shot I picked a dandelion (I think that's what the yellow smelly thing is ;) ) and let her crawl onto it. Then I simply held the flower in my left hand and rested the lens on that same hand to take the shot. Really easy to do with a little practice once you get over your fear of getting close to them. If you're allergic to them, or you've never been stung, then I don't recommend doing this type of shooting...
Tuesday, September 29, 2009
Canon's EF-S 60mm -the Poor Man's MPE-65mm
One of the good things to come out of my MPE-65mm breaking is that I was forced to dust off an EF-S 60mm and since I like shooting above life size I added extension tubes to it. The lens seems to lose a lot of focal length at life size and acts like a 37mm lens, since it only takes 37mm of extension to hit 2x. With a full set of Kenko tubes it would be closer to 3:1. IMHO it's not as sharp as the MPE-65mm, and the color and contrast isn't as good. But for the price tag it's well worth it for anyone looking for a cheaper alternative to the MPE. I also like the weight of the 60mm -even with a lot of extension the balance feels really good.

Tuesday, September 15, 2009
Twitter and my MPE-65mm
For those of you who want to follow me on Twitter
In other news: RIP MPE-65mm macro lens. I've been getting an "Err 01" message (the camera couldn't communicate with the lens) intermittently but was shooting above life size to avoid it. Today at the lake I couldn't get the lens to work at any magnification so it's time to send the old girl in for repair...
In other news: RIP MPE-65mm macro lens. I've been getting an "Err 01" message (the camera couldn't communicate with the lens) intermittently but was shooting above life size to avoid it. Today at the lake I couldn't get the lens to work at any magnification so it's time to send the old girl in for repair...
Saturday, September 12, 2009
Expose for the Red Channel
Digital sensors seem to favor the color red over the other two primary colors (blue and green). Shooting digital is pretty much the electronic equivalent of shooting with Fujichrome Velvia slide film -saturated colors that saturate even more when you under expose the scene a little. Not a big problem as long as you know what to look for.
Just remember that the overall luminance histogram will lie to you...
When shooting against a yellow flower, a Violet Darter like the one I've included with this post, or anything that has a lot of red in it ignore the luminance histogram. Look only at the RGB histogram display and expose for the red channel. If the reds are all the way over to the right of the histogram then they are over exposed and you'll lose a lot of texture detail. I try to under expose the red channel by about a third of a stop (guessing at it by looking at the histogram on the camera) and in post I'll push the exposure until I'm just starting to over expose the reds. The goal is to get a well exposed image without completely blowing out the red data so that the texture in the scene is preserved.
How you light a scene will also make a big difference in how well you can expose the subject and not blow out the red channel...
Wednesday, September 9, 2009
Baited Honeybee Deconstruction
Lots of patience, and a lot of deleted frames but I managed to pull off some low angel four times life size shots of a feeding honeybee. For the "how to" I shot this video:
Here's another image from the same session:


Here's another image from the same session:
Monday, August 31, 2009
Macro Moment #2
This time I asked my wife to help me shoot a short video on baiting honeybees with corn syrup and using the left hand brace technique to control the movement in the scene. Something that I didn't mention in the video is that I take a lot of images to get the one shot that I'm looking for -just too many variables to deal with. The depth is thin, moving the area of acceptable focus just a fraction of a millimeter can change the composition, and bees are constantly moving their antennas. Frequently I'll nail every aspect of a shot only to have to deleted it because the bee moved it's antenna right as I was pressing the shutter and it's obscuring an important feature like the eye or the proboscis.
Friday, August 28, 2009
First Magazine Publishing
Range Magazine published four of my fly photos along with an article that I co-wrote with Tom Stack (he manages my portfolio). There are also a couple of text books that might have my images in them in the near future, but nothing that I can mention specifically yet.
I'm also working on the next "Macro Moment" video and hopefully do the filming for it this weekend. Stay tuned :)

I'm also working on the next "Macro Moment" video and hopefully do the filming for it this weekend. Stay tuned :)
Monday, August 24, 2009
Freckles II Deconstruction
My mother in law planted pumpkins again this year and fortunately I managed to get some compositions out of my head from shooting honeybees in these flowers a few years ago. In 2007 I was shooting them when they stopped to clean themselves -that pumpkin pollen irritates them pretty bad! But since they were just sitting on a leaf without much to keep them busy they wouldn't let me get very close, and I was limited by the angles that I could shoot them.
The trick was to put down some corn syrup on a flower petal and wait for the girls to find it and start feeding. I placed my left index finger directly under the bee (with the petal between us) and put my thumb on top. Then I curled the petal around my index finger to get it out of the way so I could shoot at a low angle and not get the petal in the foreground (it would have been out of focus and distracting). All that was left was to place the lens on my left hand to keep it steady, and since I was holding onto the flower I had a lot of control over the composition. I wanted the line from the eye to the end of the proboscus in focus, so I just went looking for a "magic" angle" that would make the most of the curve. It sounds complicated, but with practice it's actually pretty easy to do.
Images like this one pretty much put the last nail into the "you have to freeze them" coffin...
For those of you curious about honeybees: The pitch of their wings gets higher as they get more excited. So if you listen to the sound they make you can get a feel for when it's time to back off and leave them alone. Several times I did just that, especially when they started getting in my face instead of flying off. I was dealing with some of the same workers over the last four days, and after a while they learned that I had the corn syrup so it took less and less time for them to find it and start feeding. It also took less time for them to start competing with each other and to start getting way too close to me
This frame was taken close to 3x at F13. I was adjusting the mag based on the framing that I wanted so I wasn't at even mag markers on the MPE-65mm. I also took this shot with the camera held horizontally, but I framed it knowing that I'd turn the photo 90 degrees in post -easier than trying to hold the rig vertically.
Sunday, July 26, 2009
Licking the Bowl Deconstruction
Here's another frame of a feeding honeybee that I slowed down by injecting corn syrup into a Lavender flower with a syringe. I knew that the exposure on this setup was going to be a problem -too much contrast between the clear syrup (nothing but a specular highlight zone for the flash) and the flash falloff since there's nothing close in the background to reflect the light from the flash back into the camera. So I set the FEC to -1 2/3 to avoid having to go into manual mode since I was shooting from a lot of different angles and changing the magnification. Hind site being what it is I should have set the flash to manual mode and left the magnification at 3x (where I ended up taking the most frames anyway) -it would have been easier...
The hard part about this scene isn't keeping the critter and the camera steady: She's really into that corn syrup so grabbing the Lavender stem with my left index finger and thumb was easy, and once I had a hold on the flower all I had to do was rest the lens on that same hand and slide ti to get the focus and composition that I wanted. What's tough about a shot like this one is remembering that the area of acceptable focus is parallel to the sensor and thin, so I've got to get it as flat against the bee as I can to make the most of what little depth there is at 3x and F13. For a shot like this one the eyes have to be in focus but so does the entire length of the proboscis. Also anything that's flat, or nearly flat, in the foreground also has to be in focus or your eye will go right to it. Forget focus stacking -although I did slow the honeybee down by giving her something to eat she's still in motion, and I'm actually using my finger and thumb to rotate the flower as she's feeding to keep her looking into the lens and to give me a "magic angle" that will make the most of the depth. It would take some tricky "shotgun photography" to give me more than one frame of the exact same scene and I'd rather spend my time practicing composition and getting the most of a single frame.
At times she was actually standing on my fingers...
Friday, July 10, 2009
Macro Moment #1
First off I need to apologize for the quality of this video! I'm not use to using a camera phone, but since the iPhone 3GS has a camera capable of video, and since I have it with me all the time, I thought I'd start documenting some of the techniques I use to photograph the critters. This morning at the lake seemed like a perfect opportunity -I just need to get better at using the video camera ;)
Here's the video of a sleeping solitary bee:
Here's one of the shots of that same bee:

Here's the video of a sleeping solitary bee:
Here's one of the shots of that same bee:
Wednesday, July 8, 2009
Feeding Honeybee IV Deconstruction
I don't always get a chance to shoot the critters when they are cold and sleeping, and during the heat of the day they won't let me get close unless I give them a reason to slow down. So I bought a hypodermic syringe at a pharmacy and used it to inject corn syrup deep inside a Lavender flower. The bee was so intent on eating that it let me grab onto the flower just below it so I could use the Left Hand Brace Technique to take the shot.

Monday, June 8, 2009
Canon's 270 EX
Back in the early summer of 07 I was out at Lago d'Averno (my favorite dragonfly hunting ground) shooting in +30C degree heat (high 80s to low 90s F for the metric impaired) with a Canon 20D, a 100mm macro lens + tubes, and an MT-24EX all supported on a BushHawk shoulder mount. A lot of weight to put on a camera strap, especially one that I wasn't checking on a regular basis to make sure it was still secure. I stopped to wipe the sweat from my face and let the rig dangle by the strap and as my luck would have it gravity got the best of my rig -it landed flat against the side of the BushHawk with an ugly thud...
When I first picked up my gear and brushed the dust off of it the MT-24EX didn't work. The force of the impact drove the batteries so hard against the internal contacts in the battery compartment they were flattened and no longer touching the batteries. The hot shoe on the 20D also took a lot of damage and eventually failed a few months later.
When I got home I bent the battery contacts out and managed to get the MT-24EX working again, but since that fall two years ago I knew that I was using that flash on borrowed time. About two weeks ago the "A" flash head started to intermittently fail, but because the light looked good when it did work I knew the controller was going bad. Weather due to the gravity test two years ago or shooting in wet early morning conditions this year I don't know, but the end result was the same -I couldn't rely on it anymore.
Since it failed I've been experimenting with mounting a Canon 270EX on the MT-24EX's flash mount, but with limited success. The image included with this post is a test shot, and it's pretty dark. Since I took that shot I've redesigned the flash mount so I could get a lower angle between the flash and the subject, but it's just not the same as having a dual light source. If I put the 270EX on a flash bracket, with a bigger diffuser, then the light would be a lot more even and the shadows less severe. But I don't think it's going to work mounted right at the end of my MPE-65mm -I can't make the diffuser larger without bumping the subject with it at high magnification.
So at this point my options are pretty limited: Either use the MR-14EX that's been collecting dust since I picked up the MT-24EX, use a 580EX II on a flash flash bracket (not practical for my style of shooting), or buy a new MT-24EX. That last option presents a problem: Canon has updated every flash in their lineup except the macro flashes. I've got no proof, but it just makes sense that they're going to come out with a new macro flash. I'd hate to shell out +600 USD just to see Canon announce a new unit sometime between now and next fall...
So I'm going to see what I can do with the MR-14EX, and as long as the natural light is good shoot more natural light closeups. Although I don't get as much feedback on my closeup photography as I do the high mag shots I like shooting closeups in natural light more than shooting macro.
Time to break out the gaffers tape, channel Martha Stewart, and see what I can do to reduce those half moon specular highlights that haunt the MR-14EX :)
For those of you wondering about the performance of the 270EX it's actually pretty good as far as the flash recycle time goes: Almost instantaneous all the way out to 5x and F10. The E-TTL metering with it is also a lot more accurate than the MT-24EX. So I can't discount it completely as a potential light source for macro -I just can't get it to work in the way that I want to use it...
Friday, May 29, 2009
Water Drop How To

Strobist has an excellent piece on How to Photograph Water Drops with One Speedlight and there is a tutorial video embedded in the article that's excellent for beginners wanting to get into water drop shooting. There's also another video that I'm including here, some high speed motion capture of water drops that's incredible!
Tuesday, May 26, 2009
Early Morning Macro
Although I'm not a fan of dew covered critter shots I seem to be taking more and more of them lately. It's easier to find willing subjects, like this pair of mating Soldier Beetles, early in the day when they are still a little lethargic and haven't had a chance to warm up and dry out. Later in the day that same pair wouldn't let me get anywhere near them.
When shooting mating pairs it's best to get both of their leading eyes in focus, so look for angles that will allow you to place the area of acceptable focus for maximum detail. In this shot I was holding onto the grass stalk just behind them with my left index finger and thumb so all I had to do was slowly rotate the stalk until I got an angle that worked. With the lens resting on my left hand it was easy to keep the scene steady and to get the sharpness I wanted even though I had the MPE-65mm stopped down to F13.
Sorry about the title of the shot -it was the first thing that popped into my head when I was looking at them through the view finder :)
Friday, May 22, 2009
Happy Accidents
One of the things that I'm trying to do this year is shoot in different places, to not get in the habit of looking in the same spots all the time because it's a great way to shoot the same subjects... boring...
So I went to the opposite end of Lago d'Averno hoping to see something new but was walking back to my car empty handed when I spotted some mature dragonflies trying to warm up and dry off. I'm not sure where they were perching for the night, but they were definitely making their way back toward the water when I stopped to photograph the critter in this post. Concerned that it was too awake to let me cut the perch and move it, and the simple fact that I'd be cutting a flower that was part of a recent landscaping project, I decided to shoot the damselfly by holding onto the perch with my left hand and just rest the lens on that same hand to keep everything steady. But the critter was at the end of a flower stalk so I had to grab onto the stalk behind it.
Now I have a new technique to add to my bag of tricks :)
Since my fingers are behind the damselfly they acted as a reflector for the light from the flash -but because they are almost twice as far from the light as the critter they came out about a stop under exposed and the color saturated. Instead of a black background I got a nice bright one that really makes the critter stand out.
Saturday, May 9, 2009
Field Studio In Action
I found this immature dragonfly early in the morning when it was too cold and wet to move so it was pretty easy to cut the grass it was perched on, carry it to a nearby park bench, and put it in the wood clamp for some field studio work.
The first sample image from that shoot is at F13 and 2.5x and the second is at F10 and 5x.


The first sample image from that shoot is at F13 and 2.5x and the second is at F10 and 5x.
Wednesday, May 6, 2009
Field Studio Gear
This morning I shot a dragonfly that was too cold and damp to get away from me. I started out photographing the critter where I found it but quickly realized that it just wasn't practical -there was just too much tall grass in the way and I'd be getting it in just about every frame. Plus I wanted to get some high magnification shots and it just wasn't gonna happen unless I moved the subject to another area. So I cut the grass stem that it was perched on and carried it to a stone wall close where I found it. Then, using the wood clamp pictured to the right, I secured the dragonfly's perch.
With the dragon and its perch sitting in an area where I could comfortably work it was easy to brace the lens with my left hand by putting it on the wall next to the clamp. Here are two frames from the session, the first at 3x and F13 and the second at 5x and F10:


Sharp, studio quality, images at the edge of a parking lot...

With the dragon and its perch sitting in an area where I could comfortably work it was easy to brace the lens with my left hand by putting it on the wall next to the clamp. Here are two frames from the session, the first at 3x and F13 and the second at 5x and F10:
Sharp, studio quality, images at the edge of a parking lot...
Tuesday, May 5, 2009
Capitilize on Opportunities
I take some abuse through the year from people who get tired of seeing me post a lot of the same subjects, like the solitary bee that I'm including with this post. But I don't let it get to me, and I certainly don't let it influence what I do and don't photograph. A lot of what I shoot is seasonal and transitory -if I don't photograph the critters as I find them then I'll never have any photos. It's not like I get to choose what's available...
I also used this bee to illustrate another key point: Sometimes I''l find an insect for the first time, one I've never seen before, that has just emerged and since the weather is still cool I get one or two days to photograph them before they move on to another area where I can't get to them or they tunnel into the ground and build nests. So the only time I'll see them again is when it's warm and they are hyper active. So it's now or never, and I'd rather take the photos when I can get them because there's just no way an active bee is going to let me get close enough for a four times life size shot like this one.
If I didn't capitalize on opportunities then I wouldn't have anything in my gallery...
As for the deconstruction on this photo it's really quite simple: The bee has recently emerged (I think it was the afternoon that I found it) and the temps were cool, somewhere around 14C (57F) so the critter is pretty immobile. I've got one flash head of the MT-24EX set to the 11 O' clock position relative to me acting as the key light and I'm using a Kaiser adjustable flash shoe to get it a little higher than it would normally be if I had just connected it to the Canon flash mount that comes with the MT-24EX. If I didn't elevate one of the flash heads then both lights would be hitting the subject at the same relative angle so any reflective surface is going to be twice as bright. But with one head elevated I get a break on the specular highlights and the shadows are deeper as well. If you look closely at the eyes you can see that they are actually convex and it shows up well because the light does not wrap around the lenses, or the subject, evenly due to the extending the key.
The other flash head is mounted directly to the flash mount at the 2 O 'clock position and it's acting as my fill. No ratio control (not necessary due to the position of the flash heads) and I'm diffusing the light though a modified Gary Fong Puffer diffuser. The camera is set to manual mode F10, ISO 100 (the shutter is at 1/250 but that's irrelevant since the ambient light level is too low to be recorded by the sensor). The MPE-65mm was set to 4x, and I moved the bee from were I found it sleeping in a flower to a low stone wall. Resting my left hand on the wall I held the lens with my thumb and index finger to keep it steady while I looked for an angle that would make the most of what little depth I had. I wanted a 5x shot but the bee woke up and took off before I could get it. When I went back the next day the only bees I found were deep inside the flowers and they were covered in pollen -not as "clean" looking as the one you see here. The day after that the bees were gone. Maybe next time... :)
Monday, May 4, 2009
Right Place, Right Time
I found this honeybee sitting on a leaf of a plant that it was feeding from, not completely motionless but definitely in a daze. I think that they sometimes get a rush of sugar from the nectar that they collect and since bees seem to have a problem clearing out lactic acid from their muscles the sudden surge in sugar causes a corresponding surge in lactic acid and their metabolism tanks trying to clear it. At least that's my current theory -hopefully someone with a degree will chime in and confirm it or set me straight ;)
In any case the end result is a bee that can't seem to get away, and if I keep my movements slow and allow the bee to acclimate to me then I can get as close at I want. Close enough to hold onto the leaf she's sitting on with my left index finger and thumb, and to rest the lens on that same hand to keep everything steady for a 4.5 times life size shot. Link to a larger image -just click on the photo to make it expand.
The image is a single frame shot at F10, and I chose the angle so that I could make the most of what little depth I had by putting the area of acceptable focus as flat against the side of her face as I could.
Tuesday, April 28, 2009
Studio Photography in the Field
Given the choice I'd much rather shoot active subjects because the resulting images, if I can get them, tell a story. But some critters are just too skittish to photograph when they're active, like this solitary bee (looks like a hornet but it's not). I have some ethical issues with refrigerating or freezing subjects (unless you're taking a large number of frames for a focus stack chilling a subject is lame ) so the only choice left is to shoot early in the morning on the way to work before the critters have a chance to wake up. Fortunately I found this bee snoozing and took advantage of it for a few shots.
The setup is simple: I took a flower petal and placed it on the top of a stone wall close to where I found the bee. I then got the critter to climb onto my finger and I placed it on the flower petal. Most solitary bees are not aggressive, and due to its size I'm pretty sure that this one is male and has no stinger anyway. Of course I moved slowly and I tried to be as non threatening as I could. Once I had the bee in place all I had to do was put my left hand under the lens and then rest that hand against the wall to brace the camera. Studio conditions at the edge of a parking lot. Here's one of the portraits that I took at 4x and F10:

Again I really consider this type of shooting to be some of the easiest that I do because I've got full control of the scene and plenty of time to nail the composition and focus. Weather permitting I'll be back to shooting bees actively feeding in clover between 1x and 2x soon -just don't ask me about the "keeper rate"... ;)

The setup is simple: I took a flower petal and placed it on the top of a stone wall close to where I found the bee. I then got the critter to climb onto my finger and I placed it on the flower petal. Most solitary bees are not aggressive, and due to its size I'm pretty sure that this one is male and has no stinger anyway. Of course I moved slowly and I tried to be as non threatening as I could. Once I had the bee in place all I had to do was put my left hand under the lens and then rest that hand against the wall to brace the camera. Studio conditions at the edge of a parking lot. Here's one of the portraits that I took at 4x and F10:
Again I really consider this type of shooting to be some of the easiest that I do because I've got full control of the scene and plenty of time to nail the composition and focus. Weather permitting I'll be back to shooting bees actively feeding in clover between 1x and 2x soon -just don't ask me about the "keeper rate"... ;)
Friday, April 24, 2009
Diffraction and Macro Motion Blur
This is, I hope, going to be a discussion about diffraction and how the effects of motion blur can be mistaken for it. But before I dive in I need to make a few things clear:
Please do not give me links to your examples of diffraction limited photos -I know that diffraction exists so there is no need to prove it...
Please read this entire post carefully, and with an open mind, before you post a comment...
When I first got into macro three years ago there were two prevailing themes: You had to use a tripod to get sharp images, and diffraction is the primary reason why you can't stop a lens down and get sharp images. I wanted to let the subject dictate how I shot it, and to go after moving targets, so I came up with the Left Hand Brace Technique for taking control of the motion in a scene so I could get the compositions and sharpness that I was looking for without using a tripod. Along the way I started to realize that what a lot of people were calling diffraction was really nothing more than a form of motion blur that I call macro motion blur. To explain how motion blur can mimic diffraction you first have to really understand what diffraction is.
The classic definition of diffraction is light bending as it passes through a small opening, and that's true. But there's a little more to it than that: The rays of light actually expand, like a cone, so that light rays that should hit a single pixel are now bleeding over into adjacent pixels. When that bleeding over reaches half way into those adjacent pixels you'll see a loss in image quality -diffraction has taken your lunch money.
But if you can wrap your head around expanding light rays causing a loss of detail then couldn't motion blur, as little as half a pixel of movement during the exposure, look like diffraction? My experience has taught me that it can.
Right about now some of you are thinking "But wait a minute Mr. Macro Motion Blur, why do my images get sharper when I decrease my Fstop?!" To answer that question we have to first determine what your real shutter speed is. At macro magnification, high Fstops, and low ISOs, the light that your flash is producing is the only significant light source in a scene. To prove it just set your camera to manual mode, F11, 1/200 of a second (or whatever your maximum flash sync speed is for your camera), ISO 100, and go out and take a photo on a bright sunny day with your macro lens set to its minimum focusing distance (life size magnification). You'll have to shoot something white or yellow to get anything to show up in the resulting image. Then turn on your flash and take the same shot -there will be a major difference in what you can see in the photo. At higher magnifications, with the flash turned off, you'll just get a completely black image. So your flash duration is really your shutter speed, since it's the major, or only, light source -the actual speed of the shutter doesn't matter...
So you set your camera to manual mode, F11, 1/200, and ISO 100. You've got a rig that will let you shoot at 2x, you take a shot hand held, and the resulting photo isn't very sharp. You then set your camera to F8, take the same shot, and this time the image is a lot sharper. See, no more diffraction! Well there's only one little problem -when you went from F11 to F8 you opened up the aperture in your lens to let twice as much light into the camera. Through The Lens (TTL) metering compensated for the increase in aperture (decreasing Fstop) by turning the flash on half as long -so your shutter speed (the flash) doubled. Did you defeat diffraction or macro motion blur?...
For me the answer is simple, since I can get sharp images at life size to three times life size at F13, and four to five times life size at F10 with Canon's MPE-65mm macro lens. The key is to get the flash as close to the subject as possible, use a diffuser that really diffuses the light (not one that just blocks the light), and look for ways to take control of the motion in the scene. Diffraction does exist, but it's not the bogyman that most people make it out to be...
Subscribe to:
Posts (Atom)